Search
Latest topics
» Happy Birthday!!by AtlantaMarie Today at 7:11 am
» How best to keep a fallow SFG bed
by KiwiSFGnewbie Yesterday at 9:14 pm
» Thai Basil
by markqz Yesterday at 1:40 pm
» Preserving A Bumper Tomato Harvest with Freezing vs Canning
by plantoid Yesterday at 11:36 am
» New SFG gardener in Auckland
by sanderson Yesterday at 12:14 am
» Mark's first SFG
by sanderson 11/6/2024, 11:51 pm
» Need Garden Layout Feedback
by sanderson 11/5/2024, 2:33 pm
» What Have You Picked From Your Garden Today
by OhioGardener 11/5/2024, 2:29 pm
» Greetings from Southeastern Wisconsin
by sanderson 11/5/2024, 2:01 pm
» N & C Midwest: Nov. Dec. 2024
by Scorpio Rising 11/3/2024, 3:51 pm
» Spinning Compost Bin-need some ideas
by rtfm 11/2/2024, 7:49 pm
» Kiwi's SFG Adventure
by KiwiSFGnewbie 10/31/2024, 9:55 pm
» Growing fruit trees in Auckland
by OhioGardener 10/31/2024, 4:23 pm
» Vermiculite -- shipping sale through 10/31/2024
by markqz 10/30/2024, 2:27 pm
» N & C Midwest: October 2024
by Scorpio Rising 10/30/2024, 10:38 am
» What are you eating from your garden today?
by Scorpio Rising 10/27/2024, 10:27 pm
» Old Mulch and Closing Beds for Winter
by sanderson 10/26/2024, 11:00 pm
» Ohio Gardener's Greenhouse
by OhioGardener 10/25/2024, 7:17 pm
» Hello from Land of Umpqua, Oregon Zone 8b
by sanderson 10/25/2024, 3:14 pm
» Hello everyone!
by SFGHQSTAFF 10/24/2024, 3:22 pm
» Senior Gardeners
by sanderson 10/23/2024, 6:09 pm
» Hello from South Florida
by markqz 10/23/2024, 10:30 am
» Confirm what this is
by sanderson 10/11/2024, 2:51 pm
» Harlequin Beetles?
by sanderson 10/7/2024, 3:08 pm
» N & C Midwest: September 2024
by OhioGardener 9/30/2024, 4:13 pm
» The SFG Journey-Biowash
by OhioGardener 9/29/2024, 8:33 am
» Fall is For Garlic Planting
by Scorpio Rising 9/28/2024, 12:19 am
» source for chemical-free lanscape fabric
by Woodsong 9/19/2024, 10:51 am
» Hurricane
by sanderson 9/14/2024, 5:42 pm
» Pest Damage
by WBIowa 9/8/2024, 2:48 pm
Google
Newbie Question #3
+8
Turan
yolos
kamigh
sanderson
quiltbea
littlesapphire
CapeCoddess
momvet
12 posters
Page 1 of 2
Page 1 of 2 • 1, 2 
 Newbie Question #3
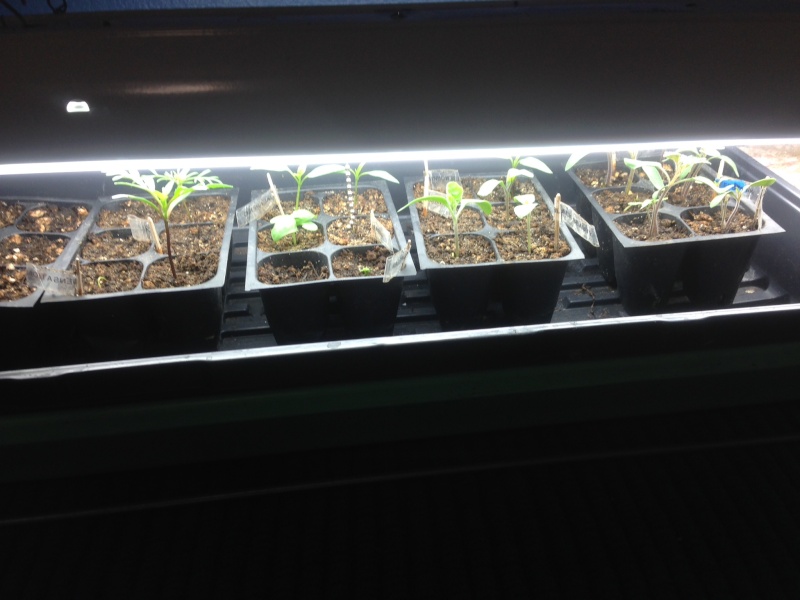
I hope I'm not being annoying by all my questions but I read and read the forum, yet don't know if my babies this year will survive. I used a Jiffy tray because I knew I wasn't going to start a ton of plants, but will never do that again. I used a heat mat and already had lights that I started using once the first ones popped up their heads. (not on a timer so inconsistent but tried for 16 hours a day). Bottom watered (the only thing the tray was good for). Almost everything came up (not my cherry tomato, kale, only one parsley) but I have tomatoes, peppers, eggplant, zinnias, onions and scallions. They look OK but leggy. I know I need to transplant the tomatoes now and the peppers soon (they can both be buried deeper, right? but have several questions. 1} how do you keep the light close to the plants when they grow at such different rates? (I read to elevate the tinier ones but how? and how do you keep track if you are moving them?) Which leads me to question 2) If you do use peat tablets, how do you keep track of what is what? They are pretty small to put a label in, so I laid a label against the pots as I planted them, but that does't help if you have to move a plant to get more light. 3) If you elevate the little plants, how do you keep them watered? I will definitely do it differently next year (and will welcome any advice). Is there hope for these guys? I am trying to keep the cost down but I did order another 4' stand so can move some over there. I moved the lights up a little for the pictures. Thanks
 |

momvet- Posts : 146
Join date : 2015-02-09
Location : Southern California
 Re: Newbie Question #3
I put all the same plants in their own containers or trays, like this lettuce clampack: 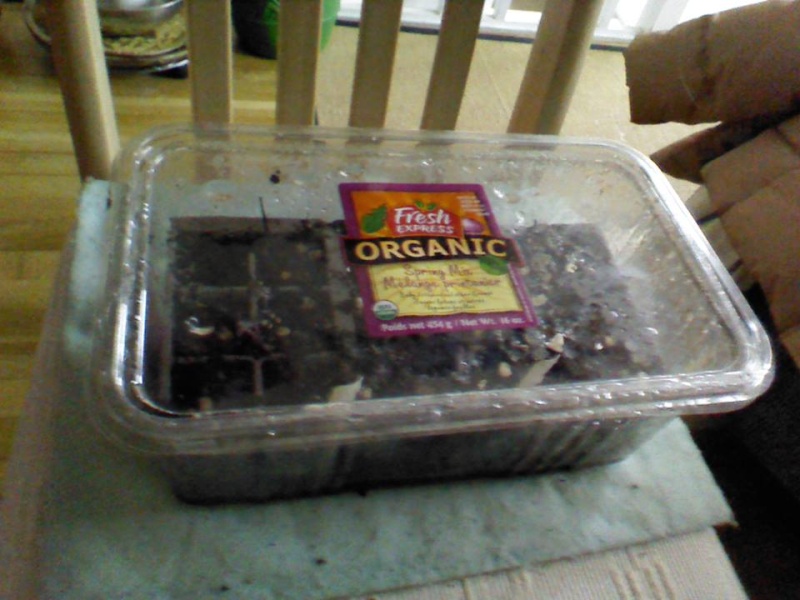
This container is on the heating pad for sprouting, but once the seedlings break thru, the lid will come off and the container will go into the window.
For peat pellets, you could use smaller containers if need be. Some folks on the forum even use those styrofoam trays that meat comes in. Just check out what your purchased food items come in...you may find all kinds of containers and trays you didn't know you had. I even line the bottom of my trash bags & recycle bins with them.
When watering, the water goes directly into the containers or trays and gets soaked up from the bottom by the MM, or in your case I guess the pellets would also soak it up.
Last year my winter went on longer and was cloudier than expected. The seedlings were ready but the daylight just wasn't there. I used fluorescent lighting for the first time - my under the counter kitchen light: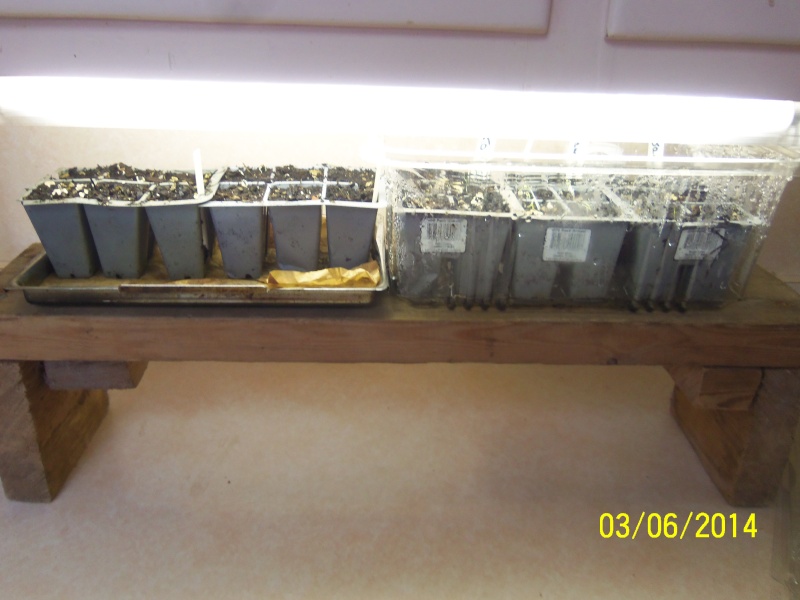
I couldn't find the photo of them later on, but at some point, each 6 pack was in a different smaller container, and they were all at different levels using magazines, rice boxes, books and such...anything I could find to get to the level I needed.
Keep those questions coming if you don't find answers.
CC

This container is on the heating pad for sprouting, but once the seedlings break thru, the lid will come off and the container will go into the window.
For peat pellets, you could use smaller containers if need be. Some folks on the forum even use those styrofoam trays that meat comes in. Just check out what your purchased food items come in...you may find all kinds of containers and trays you didn't know you had. I even line the bottom of my trash bags & recycle bins with them.
When watering, the water goes directly into the containers or trays and gets soaked up from the bottom by the MM, or in your case I guess the pellets would also soak it up.
Last year my winter went on longer and was cloudier than expected. The seedlings were ready but the daylight just wasn't there. I used fluorescent lighting for the first time - my under the counter kitchen light:

I couldn't find the photo of them later on, but at some point, each 6 pack was in a different smaller container, and they were all at different levels using magazines, rice boxes, books and such...anything I could find to get to the level I needed.
Keep those questions coming if you don't find answers.
CC

CapeCoddess- Posts : 6811
Join date : 2012-05-20
Age : 68
Location : elbow of the Cape, MA, Zone 6b/7a
 Re: Newbie Question #3
Yes, it sure looks like your plants are getting leggy. Don't let it get you down  It takes us all a lot of patience and trial and error to get good at starting seeds (I'm still learning!).Your toms will be just fine, just plant them a little deeper. Likewise, your peppers should be ok, too. I'm not so sure about the other plants, but you can always plant them and see how they turn out.
CC had some very good advice, especially about putting different types of plants together into their own little container so they're easier to maneuver and also keep track of. I've only ever tried to plant in peat pellets once, and it really didn't work out well for me. Your plants, other than the legginess, seem to be doing better than mine did, though, so keep it up this year and do some research into another method for next year if you decide you don't want to do the pellets again.
I totally understand being frustrated by plants with different heights. I've had to get creative. I have a pretty cool setup in my basement. I have a four foot work lamp that takes four T5 bulbs, which my husband (a man who knows too much about light bulbs) says are brighter than regular T8 bulbs, and I wholeheartedly agree.
Anyway, what I do is, as I plant new seeds, I set the oldest ones to the left of the light and the youngest ones to the right. I usually have two trays, and then set smaller trays into the bigger trays to keep the plants separated. Then, as the older plants get taller, I both raise the left side of the light on its chain, and I also stack things under the right tray. Then, as plants in the right tray get bigger, I just move them over to the left tray. And since the light is at an angle by this point, I can adjust how close the plants are to the light by moving them more to the right or more to the left. I hope that all made sense. I only have one picture of this setup, but it's pretty terrible. As you can see, I keep the light VERY close to the plants.

When I took this picture, I had yet to start lifting the light up too much, so it's not quite at an angle. But usually by the time plants need to go in the ground, it looks pretty crooked.
I hope this made some sense to you Just keep trying. We all make mistakes; that's how we learn, afterall!
CC had some very good advice, especially about putting different types of plants together into their own little container so they're easier to maneuver and also keep track of. I've only ever tried to plant in peat pellets once, and it really didn't work out well for me. Your plants, other than the legginess, seem to be doing better than mine did, though, so keep it up this year and do some research into another method for next year if you decide you don't want to do the pellets again.
I totally understand being frustrated by plants with different heights. I've had to get creative. I have a pretty cool setup in my basement. I have a four foot work lamp that takes four T5 bulbs, which my husband (a man who knows too much about light bulbs) says are brighter than regular T8 bulbs, and I wholeheartedly agree.
Anyway, what I do is, as I plant new seeds, I set the oldest ones to the left of the light and the youngest ones to the right. I usually have two trays, and then set smaller trays into the bigger trays to keep the plants separated. Then, as the older plants get taller, I both raise the left side of the light on its chain, and I also stack things under the right tray. Then, as plants in the right tray get bigger, I just move them over to the left tray. And since the light is at an angle by this point, I can adjust how close the plants are to the light by moving them more to the right or more to the left. I hope that all made sense. I only have one picture of this setup, but it's pretty terrible. As you can see, I keep the light VERY close to the plants.

When I took this picture, I had yet to start lifting the light up too much, so it's not quite at an angle. But usually by the time plants need to go in the ground, it looks pretty crooked.
I hope this made some sense to you
 Re: Newbie Question #3
I raised my 4' long lights with old VHS tapes since I didn't have them on chains. I could prop one side higher than the other this way by tucking another tape under the end of the light fixture. This way you can keep the light the proper distance from the plants as they need it.
You'll find gardeners use many ways to get their seeds started each year. Just try something and if it works, you're set.
You'll find gardeners use many ways to get their seeds started each year. Just try something and if it works, you're set.

quiltbea-
 Posts : 4707
Join date : 2010-03-21
Age : 82
Location : Southwestern Maine Zone 5A
 Re: Newbie Question #3
Momvet, You posted a photo!! 
I've been holding off replying, hoping someone with more experience could help you. You solved one thing that is not working for you, peat pots, by deciding not to use them again. Some folks are happy with them, I use MM and once even a small tray of pure vermiculite to spout. I learned my lesson about NOT having a label for EACH cup!
I'm not a happy camper this year because of fungus gnats and some legginess. But, things are sprouting. I expanded from 2 fluorescent lights to 4 lights because of more flowers and herbs. With 4 lights I can group taller seedlings together and raise a light.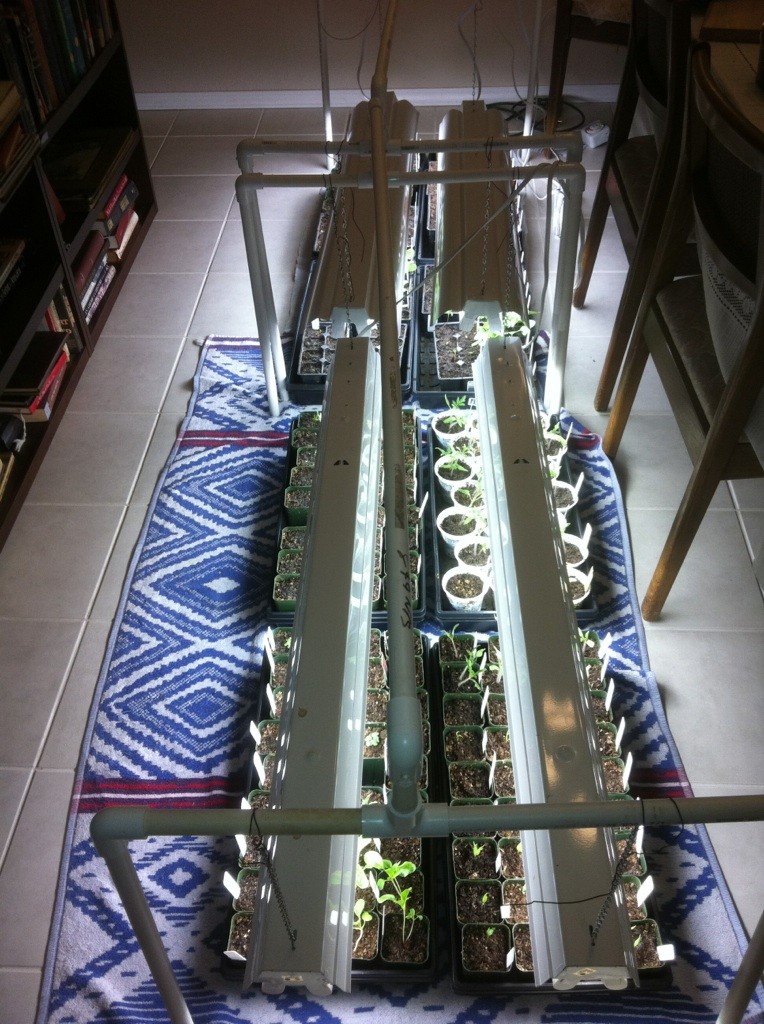

PS As you can see, there are all kinds of things to elevate short plants! VHS tape cassettes, books, pieces of lumber.

I've been holding off replying, hoping someone with more experience could help you. You solved one thing that is not working for you, peat pots, by deciding not to use them again. Some folks are happy with them, I use MM and once even a small tray of pure vermiculite to spout. I learned my lesson about NOT having a label for EACH cup!
I'm not a happy camper this year because of fungus gnats and some legginess. But, things are sprouting. I expanded from 2 fluorescent lights to 4 lights because of more flowers and herbs. With 4 lights I can group taller seedlings together and raise a light.


PS As you can see, there are all kinds of things to elevate short plants! VHS tape cassettes, books, pieces of lumber.
 Re: Newbie Question #3
I was (am) in the same boat as you - lots of little seedlings all growing at different rates, causing some legginess. You have gotten some very good advice with raising them up on different things, and putting them in containers to help with the watering. My solution: expand! I know that it's not always financially feasible, but if you can, it makes all the difference in the world. I had an old relic seedling stand from my mother's gardening heyday in the 80s which I used for about 8 years. It was a pain to put together and looked awful. For Christmas my family bought me a small footprint 4-tier light stand, which is AWESOME!!! However, I'm growing more than even that has room for, so guess what I set up last night? The old rickety stand! This way my big tomatoes and peppers can get the light they need without shading the slower growers.
Also, when I used peat pellets, my solution for keeping track of what was what was to write the variety on a piece of masking tape and wrap it around the pellet, along with the date sowed. If you overlap the tape a little, it will stick and not fall off when you water. Now that I use soil blocks, I keep them in little trays that I numbered and have a grid system on a notepad I keep handy. That way I can note when and where I move the blocks.
Hope this helps!!! It's nice to know there are others out there with the same problems I have
Karla

kamigh- Posts : 77
Join date : 2013-10-19
Location : Flower Mound, TX
 Lessons learned
I think the biggest mistake I made was not labeling the individual peat pots, but they were so small. So, now that I want to move them around to improve their distance from the light, I can't because I won't know what's what. I didn't start much and they are all in a single tray, so I can't use materials to "lift" them unless they are inside the tray (they are in little depressions which soak up the water you put in the bottom tray. Not sure if I am explaining it right. So - next time (it will be this fall - smaller containers with like plants and label! Thanks , will let you know how it goes. And yes - I posted a picture!


momvet- Posts : 146
Join date : 2015-02-09
Location : Southern California
 Re: Newbie Question #3
To label my seed starting operations, I use toothpicks with a piece of tape (or labels from my label machine) on the top. I give each of my different varieties a number and record what number relates to what variety. Each pot or soil block gets its own toothpick label. That toothpick follows each individual plant as it is continually moved or potted up.
Here is a picture of my toothpicks in some soil blocks.
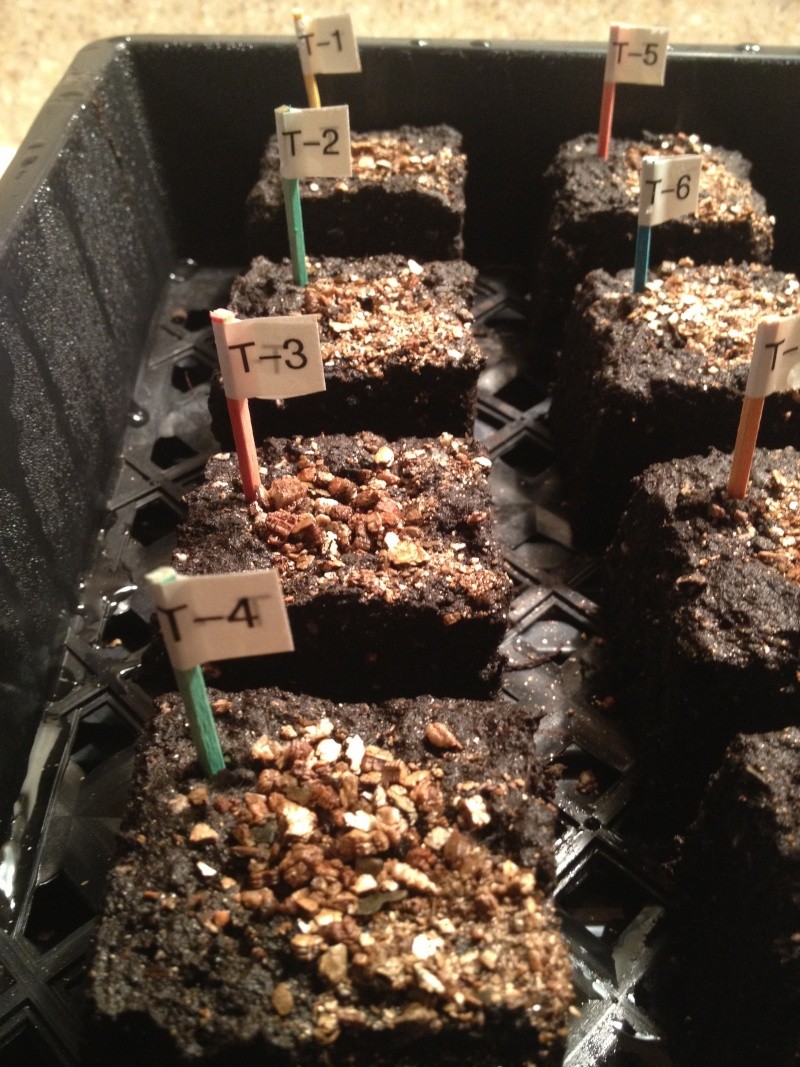
This year I am using some soil blocks but more peat pellets. So easy. We shall see if the seedlings do as well in the peat pellets as in the soil blocks.
Hear are the toothpicks in some peat pots I tried last year.
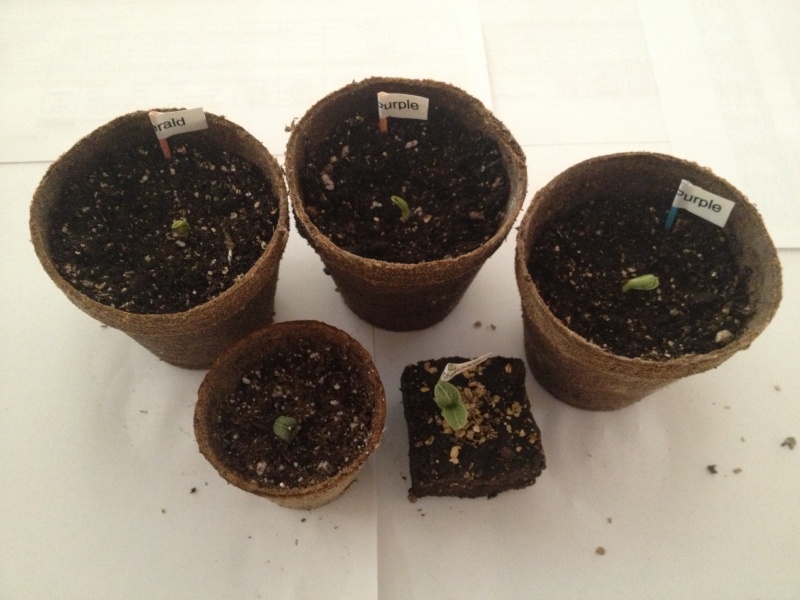
My first year of starting my own seedlings, I did a really dumb thing so don't feel so bad. I used a permanent marker and wrote the name of the variety on the outside of the peat pot. Of course when the peat pot was watered, the permanent marker was no longer permanent.
This year I also bought a couple of those peat pellet tray pots that sit in tiny depressions and soak up the water from water on the bottom of the container using a self watering mat (sounds like what you used). I intend to repot each of the peat pellet pots into bigger plastic pots so I can move them around individually and raise and lower them to get them right up under the lights based on their height.
Here is a picture of my toothpicks in some soil blocks.

This year I am using some soil blocks but more peat pellets. So easy. We shall see if the seedlings do as well in the peat pellets as in the soil blocks.
Hear are the toothpicks in some peat pots I tried last year.

My first year of starting my own seedlings, I did a really dumb thing so don't feel so bad. I used a permanent marker and wrote the name of the variety on the outside of the peat pot. Of course when the peat pot was watered, the permanent marker was no longer permanent.
This year I also bought a couple of those peat pellet tray pots that sit in tiny depressions and soak up the water from water on the bottom of the container using a self watering mat (sounds like what you used). I intend to repot each of the peat pellet pots into bigger plastic pots so I can move them around individually and raise and lower them to get them right up under the lights based on their height.
yolos-
 Posts : 4139
Join date : 2011-11-20
Age : 74
Location : Brooks, Ga Zone 7B/8A
 Re: Newbie Question #3
Yolos.....I love your numbering system. When working with soil blocks, they are so small there's little you can use unless you do several in a set. I tried that but still had probs but yours seems to be the answer for the small blocks and in their future, too. For half inch soil blocks one can break a toothpick in half.
Thanks for a great idea.
Thanks for a great idea.

quiltbea-
 Posts : 4707
Join date : 2010-03-21
Age : 82
Location : Southwestern Maine Zone 5A
 Re: Newbie Question #3
I use toothpicks with a flag with the initials in my soil blocks as well.
I also have a grid on a scrap of paper next to the seed starting tray.
And I tend to plant in groups of 4, one set of soil blocks.
Once a seed has sprouted and is ready to come off the heat mat it goes to a tray in the window or under a light. I try to keep plants close enough to light, but use a lot of window light. Legginess happens, plants over come it when planted out. It is not catastrophic.
Some times a gentle spray watering from the top is the easiest way to deal with getting every thing watered. I have an old watering can with a rose to make that gentle spray.
Things planted in peat pellets run out of food fast so be sure to fertilize regularly and get them into bigger pots with better soil.
NIce pictures!

Turan-
 Posts : 2618
Join date : 2012-03-29
Location : Gallatin Valley, Montana, Intermountain zone 4
 Re: Newbie Question #3
+1 Nice for little pot seeding systems.quiltbea wrote:Yolos.....I love your numbering system.
 Thanks!
This is a great idea! I thought of toothpicks but I knew if I wrote on them, I wouldn't be able to read them! I have a label machine so will definitely use this idea for the teeny tiny ones!yolos wrote:To label my seed starting operations, I use toothpicks with a piece of tape (or labels from my label machine) on the top. I give each of my different varieties a number and record what number relates to what variety. Each pot or soil block gets its own toothpick label. That toothpick follows each individual plant as it is continually moved or potted up.

momvet- Posts : 146
Join date : 2015-02-09
Location : Southern California
 Another great piece of advice
I appreciate everyone's input - and so quickly! I have come to realize that in order to keep the different seedlings close to the light, I would need to keep them in individual trays. So I will do my best to collect them (went to Smart and Final and found these, but they sell them in 100 packs--this is a small (and was supposed to be low budget!) operation!CapeCoddess wrote:I put all the same plants in their own containers or trays, like this lettuce clampack:I put all the same plants in their own containers or trays, like this lettuce clampack:
This container is on the heating pad for sprouting, but once the seedlings break thru, the lid will come off and the container will go into the window.

momvet- Posts : 146
Join date : 2015-02-09
Location : Southern California
 Re: Newbie Question #3
momvet wrote: So I will do my best to collect them (went to Smart and Final and found these, but they sell them in 100 packs--this is a small (and was supposed to be low budget!) operation!
Some folks are really creative about scoring free things for gardening. Free/cheap are our favorite words.
Scrap lumber from construction sites (always get permission first)
Goodwill, Habitat for Humanity
Yogurt cups, salad trays, plastic soda cups, egg cartons, old pantyhose, wire hangers
Gifted or collected remnants of material (garden cage wire, chicken wire, old curtain sheers, rebar, remesh, high rib mesh, Styrofoam
From neighbors and food vendors: free manure, culled produce, coffee grounds, 3-gallon and 5-gallon buckets.
There are more examples, but you get the drift. Free and cheap is creative. The only thing to not skimp on is the irrigation system of choice. Even if it just means buying a nice wand for the hose.
 Re: Newbie Question #3
momvet wrote:I think the biggest mistake I made was not labeling the individual peat pots, but they were so small. So, now that I want to move them around to improve their distance from the light, I can't because I won't know what's what. I didn't start much and they are all in a single tray, so I can't use materials to "lift" them unless they are inside the tray (they are in little depressions which soak up the water you put in the bottom tray. Not sure if I am explaining it right. So - next time (it will be this fall - smaller containers with like plants and label! Thanks , will let you know how it goes. And yes - I posted a picture!
I know those depressions well. Take the pellets out of that tray and move each variety to meat trays (well washed and bleached), saucers, tupperware or anything that will hold a little water. I lined clam shells with foil so they would hold water and that made great small starting domes. I even used the top of the pellet tray so I could keep stuff that had not sprouted on the heat pad and move the sprouted stuff off the heat. My tomatoes came up early and my peppers took forever. I learned not to use the big pellet tray, but to use smaller water holding things and buy the pellets in the big replacement box. That way you can group each veggie or variety of veggie in it's own group. My nursery sells them individually. Now you have the ability to moved smaller groups to different heights as they grow.
Next year you can see about using other things filled with MM to start seeds. I save all the clamshell packs from strawberries and salad from my winter shopping for just this purpose because they make great little mini greenhouse domes.
Use what you have around the house even to making trays with shoe box tops lined with aluminum foil.
Kay
A WEED IS A FLOWER GROWING IN THE WRONG PLACE
Elizabeth City, NC
Click for weather forecast

walshevak
Certified SFG Instructor-
 Posts : 4370
Join date : 2010-10-17
Age : 81
Location : wilmington, nc zone 8
 3rd attempt at posting a picture
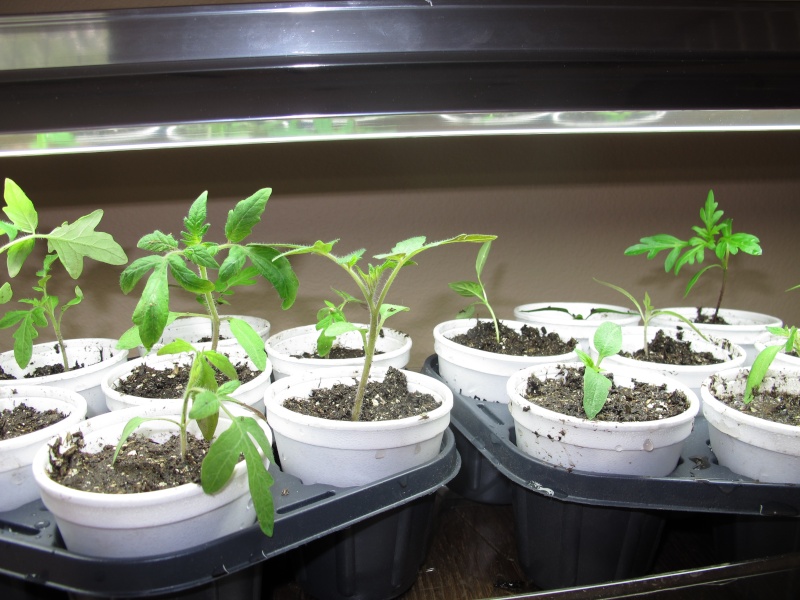
Thanks to all the excellent help here, I think at least half of the seedlings will be OK, and now that I have two light set-ups, I have time to start some new ones (the leggiest ones in the first pictures were spinach, which I have no idea why I started - it probably won't do well this late here). Anyway, I tried to post a picture of my new transplants and their beds, which I finally finished, but I have no idea how I posted the last two pictures (I follow the instructions, but once I post one, when I click on the "post an image"icon, it takes me back to the last one I posted. Anyway, here is what I did today (I hope) Thanks again, everyone - I couldn't have done it without you!


momvet- Posts : 146
Join date : 2015-02-09
Location : Southern California
 Re: Newbie Question #3
I find I have to click Preview before my computer will let me post another photo.  Don't know why.
 Re: Newbie Question #3
Momvet, so glad you're feeling better and got some smaller trays to boost up your smaller plants. Love the picture; everything's looking very happy! Good luck! Make sure to keep us updated 
 Re: Newbie Question #3
The redder (pinker) the light, generally the more legginess you'll get.
Bluer lighting, all things being equal, leads to more compact growth. Redder lighting (even incandescent floods, yellowish) will lead to leggy plants.
Related reading for the brave - http://myfolia.com/groups/1-general-chit-chat/topics/6896-spectral-curves-of-cfls-vs-par-plant-requirements/posts
Bluer lighting, all things being equal, leads to more compact growth. Redder lighting (even incandescent floods, yellowish) will lead to leggy plants.
Related reading for the brave - http://myfolia.com/groups/1-general-chit-chat/topics/6896-spectral-curves-of-cfls-vs-par-plant-requirements/posts
I think my sunflower plant can take me in a fair fight...it's taller than me, and it keeps giving me dirty looks.

brainchasm-
 Posts : 479
Join date : 2013-02-26
Age : 48
Location : Las Vegas, NV
 Thanks!
Hi everyone - update here and thanks to all of the good advice, I have a lot of plants started. I don't know if my lights are red or blue, sorry. Just wondering if I started my plants too early. Although they seem hardy, some of them don't seem as dark green as before and I am getting yellowing of lower leaves. I did end up repotting into Mel's Mix (as an aside - I have been using the commercial mix for this and am getting a lot of mushrooms). I thought that would feed them enough but when I saw the yellowing, I added dilute Miracle Mix house plant food to the water. I was going to post pics but having trouble with my camera. Anyway, I have tomatoes, peppers, eggplant, zinnias and cosmos (plus one lonely onion/scallion - don't know because it was before I read the excellent advice about labeling on this thread!).brainchasm wrote:The redder (pinker) the light, generally the more legginess you'll get.
Bluer lighting, all things being equal, leads to more compact growth. Redder lighting (even incandescent floods, yellowish) will lead to leggy plants.
Related reading for the brave - http://myfolia.com/groups/1-general-chit-chat/topics/6896-spectral-curves-of-cfls-vs-par-plant-requirements/posts

momvet- Posts : 146
Join date : 2015-02-09
Location : Southern California
 Re: Newbie Question #3
Momvet, Because of where you live, you can put the seedlings outside now. Wish you could post photos. If you planted the seedlings in Mel's Mix, you shouldn't have to "feed" them. Maybe up-pot to larger containers but not feed them. Are they over fertilized? Over watered? Under watered? You may want to direct sow some seeds in the spots you plan to plant them just as insurance.
 Re: Newbie Question #3
That's what I thought, so I never fed them, but then I was worried about the color.
I SO want to put them out now, but I need to harden them off first. I work out of town and it is the worst timing because I will be gone from the 2/24 through April 1!! ACK. I will be home Sundays but my DH will be responsible for moving lights up, keeping them watered, etc. He is willing but not exactly the nurturing type (he also has to keep the beds OK - thankfully the MM is water retentive!). No way can he understand the acclimation process - plus he's gone all day. I guess I should have though about it, but my work schedule is just crazy. Think they'll survive another week and a half? I know, pictures would help. They look pretty healthy.
Sanderson - thanks for the info about posting a second picture. These are NOT good but I thought it might help you guys see . First pic - the ones I'm worried about. second - doing better because of the advice on this thread.
Last edited by momvet on 3/19/2015, 2:13 pm; edited 1 time in total

momvet- Posts : 146
Join date : 2015-02-09
Location : Southern California
 Re: Newbie Question #3
IF the plants are yellowing, the may need to be fed/fertilized with a weak plant food solution.
43 years a gardener and going strong with SFG.
https://squarefoot.forumotion.com/t3574-the-end-of-july-7-weeks-until-frost
There are certain pursuits which, if not wholly poetic and true, do at least suggest a nobler and finer relation to nature than we know. The keeping of bees, for instance. ~ Henry David Thoreau
https://squarefoot.forumotion.com/t1306-other-gardening-books
Page 1 of 2 • 1, 2 
 Similar topics
» Newbie Box Question
» Newbie question on my mix/help!
» Another Newbie Question
» Newbie Question #5
» very newbie question
» Newbie question on my mix/help!
» Another Newbie Question
» Newbie Question #5
» very newbie question
Page 1 of 2
Permissions in this forum:
You cannot reply to topics in this forum


