Search
Latest topics
» N & C Midwest: Nov. Dec. 2024by OhioGardener Yesterday at 2:58 pm
» Kiwi's SFG Adventure
by KiwiSFGnewbie 11/12/2024, 7:10 pm
» Thanksgiving Cactus
by OhioGardener 11/12/2024, 5:40 pm
» Happy Birthday!!
by sanderson 11/11/2024, 11:57 am
» Need Garden Layout Feedback
by markqz 11/9/2024, 9:16 pm
» Thai Basil
by Scorpio Rising 11/8/2024, 8:52 pm
» How best to keep a fallow SFG bed
by KiwiSFGnewbie 11/8/2024, 8:11 pm
» Preserving A Bumper Tomato Harvest with Freezing vs Canning
by plantoid 11/7/2024, 11:36 am
» New SFG gardener in Auckland
by sanderson 11/7/2024, 12:14 am
» Mark's first SFG
by sanderson 11/6/2024, 11:51 pm
» What Have You Picked From Your Garden Today
by OhioGardener 11/5/2024, 2:29 pm
» Greetings from Southeastern Wisconsin
by sanderson 11/5/2024, 2:01 pm
» Spinning Compost Bin-need some ideas
by rtfm 11/2/2024, 7:49 pm
» Growing fruit trees in Auckland
by OhioGardener 10/31/2024, 4:23 pm
» Vermiculite -- shipping sale through 10/31/2024
by markqz 10/30/2024, 2:27 pm
» N & C Midwest: October 2024
by Scorpio Rising 10/30/2024, 10:38 am
» What are you eating from your garden today?
by Scorpio Rising 10/27/2024, 10:27 pm
» Old Mulch and Closing Beds for Winter
by sanderson 10/26/2024, 11:00 pm
» Ohio Gardener's Greenhouse
by OhioGardener 10/25/2024, 7:17 pm
» Hello from Land of Umpqua, Oregon Zone 8b
by sanderson 10/25/2024, 3:14 pm
» Hello everyone!
by SFGHQSTAFF 10/24/2024, 3:22 pm
» Senior Gardeners
by sanderson 10/23/2024, 6:09 pm
» Hello from South Florida
by markqz 10/23/2024, 10:30 am
» Confirm what this is
by sanderson 10/11/2024, 2:51 pm
» Harlequin Beetles?
by sanderson 10/7/2024, 3:08 pm
» N & C Midwest: September 2024
by OhioGardener 9/30/2024, 4:13 pm
» The SFG Journey-Biowash
by OhioGardener 9/29/2024, 8:33 am
» Fall is For Garlic Planting
by Scorpio Rising 9/28/2024, 12:19 am
» source for chemical-free lanscape fabric
by Woodsong 9/19/2024, 10:51 am
» Hurricane
by sanderson 9/14/2024, 5:42 pm
Google
The Winter Journey and greenhouse plastic
+24
trolleydriver
quiltbea
Scorpio Rising
walshevak
Kelejan
donnainzone5
steve638
AtlantaMarie
brainchasm
CapeCoddess
yolos
Goosegirl
Turan
camprn
johnp
boffer
GloriaG
2SooCrew
Marc Iverson
Cajunsmoke14
meatburner
sanderson
audrey.jeanne.roberts
has55
28 posters
Page 14 of 15
Page 14 of 15 •  1 ... 8 ... 13, 14, 15
 Re: The Winter Journey and greenhouse plastic
For me it took forever to load. When I posted at the bottom with Sanderson, no pics were showing. By the time I read everything, the pics were there.trolleydriver wrote:The photo is showing for me. However, I've noticed some delays with images being shown on other threads this evening. It may have something to do with the image hosting website that the forum uses.audrey.jeanne.roberts wrote:Is the picture showing on my post above? It's not showing for me anymore and I'm puzzled.
...
 Re: The Winter Journey and greenhouse plastic
Mine is tiny, and lots of work, but it's wonderful to have when the weather is bad.trolleydriver wrote:a.j.r ... Well that is just fantastic!
How I would love to have a greenhouse.
 Re: The Winter Journey and greenhouse plastic
SR, CA does get below 32*F in the winter, depending on where one lives.  Audrey is in the foothills so she does get some hard freezes, more than I do in the valley flatland. If I want to over-winter tomato or pepper, I need to use the mini-greenhouse, also, just not as many days (nights) as Audrey. This year I'm not overwintering anything so the greenhouse is packed away.
 Re: The Winter Journey and greenhouse plastic
I live in the mountains at 1500 ft elevation and we have winter night temps down into the lower 20s. The greenhouse allows me to grow tomatoes all year around (we have fruit 10 months out of the year). I'm also able to keep bell peppers, hot chili peppers and my herbs growing, all of which are frost sensitive.Scorpio Rising wrote:Jowowow! That is amazing! With your moderate climate, I am not sure why you Californians need greenhouses? Is it the extreme heat? And why would a greenhouse help with that, they are warmer, all least here. Just don't know.
Me too, TD. I would ove a greenhouse/big cold frame.....jumpstart and the end....my Black Seeded Simpson got bit.....pulled everything, just a few mache out there...
We are able to grow a lot of things all winter long without protection, virtually all winter veggies will grow without protection.
I have one more day's worth of work to finish the greenhouse. We have the zipper to install, we were going to do that today but it rained off and on and the moisture wouldn't be good for the self-sticking glue. I cleaned out a lot of the stuff that had piled up in there and made the new beds out of large wooden beam scraps we have. When we put the greenhouse up 4 years ago I put 4-6 inches of wood chips in the walkways inside, that is now soil! So I'm scraping it down to the gravel driveway that it's set on and using that in the planters, then replacing the wood chips.
 Re: The Winter Journey and greenhouse plastic
awesome greenhouse AJR. I haven't tried growing summer crops in the green house yet. will try it in one of my green beds later in the winter, after i harvest the broccoli and cauliflower. the other 3 beds I will keep in different type of greens, macho, etc... I hope I can successfully grow the peppers and tomatoes to beat texas heat. Today, I harvested the tomatoes and one melon just before tomorrow AM light freeze 32-30. A friend is experimenting with cantaloupe.
Has anyone in the Dallas-ft worth area grew tomatoes and peppers successfully in raised beds?
my harvest today

the 2nd portable greenhouse was tied to the 1st greenhouse with hose clamps today. netting over the cool weather plants to stop cabbage looper

Has anyone in the Dallas-ft worth area grew tomatoes and peppers successfully in raised beds?
my harvest today

the 2nd portable greenhouse was tied to the 1st greenhouse with hose clamps today. netting over the cool weather plants to stop cabbage looper


has55- Posts : 2345
Join date : 2012-05-10
Location : Denton, tx
 Re: The Winter Journey and greenhouse plastic
AJR , have you ever used the walkway wood chips after it composted for plants or will this be the first time?

has55- Posts : 2345
Join date : 2012-05-10
Location : Denton, tx
 Re: The Winter Journey and greenhouse plastic
This is the first time on the walkway chips. I added some fresh ones to it last season. We had had so much rain that the floor was saturated for much of the winter. That hastened the breakdown of the chips.
 Re: The Winter Journey and greenhouse plastic
I'm trying to see this image. was the greenhouse up or was there a way for the water to get into the greenhouse?audrey.jeanne.roberts wrote:This is the first time on the walkway chips. I added some fresh ones to it last season. We had had so much rain that the floor was saturated for much of the winter. That hastened the breakdown of the chips.

has55- Posts : 2345
Join date : 2012-05-10
Location : Denton, tx
 Re: The Winter Journey and greenhouse plastic
added the side vent on this side for better airflow. There another one on the other side. I used the green arrow to point to the location. I joined the two hoop houses tighter with hose clamps.


has55- Posts : 2345
Join date : 2012-05-10
Location : Denton, tx
 Re: The Winter Journey and greenhouse plastic
Nice to see your progress has55. What you are building would fit very nicely over my SFG beds. 

trolleydriver
Forum Moderator-
 Posts : 5388
Join date : 2015-05-04
Age : 77
Location : Ottawa, Ontario, Canada
 Re: The Winter Journey and greenhouse plastic
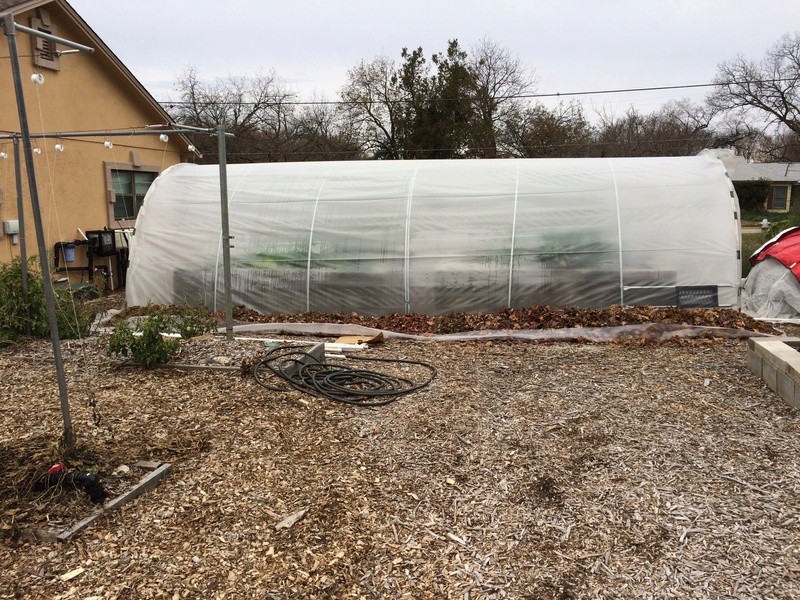
finally got around to finishing the addition of the 2nd greenhouse.



has55- Posts : 2345
Join date : 2012-05-10
Location : Denton, tx
 Re: The Winter Journey and greenhouse plastic
+1sanderson wrote:Very, very nice!

trolleydriver
Forum Moderator-
 Posts : 5388
Join date : 2015-05-04
Age : 77
Location : Ottawa, Ontario, Canada
 FINALLY got my pictures to post!
Well, as Sanderson knows, my phone was not allowing me to email pictures which is how I start the process to post my images here. I gave my phone to my daughter and have no idea what the heck she did but I'm back in business, lol!
This is my hillside garden which is mostly at rest but also has some winter items planted.
 " />
" />
In front a broccoli plant, several cauliflowers are behind it and to the right a row of kale. I have some chinese cabbage behind it all, but the rabbits keep enjoying them *deep sigh!* I have covered them with large mouthed plastic containers so they can grow. I'll have to rig something to keep the rabbits out of them.

 " />
" />
This is my greenhouse, recovered now in 6 mil greenhouse plastic. We used construction zippers to create the doorways (there is now another opening on the other side). The interior beds get covered when it gets down to about 35 degrees. This holds the warmth that gets stored in the ground in and keeps more cold out. The survival blankets alone will add about 20 degrees to the temps. If it drops into the 20s we run a low temp heater on its lowest setting to keep them about 50 degrees.

 " />
" />
New bed #1. Soil is 4 year old wood chips that have broken down inside of the greenhouse floor. This is now covered with scrap greenhouse plastic to keep warmer and has been planted with various winter crops. Some have started to grow very slowly, others will grow once the days begin to lengthen again.

 " />
" />
Bed #2 This bed is a mix of a potting mix I've found that works really well for me to start seeds in and the wood chip soil so it's a bit lighter and airier. I'm going to test the two beds to see which has better results over time. The pots in front are a rosemary and turmeric. The turmeric and my ginger plant are now in the house to survive the winter as they are tropical species and do not like to be below 65 degrees.

 " />
" />
The beds uncovered. On the left side of the front box is a Roma tomato that is producing giant beautiful tomatoes right now mmmmmmmm! The bowls with tomatoes are what was harvested green from my hillsides just before the first frost. They are ripening perfectly in the greenhouse. This was an experiment this winter.

 " />
" />
My two 4x8 table tops. So far the bell peppers and tomatoes in them are still surviving the frost. They may not make it past the next week when we drop into the 20s but, we'll see! The green beans and cucumbers that were in them did not make it. The rest are winter veggies. The bees ADORE the broccoli Raab (yellow flowers) and flood in every time I open the cover. The back tabletop's poles are falling over, hubby has to secure them better as he did the front ones. It's on the list, lol!
Off to work now! Have a great day all, Audrey
This is my hillside garden which is mostly at rest but also has some winter items planted.
 " />
" />In front a broccoli plant, several cauliflowers are behind it and to the right a row of kale. I have some chinese cabbage behind it all, but the rabbits keep enjoying them *deep sigh!* I have covered them with large mouthed plastic containers so they can grow. I'll have to rig something to keep the rabbits out of them.
 " />
" />This is my greenhouse, recovered now in 6 mil greenhouse plastic. We used construction zippers to create the doorways (there is now another opening on the other side). The interior beds get covered when it gets down to about 35 degrees. This holds the warmth that gets stored in the ground in and keeps more cold out. The survival blankets alone will add about 20 degrees to the temps. If it drops into the 20s we run a low temp heater on its lowest setting to keep them about 50 degrees.
 " />
" />New bed #1. Soil is 4 year old wood chips that have broken down inside of the greenhouse floor. This is now covered with scrap greenhouse plastic to keep warmer and has been planted with various winter crops. Some have started to grow very slowly, others will grow once the days begin to lengthen again.
 " />
" />Bed #2 This bed is a mix of a potting mix I've found that works really well for me to start seeds in and the wood chip soil so it's a bit lighter and airier. I'm going to test the two beds to see which has better results over time. The pots in front are a rosemary and turmeric. The turmeric and my ginger plant are now in the house to survive the winter as they are tropical species and do not like to be below 65 degrees.
 " />
" />The beds uncovered. On the left side of the front box is a Roma tomato that is producing giant beautiful tomatoes right now mmmmmmmm! The bowls with tomatoes are what was harvested green from my hillsides just before the first frost. They are ripening perfectly in the greenhouse. This was an experiment this winter.
 " />
" />My two 4x8 table tops. So far the bell peppers and tomatoes in them are still surviving the frost. They may not make it past the next week when we drop into the 20s but, we'll see! The green beans and cucumbers that were in them did not make it. The rest are winter veggies. The bees ADORE the broccoli Raab (yellow flowers) and flood in every time I open the cover. The back tabletop's poles are falling over, hubby has to secure them better as he did the front ones. It's on the list, lol!
Off to work now! Have a great day all, Audrey
 Re: The Winter Journey and greenhouse plastic
Audrey, Aren't the tomatoes in the greenhouse 2 summers old? I love your garden(s).
 Re: The Winter Journey and greenhouse plastic
+1sanderson wrote:Audrey, Aren't the tomatoes in the greenhouse 2 summers old? I love your garden(s).

has55- Posts : 2345
Join date : 2012-05-10
Location : Denton, tx
 Re: The Winter Journey and greenhouse plastic
The Juliet tomato in the small raised table top and the Roma in the left half of the large raised bed are two years old. The right side of the large bed are new plants started late in the season off of suckers rooted in water. Those are a cherry tomato that's very sweet, but I have no idea what it was originally now.sanderson wrote:Audrey, Aren't the tomatoes in the greenhouse 2 summers old? I love your garden(s).
I'm going to pull the Juliet in the spring and won't replace a tomato in that bed.
It's all pretty messy outside, but I'm just not looking, lol!
 Re: The Winter Journey and greenhouse plastic
Nice job on your new greenhouse Haas! My elbow got hurt just lifting pavers, let alone how many cinder blocks you put into place in that. 
 Re: The Winter Journey and greenhouse plastic
the foundation screen is working great. I don't have to run out to ventilate the greenhouse. This morning it was 35 degrees at 8:00 AM. I don't know what the GH temp was inside because I chose not to run out there in the cold, but relax with a cup of coffee. The vents are partially close approx 1/4 of an inch. it's 10:00 now with temps at 49 degrees. That means it at least 55 degrees for them to start opening.
This year, I use braces to secure the plastic to the vents.


This year, I use braces to secure the plastic to the vents.


has55- Posts : 2345
Join date : 2012-05-10
Location : Denton, tx
 Re: The Winter Journey and greenhouse plastic
I had put together some of my past winter experiments and thought I would update it on this past thread. May helped someone avoid some of the crazy, but fun adventures.
below are some of my past experiments for spring, fall, winter and summer protection.
light winter blanket. it did well. allowed enough light. for a light freeze. Use snap clamps on 1"PVC pipe filled with gravel. this allowed easy assess to the food. Just lift, get food and put it back down. no dirt or wood plank to hold edges down. hoops work well with SFG beds. I switched from PVC hoops to electrical conduit hoops using a hoop bender. this will probably give me 20 yrs or more.
Enlarge this image Click to see fullsize

I was able to place the shade cloth in position to protect from the sun. PVC worked best here, cheap and used snap clamps. I love snap clamps.
Enlarge this image Click to see fullsize

Enlarge this image Click to see fullsize

used 5 way PVC coupler for flexibility
Enlarge this image Click to see fullsize

Enlarge this image Click to see fullsize

Enlarge this image Click to see fullsize

Enlarge this image Click to see fullsize

Aluminet shade cloth works the best. it actually lowers the temps besides protecting from intense sun rays
Enlarge this image Click to see fullsize

I stated low but found it was easier for me to raise the canopy for easy assess.
Enlarge this image Click to see fullsize

one of my first winter canopy for temps below27 degrees. I found the greens would freeze some at this temp, but would quickly that out during the day and have a sweeter taste. It worked, but I work 12 hrs night shift and would have to run out before going to work to raise the canopy. So I abandoned the idea. I got this idea from a Colorado experiment at some university. I learned a lot from them it sparked new ideas.
Enlarge this image Click to see fullsize
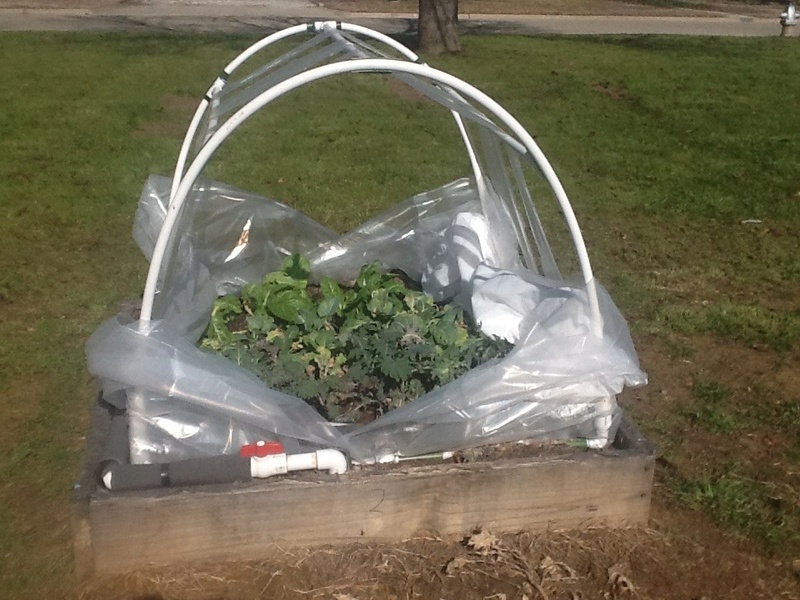
here's is aluminet shading with snap clamps. great stuff
Enlarge this image Click to see fullsize

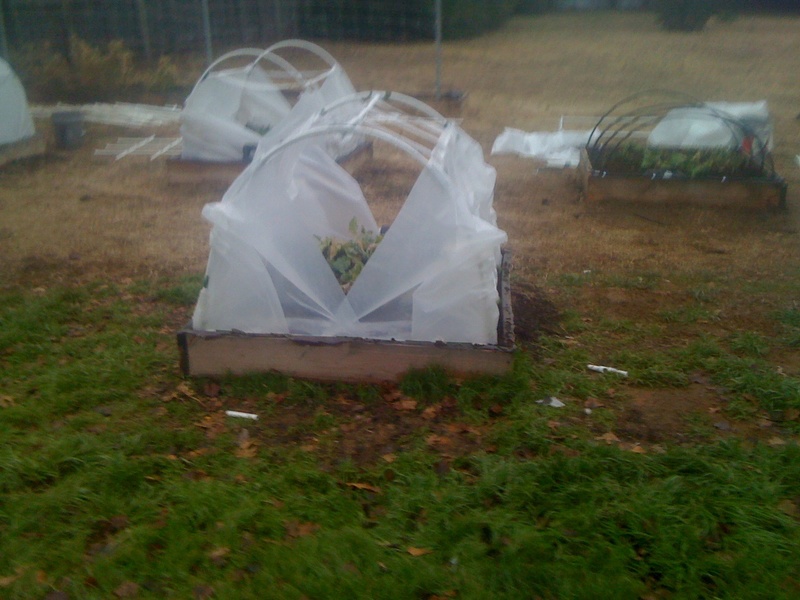
I used lowes plastic, but you can't see anything. Plus it cheap, last one season. they sell it as clear, but it opaque. I like to see the food as I walked toward it or from a distance. Co I ordered from agriculture solution. great prices. https://www.agriculturesolutions.com/products/greenhouse-supplies/greenhouse-plastic
Enlarge this image Click to see fullsize
Enlarge this image Click to see fullsize
Enlarge this image Click to see fullsize
Enlarge this image Click to see fullsize

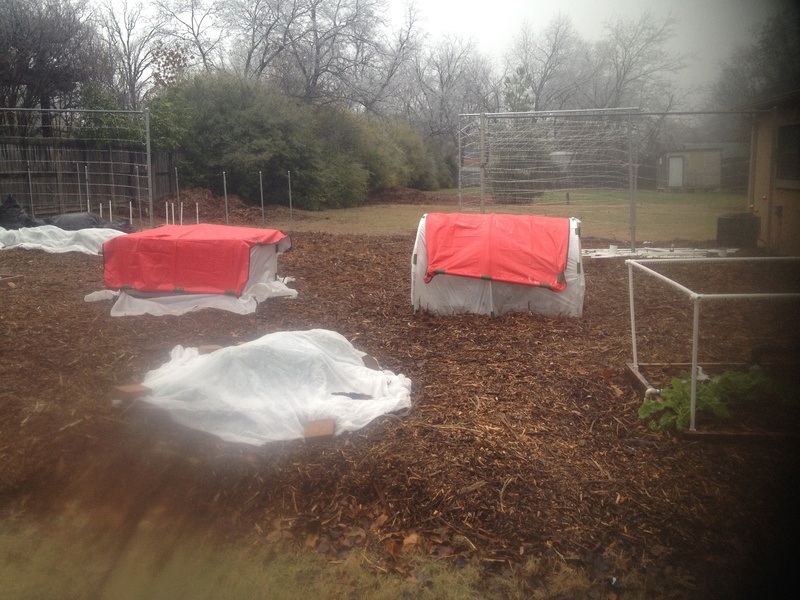
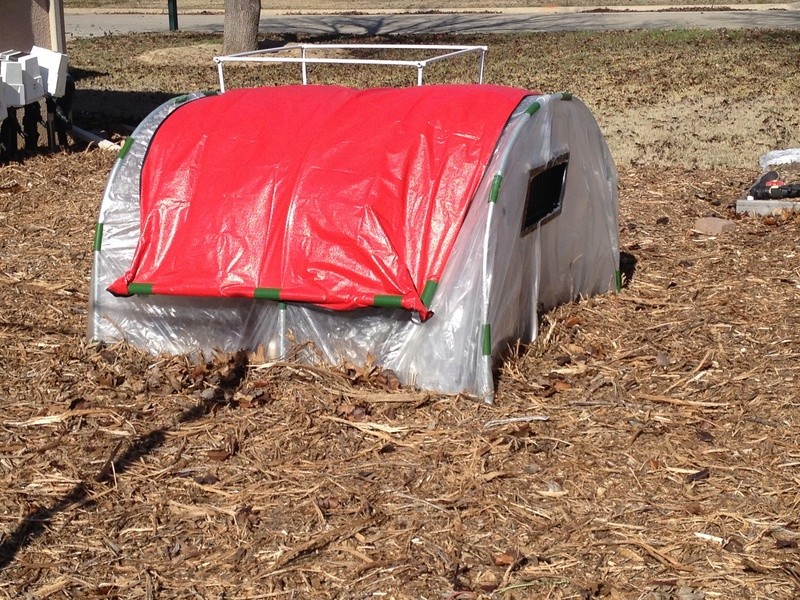
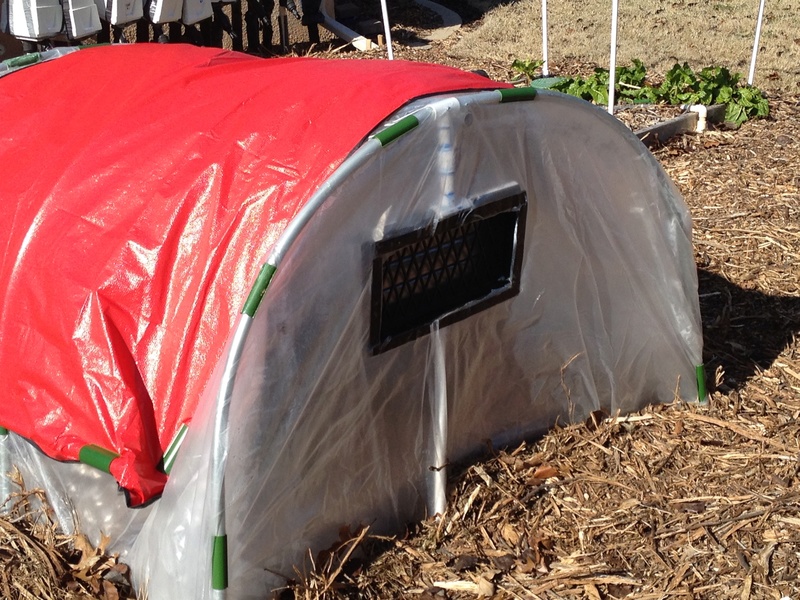
this was my best idea for winter protection. the square one was a waste of time because rain and snow tried to collapse it. But the round hoop house was a breeze to get in a get the food. I added automatic vent foundation opener to allowed the air to move out when hot and close when it drops below 55 degrees. http://www.allpestexpress.com/temp-vent-crawl-space-vents.aspx I was going to used lowes and home depot vents, but they had bad reviews. These have worked like a charm. You can get one piece or two piece assembly. I put a swing door on both sides for easy assessed to the food and then just close the door and go back into the house. I got the swing doors from here. it the same place I got the greenhouse and the hoop bender. I just got the door shorter to fit the low hoop house.
1 3/8" OD Angle Brace Adapter-this piece allows you to move in any direction. great iinvention- I used it on the hoop, then used a pole so I could attach the vents. http://www.buildmyowngreenhouse.com/138odanglebraceadapter4pack.aspx
Scissor Door Hinge & Latch-http://www.buildmyowngreenhouse.com/8pack1teeconnectorhooptobaserail-1-1-2.aspx
Space All-Weather Blanket-https://www.rei.com/product/407106/space-all-weather-blanket
Enlarge this image Click to see fullsize
Enlarge this image Click to see fullsize

Enlarge this image Click to see fullsize
Enlarge this image Click to see fullsize
Enlarge this image Click to see fullsize

Enlarge this image Click to see fullsize

Enlarge this image Click to see fullsize

a closer look at the vents used in the hoophouse and on my greenhouse.
Enlarge this image Click to see fullsize

Enlarge this image Click to see fullsize

Enlarge this image Click to see fullsize

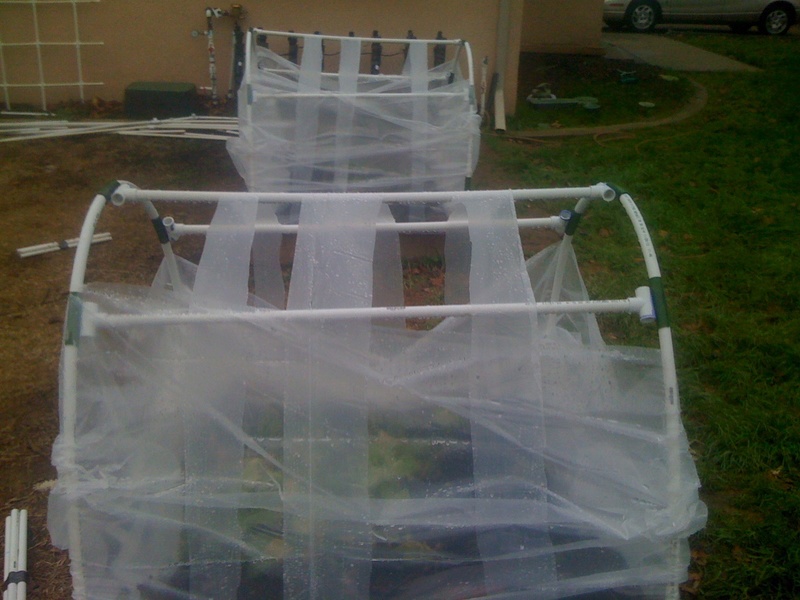
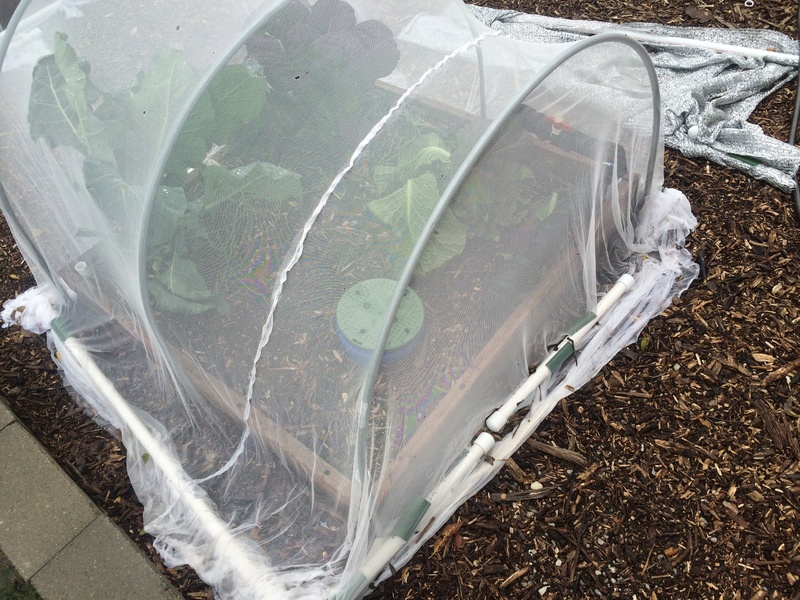
insect protection. purchased from Joann's fabric. got the idea from Jimmy Cee. it was a better idea, then the tulle the women suggested. used 1" PVC poles for weight. snap clamps to attached the poles to the fabric.. easy in and out
Enlarge this image Click to see fullsize

have to use short poles on two sides so it will collapse when you lift the long poles.
Enlarge this image Click to see fullsize
Enlarge this image Click to see fullsize

this is an example how the swing doors work. I adapted them for the low hoop house you saw earlier. you also see the top and bottom poles that support the foundation vent. the poles insert into that swing adapter brace I discussed in an earlier picture.
1 3/8" OD Angle Brace Adapter-this piece allows you to move in any direction. great invention i used it on hoop, then used a pole so i could attached the vents. http://www.buildmyowngreenhouse.com/138odanglebraceadapter4pack.aspx
Enlarge this image Click to see fullsize

Enlarge this image Click to see fullsize

another winter project it worked, but too much work. I also felt the PVC was stressing too much when the temp became cold. this is one reason I switched to EMT. it can take it and resolved so many issues.
Enlarge this image Click to see fullsize

Enlarge this image Click to see fullsize

Enlarge this image Click to see fullsize

Enlarge this image Click to see fullsize

Enlarge this image Click to see fullsize

below are some of my past experiments for spring, fall, winter and summer protection.
light winter blanket. it did well. allowed enough light. for a light freeze. Use snap clamps on 1"PVC pipe filled with gravel. this allowed easy assess to the food. Just lift, get food and put it back down. no dirt or wood plank to hold edges down. hoops work well with SFG beds. I switched from PVC hoops to electrical conduit hoops using a hoop bender. this will probably give me 20 yrs or more.
Enlarge this image Click to see fullsize

I was able to place the shade cloth in position to protect from the sun. PVC worked best here, cheap and used snap clamps. I love snap clamps.
Enlarge this image Click to see fullsize

Enlarge this image Click to see fullsize

used 5 way PVC coupler for flexibility
Enlarge this image Click to see fullsize

Enlarge this image Click to see fullsize

Enlarge this image Click to see fullsize

Enlarge this image Click to see fullsize

Aluminet shade cloth works the best. it actually lowers the temps besides protecting from intense sun rays
Enlarge this image Click to see fullsize

I stated low but found it was easier for me to raise the canopy for easy assess.
Enlarge this image Click to see fullsize

one of my first winter canopy for temps below27 degrees. I found the greens would freeze some at this temp, but would quickly that out during the day and have a sweeter taste. It worked, but I work 12 hrs night shift and would have to run out before going to work to raise the canopy. So I abandoned the idea. I got this idea from a Colorado experiment at some university. I learned a lot from them it sparked new ideas.
Enlarge this image Click to see fullsize

here's is aluminet shading with snap clamps. great stuff
Enlarge this image Click to see fullsize

I used lowes plastic, but you can't see anything. Plus it cheap, last one season. they sell it as clear, but it opaque. I like to see the food as I walked toward it or from a distance. Co I ordered from agriculture solution. great prices. https://www.agriculturesolutions.com/products/greenhouse-supplies/greenhouse-plastic
Enlarge this image Click to see fullsize

Enlarge this image Click to see fullsize

Enlarge this image Click to see fullsize

Enlarge this image Click to see fullsize

this was my best idea for winter protection. the square one was a waste of time because rain and snow tried to collapse it. But the round hoop house was a breeze to get in a get the food. I added automatic vent foundation opener to allowed the air to move out when hot and close when it drops below 55 degrees. http://www.allpestexpress.com/temp-vent-crawl-space-vents.aspx I was going to used lowes and home depot vents, but they had bad reviews. These have worked like a charm. You can get one piece or two piece assembly. I put a swing door on both sides for easy assessed to the food and then just close the door and go back into the house. I got the swing doors from here. it the same place I got the greenhouse and the hoop bender. I just got the door shorter to fit the low hoop house.
1 3/8" OD Angle Brace Adapter-this piece allows you to move in any direction. great iinvention- I used it on the hoop, then used a pole so I could attach the vents. http://www.buildmyowngreenhouse.com/138odanglebraceadapter4pack.aspx
Scissor Door Hinge & Latch-http://www.buildmyowngreenhouse.com/8pack1teeconnectorhooptobaserail-1-1-2.aspx
Low Tunnel Connector Kits-http://www.buildmyowngreenhouse.com/rc-lowtunnelbenders5399.aspx
the red body shelter for camping I got from a camping store. it actually should be two fo severe cold, but you don't have that issue. Space All-Weather Blanket-https://www.rei.com/product/407106/space-all-weather-blanket
Enlarge this image Click to see fullsize

Enlarge this image Click to see fullsize

Enlarge this image Click to see fullsize

Enlarge this image Click to see fullsize

Enlarge this image Click to see fullsize

Enlarge this image Click to see fullsize

Enlarge this image Click to see fullsize

a closer look at the vents used in the hoophouse and on my greenhouse.
Enlarge this image Click to see fullsize

Enlarge this image Click to see fullsize

Enlarge this image Click to see fullsize

insect protection. purchased from Joann's fabric. got the idea from Jimmy Cee. it was a better idea, then the tulle the women suggested. used 1" PVC poles for weight. snap clamps to attached the poles to the fabric.. easy in and out
Enlarge this image Click to see fullsize

have to use short poles on two sides so it will collapse when you lift the long poles.
Enlarge this image Click to see fullsize

Enlarge this image Click to see fullsize

this is an example how the swing doors work. I adapted them for the low hoop house you saw earlier. you also see the top and bottom poles that support the foundation vent. the poles insert into that swing adapter brace I discussed in an earlier picture.
1 3/8" OD Angle Brace Adapter-this piece allows you to move in any direction. great invention i used it on hoop, then used a pole so i could attached the vents. http://www.buildmyowngreenhouse.com/138odanglebraceadapter4pack.aspx
Enlarge this image Click to see fullsize

Enlarge this image Click to see fullsize

another winter project it worked, but too much work. I also felt the PVC was stressing too much when the temp became cold. this is one reason I switched to EMT. it can take it and resolved so many issues.
Enlarge this image Click to see fullsize

Enlarge this image Click to see fullsize

Enlarge this image Click to see fullsize

Enlarge this image Click to see fullsize

Enlarge this image Click to see fullsize


has55- Posts : 2345
Join date : 2012-05-10
Location : Denton, tx
 Re: The Winter Journey and greenhouse plastic
I read through the whole narrative of your journey. One thing stood out for me personally. I started with square tops and the rain just collected and wouldn't shed. You turned to hoops and I turned to gable roofs. 
 Re: The Winter Journey and greenhouse plastic
You're right.sanderson wrote:I read through the whole narrative of your journey. One thing stood out for me personally. I started with square tops and the rain just collected and wouldn't shed. You turned to hoops and I turned to gable roofs.


has55- Posts : 2345
Join date : 2012-05-10
Location : Denton, tx
 Re: The Winter Journey and greenhouse plastic
Thanks for sharing this, especially the photos!
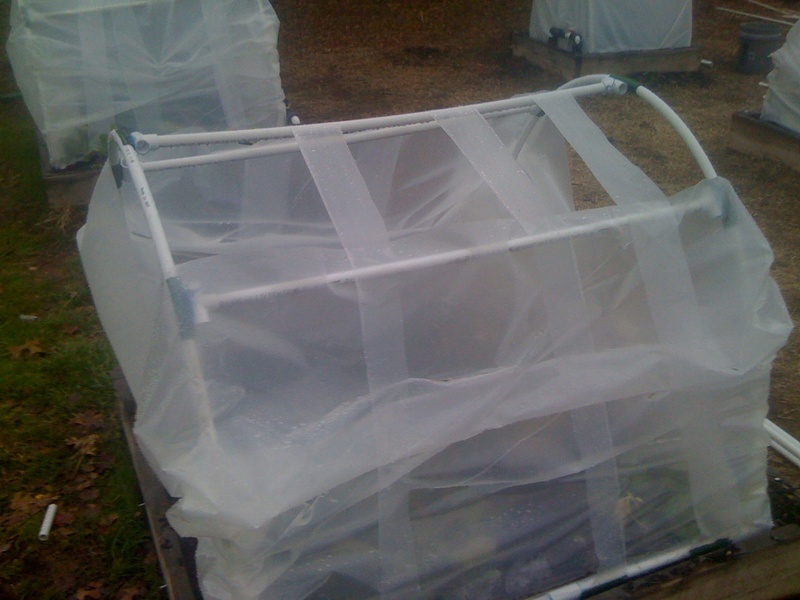
I have a question. I see you have T-connectors attached to the cross pieces that go between the hoops, but the hoops don't go through the other part of the T. Instead there is something dark colored that the hoop is through and that is affixed(?) to the T-connector? What am I seeing?
I have a question. I see you have T-connectors attached to the cross pieces that go between the hoops, but the hoops don't go through the other part of the T. Instead there is something dark colored that the hoop is through and that is affixed(?) to the T-connector? What am I seeing?
BeetlesPerSqFt-
 Posts : 1433
Join date : 2016-04-11
Location : Centre Hall, PA Zone 5b/6a LF:5/11-FF:10/10
 Re: The Winter Journey and greenhouse plastic
BeetlesPerSqFt wrote:Thanks for sharing this, especially the photos!
I have a question. I see you have T-connectors attached to the cross pieces that go between the hoops, but the hoops don't go through the other part of the T. Instead there is something dark colored that the hoop is through and that is affixed(?) to the T-connector? What am I seeing?
BPSF, are you looking at the last picture? If so, a snap clamp that is glued to the T-connector. I used Christy red hot blue PVC glue Christy's 8-fl oz PVC Cement . So many things you can do with snap clamps.
if I had to do this type of hoop house again, I would use all EMT, sat it within the wood border and latch it to prevent the wind from pushing it. I would get my slip thru T connectors and other parts from build my own green house. It would cost more than PVC, but eliminate a lot of stressor when the wind, ice and snow comes. easy in and out. I would also put PVC pipe in the ground and attached a short legs to the sides or front and back of the bottom to help keep the hoop in the bed. I had to be careful on windy days when I lifted it up, but otherwise it work. EMT won't be bother by the weather. the automatic vents are necessary need for me. automatic venting, so I would not have to run out to open the hoop house to prevent overheating and to close it to prevent freezing.
in the end my favorite is the swing door version, even though I had to bend down to harvest the food. picture 18-19

has55- Posts : 2345
Join date : 2012-05-10
Location : Denton, tx
Page 14 of 15 •  1 ... 8 ... 13, 14, 15
 Similar topics
» The Winter Journey: winter planting, ventilation vents and 0 degrees effect on cool weather plants in no heat greenhouse
» Duct tape on greenhouse plastic
» seeds started in plastic greenhouse zone 8a
» The SFG Journey-Portable Greenhouse
» has55's R & D Journey
» Duct tape on greenhouse plastic
» seeds started in plastic greenhouse zone 8a
» The SFG Journey-Portable Greenhouse
» has55's R & D Journey
Page 14 of 15
Permissions in this forum:
You cannot reply to topics in this forum


