


by markqz Yesterday at 8:26 pm
» Happy Thanksgiving from the USA
by OhioGardener Yesterday at 7:12 pm
» N & C Midwest: Nov. Dec. 2024
by OhioGardener 11/26/2024, 4:08 pm
» Catalog season has begun!
by cyclonegardener 11/26/2024, 9:12 am
» Happy Birthday!!
by Scorpio Rising 11/25/2024, 7:21 am
» Butterbaby Hybrid Squash (Butternut)
by Scorpio Rising 11/24/2024, 8:19 pm
» Indoor Lighting for Kitchen Herbs & Lettuce
by OhioGardener 11/22/2024, 6:58 pm
» Interesting Marketing for Compost
by OhioGardener 11/21/2024, 7:29 pm
» How does green turn to brown?
by OhioGardener 11/21/2024, 4:58 pm
» Ohio Gardener's Greenhouse
by OhioGardener 11/21/2024, 12:16 pm
» Tree roots, yeeessss.....
by sanderson 11/20/2024, 2:21 am
» The SFG Journey-Biowash
by has55 11/19/2024, 7:37 pm
» What are you eating from your garden today?
by OhioGardener 11/19/2024, 8:27 am
» Cooked worms?
by KiwiSFGnewbie 11/19/2024, 1:04 am
» New SFG gardener in Auckland
by KiwiSFGnewbie 11/16/2024, 11:25 pm
» Kiwi's SFG Adventure
by KiwiSFGnewbie 11/12/2024, 7:10 pm
» Thanksgiving Cactus
by OhioGardener 11/12/2024, 5:40 pm
» Need Garden Layout Feedback
by markqz 11/9/2024, 9:16 pm
» Thai Basil
by Scorpio Rising 11/8/2024, 8:52 pm
» How best to keep a fallow SFG bed
by KiwiSFGnewbie 11/8/2024, 8:11 pm
» Preserving A Bumper Tomato Harvest with Freezing vs Canning
by plantoid 11/7/2024, 11:36 am
» What Have You Picked From Your Garden Today
by OhioGardener 11/5/2024, 2:29 pm
» Greetings from Southeastern Wisconsin
by sanderson 11/5/2024, 2:01 pm
» Spinning Compost Bin-need some ideas
by rtfm 11/2/2024, 7:49 pm
» Growing fruit trees in Auckland
by OhioGardener 10/31/2024, 4:23 pm
» Vermiculite -- shipping sale through 10/31/2024
by markqz 10/30/2024, 2:27 pm
» N & C Midwest: October 2024
by Scorpio Rising 10/30/2024, 10:38 am
» Old Mulch and Closing Beds for Winter
by sanderson 10/26/2024, 11:00 pm
» Hello from Land of Umpqua, Oregon Zone 8b
by sanderson 10/25/2024, 3:14 pm
» Hello everyone!
by SFGHQSTAFF 10/24/2024, 3:22 pm
Soil Blocks: Tutorial In Photos
Page 1 of 2 • 1, 2 ![]()

Soil Blocks: Tutorial In Photos
![]() quiltbea 3/31/2012, 2:04 pm
quiltbea 3/31/2012, 2:04 pm
Enlarge this imageReduce this image Click to see fullsize
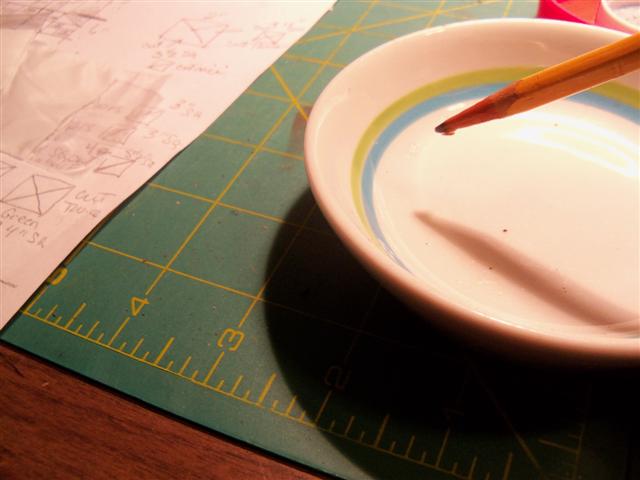
01. Put some soil mixture into a waterproof container. (Note: I bought a kitty pan for the purpose. Its the right size and sturdy). You can buy the mixture already made from johnnyseeds.com (512 Soil Mixture) or make your own:
3 Qts Peat Moss, 2 Tablespoons Greensand, 2 Tablespoons Phosphate Rock, 2 Tablespoons Bloodmeal. Mix together well. Then add: 1 Qt Perlite, 3 Qts Compost. Mix together and use this for your soil block starting soil.
Enlarge this imageReduce this image Click to see fullsize

02. With some soil mixture in the container, add 1 or 2 cupsful of water. Check the consistency of the mixture. Keep adding water til it holds together and is the consistency of wet oatmeal.
Enlarge this imageReduce this image Click to see fullsize
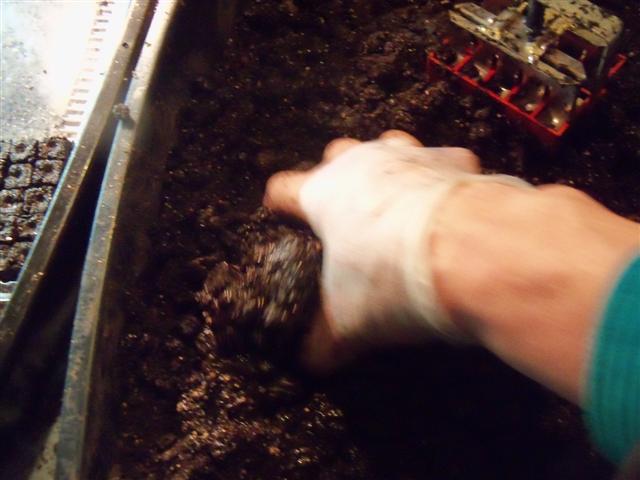
03. Press the soil blocker deep into the mixture. Do this a couple of times to be sure the holes are all filled.
Enlarge this imageReduce this image Click to see fullsize

04. If all the holes are filled well, scrape the bottom off evenly. I use an old butter knife for the purpose. You want the bottom smooth so the blocks don't tip over.
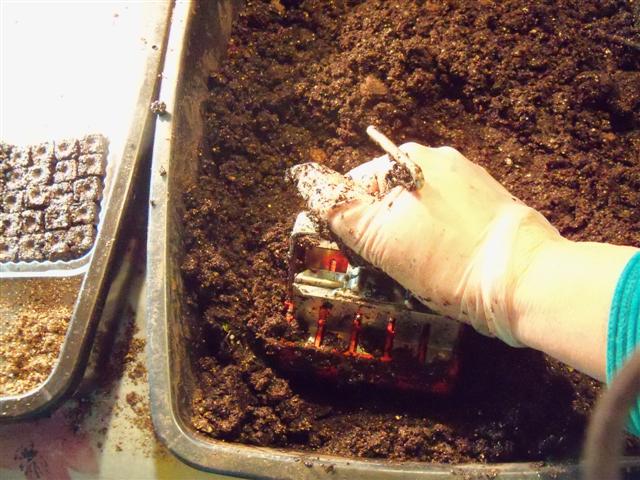
Enlarge this imageReduce this image Click to see fullsize
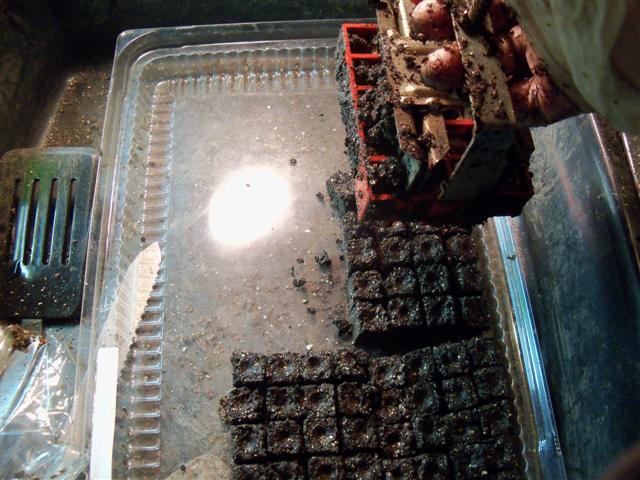
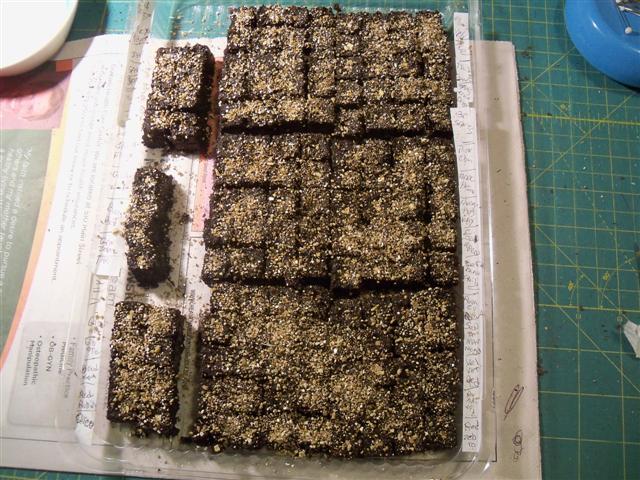
05. Release the blocks onto a waterproof tray of some sort. The blocks will all have a little hollow in their centers to receive a seed.
Enlarge this imageReduce this image Click to see fullsize
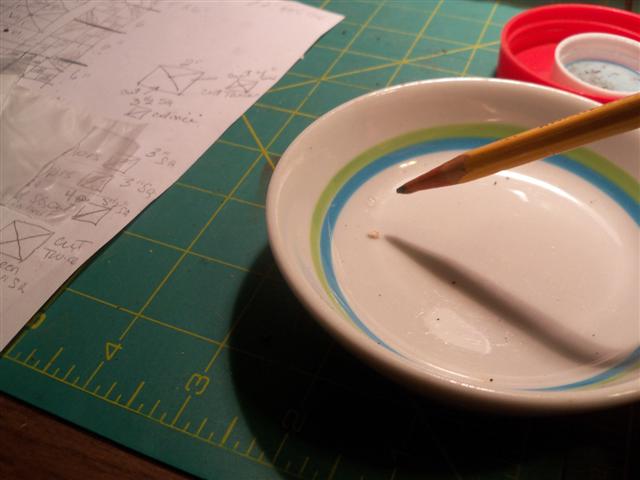
06. You want to place only ONE seed in the center of each block. I use a pencil as my lifter. Wet the tip of the pencil.
Enlarge this imageReduce this image Click to see fullsize
07. Touch the seed with the wet tip and it will adhere. Drop the seed in the middle of the mini-block.
Enlarge this imageReduce this image Click to see fullsize

08. Place only ONE seed in each block.
Enlarge this imageReduce this image Click to see fullsize
09. Make sure you label your seeds in some manner. I stick tape along the side of the base tray so I know what I've sown. When all the seed blocks are filled, cover with a thin layer of fine vermiculite. This is lightweight so the seeds can germinate more easily than if covered with soil. It also may help prevent damping off.
Enlarge this imageReduce this image Click to see fullsize

10. Spritz your seed blocks lightly with water. You want them to remain moist in order to germinate. I often use a very weak green tea water to spritz mine. It may also help prevent damping off.
Green Tea water: Make yourself a cup of green tea and enjoy it. Take the used tea bag and drag it back and forth thru another cup of room-temperature water til it just starts to turn color a little. Fill a spritz bottle with the resulting weak tea.
Enlarge this imageReduce this image Click to see fullsize
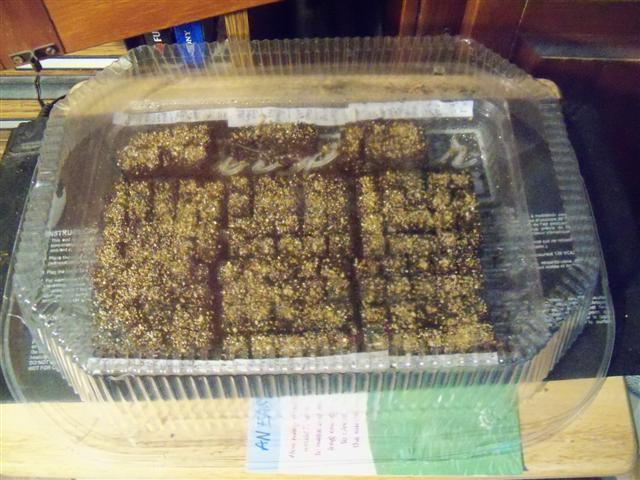
11. Cover the soil blocks with a dome or plastic wrap so the seeds stay moist and warm. I put mine on a heat mat but you can also put the tray on top of the refrigerator or atop a water heater for that needed additional heat. Except for lettuce and some flowers seeds, the seeds do NOT need light to germinate nor will they germinate if the soil gets dry so check every day to be sure the tops are moist. Spritz them with water as needed.
Once they germinate, they can be immediately removed to place under the lights. You do NOT have to wait for them all to germinate. Just remove each individual soil block with your fingers or a pair of tweezers, being sure you make a new label for it. Place it under the lights with the top of the plant about 2" from the light itself. Leave the lights on 16 hours a day. Water from the bottom.
You can transplant the mini blocks to 2" midi soil blocks in the next few days.

quiltbea-
 Posts : 4707
Join date : 2010-03-21
Age : 82
Location : Southwestern Maine Zone 5A
Re: Soil Blocks: Tutorial In Photos
![]() RoOsTeR 3/31/2012, 3:04 pm
RoOsTeR 3/31/2012, 3:04 pm

I am my gardens worst enemy.

RoOsTeR-
 Posts : 4299
Join date : 2011-10-04
Location : Colorado Front Range
Re: Soil Blocks: Tutorial In Photos
![]() AvaDGardner 3/31/2012, 3:54 pm
AvaDGardner 3/31/2012, 3:54 pm
What does the green tea water do after you've put on the regular water? Antioxidants?
There's a form that you buy for making the squares?
LOVE the wet pencil tip. It's amazing how even short fingernails get in the way of nabbing one or two tiny seeds.
Ava

AvaDGardner- Posts : 634
Join date : 2012-02-17
Location : Garden Grove, CA (still Zone 10b)
Re: Soil Blocks: Tutorial In Photos
![]() quiltbea 3/31/2012, 8:31 pm
quiltbea 3/31/2012, 8:31 pm

I think the green tea may have bacteria that foils the damping off fungus so I use it. It doesn't hurt, that's for sure.
quiltbea- Posts : 4707
Join date : 2010-03-21
Age : 82
Location : Southwestern Maine Zone 5A
Re: Soil Blocks: Tutorial In Photos
![]() CindiLou 4/26/2012, 7:50 pm
CindiLou 4/26/2012, 7:50 pm
20 impatiens (may need more of these. I love them.)
20 salvia (Sunset - bright red)
20 dianthus (pinks are my favorite right now)

I got the 2" blocker also so I can up pot when ready.
It was very easy to use...after some soil adjusting.
First it was too wet then too dry...then is was juuuusst right

CindiLou- Posts : 998
Join date : 2010-08-30
Age : 65
Location : South Central Iowa, Zone 5a (20mi dia area in 5b zone)rofl...
Re: Soil Blocks: Tutorial In Photos
![]() llama momma 4/27/2012, 5:49 am
llama momma 4/27/2012, 5:49 am
Does the following sound right?
- 3/4" and 2" soil blockers are about 30 dollars each
- heat mat is about 50 dollars(?)
- plus initial outlay of soil mix ingredients ??
- trays look like pretty inexpensive plastic cake thingy's.
Would 140 dollars be a good rough estimate?
I'm spending nearly that much every year on flats of annuals and supplies for the flower garden. In addition, if I used this method for starting all my veggies too, the savings is making me dizzy!

llama momma
Certified SFG Instructor- Posts : 4914
Join date : 2010-08-20
Location : Central Ohio zone 6a
Re: Soil Blocks: Tutorial In Photos
![]() quiltbea 4/27/2012, 10:46 am
quiltbea 4/27/2012, 10:46 am
Leak-proof trays are 5 for $14.95. I like to double them because they aren't the strongest things in the world. I also like to use them specifically because two side-by side fill the length of a light so that's approx $30. That makes me one pair short so I use an old seedling tray (bought by mistake one year but I've found they make terrific starting boxes outside for lettuces) inside 2 of the leak-proofs to make the leak-proofs sturdier. Got these all from Johnny's. Note: I used cat litter trays the first year from the Family Dollar Store for $2 each. They worked very well but I wanted to get the longer, slimmer trays in which the blocks fit so much nicer and bottom-watering works so well. Now I use the litter trays for transporting seedlings to the comm garden and hardening off some of the bigger pots so it was a good investment. Cost here is: approx $30 for 10 leak-proof trays.
My heating mat is 10" by 20" and cost around $30 a few years ago. Got it online. I use old cake containers with lids for my domed starting units on the heat mat so they cost me nothing.
The 2 Blockers are $25 and $30 and the insert kit to make the little square in the middle of the midi blocker is $7.95, also from Johnny's. Cost approx $63.
I bought my 512 Soil mix the first year and it is $12.95 for 20-qt bag and that handled all my seedlings and then some for the community garden. Johnny's. Cost $13 plus extra postage which is either $10 or $16 depending on distance. Up to $29.
Total around $152 plus regular postage.
You never have to buy starting kits or pots aagain. Cut soda bottles in half or use used soda-cups for the larger plants. You can use the soda bottles year after year after a good cleaning.
Usually when one starts seeds on the heat mat or in the window in the cells, one has to wait for most of the seeds to germinate but when some are getting quite tall, you really need to get them all under the lights. Some seeds may not have germinated by then. I have several varieties on the mat that germinate at different rates. With this method, you just lift the individual 3/4" block from the heat mat unit and put it under the lights. I wait a couple days to up-pot it to the 2" block. I like to have several before I mix up a soil batch and get my hands down and dirty.
I also found that allowing the tiny sprout to stretch up straight and about an inch or more tall while on the heat mat works wonders for its health. I think the extra heat from the heat mat does wonders for the tiny thing. It doesn't mind the change to the cooler conditions if its got its first burst of energy. That's when I place it under the lights and allow it to stretch out its leaves and if roots begin to show, I up-pot to the 2 incher. Just a personal observation.
quiltbea- Posts : 4707
Join date : 2010-03-21
Age : 82
Location : Southwestern Maine Zone 5A
Re: Soil Blocks: Tutorial In Photos
![]() UnderTheBlackWalnut 4/27/2012, 11:08 am
UnderTheBlackWalnut 4/27/2012, 11:08 am
Here is what I purchased:
http://www.menards.com/main/outdoor/storage-buildings/greenhouses/10x20-propagation-heating-mat/p-1730057.htm
They also had trays and lids marked down as well....
UnderTheBlackWalnut- Posts : 556
Join date : 2011-04-18
Age : 58
Location : Springfield (central), IL, on the line between 5b and 6a
Re: Soil Blocks: Tutorial In Photos
![]() llama momma 4/27/2012, 1:49 pm
llama momma 4/27/2012, 1:49 pm

llama momma
Certified SFG Instructor- Posts : 4914
Join date : 2010-08-20
Location : Central Ohio zone 6a
Re: Soil Blocks: Tutorial In Photos
![]() CindiLou 4/27/2012, 2:02 pm
CindiLou 4/27/2012, 2:02 pm
 It's always nice when you can tell them what to get you! Saves you from all the oh hum and yuck presents.
 Garden supplies always welcome!
CindiLou- Posts : 998
Join date : 2010-08-30
Age : 65
Location : South Central Iowa, Zone 5a (20mi dia area in 5b zone)rofl...
llama momma
Certified SFG Instructor- Posts : 4914
Join date : 2010-08-20
Location : Central Ohio zone 6a
Re: Soil Blocks: Tutorial In Photos
![]() llama momma 4/28/2012, 7:11 am
llama momma 4/28/2012, 7:11 am
llama momma
Certified SFG Instructor- Posts : 4914
Join date : 2010-08-20
Location : Central Ohio zone 6a
Re: Soil Blocks: Tutorial In Photos
![]() quiltbea 4/28/2012, 11:04 am
quiltbea 4/28/2012, 11:04 am
quiltbea- Posts : 4707
Join date : 2010-03-21
Age : 82
Location : Southwestern Maine Zone 5A
Re: Soil Blocks: Tutorial In Photos
![]() RoOsTeR 4/28/2012, 11:08 am
RoOsTeR 4/28/2012, 11:08 am

I am my gardens worst enemy.
RoOsTeR- Posts : 4299
Join date : 2011-10-04
Location : Colorado Front Range
Re: Soil Blocks: Tutorial In Photos
![]() llama momma 4/28/2012, 11:09 am
llama momma 4/28/2012, 11:09 am
llama momma
Certified SFG Instructor- Posts : 4914
Join date : 2010-08-20
Location : Central Ohio zone 6a
Re: Soil Blocks: Tutorial In Photos
![]() llama momma 4/28/2012, 11:10 am
llama momma 4/28/2012, 11:10 am
RoOsTeR wrote:Hmm, I wonder if this works for Father's Day
Yes and tell Mrs. Rooster it would be a very fine gift indeed!
llama momma
Certified SFG Instructor- Posts : 4914
Join date : 2010-08-20
Location : Central Ohio zone 6a
Re: Soil Blocks: Tutorial In Photos
![]() quiltbea 4/28/2012, 6:21 pm
quiltbea 4/28/2012, 6:21 pm
quiltbea- Posts : 4707
Join date : 2010-03-21
Age : 82
Location : Southwestern Maine Zone 5A
Re: Soil Blocks: Tutorial In Photos
![]() llama momma 4/29/2012, 1:18 am
llama momma 4/29/2012, 1:18 am
I purchased 20 qts of Johnny's 512. Also copied Eliot Coleman's recipe. I'll make my own at some point but I hope greensand and phosphate rock are easy to come by and suppose they are found at garden centers or feed stores? I'm familiar with the other ingredients and/or have them on hand. Thank you so much for your help, Llama momma
llama momma
Certified SFG Instructor- Posts : 4914
Join date : 2010-08-20
Location : Central Ohio zone 6a
Re: Soil Blocks: Tutorial In Photos
![]() floyd1440 4/29/2012, 7:23 am
floyd1440 4/29/2012, 7:23 am
RoOsTeR wrote:Hmm, I wonder if this works for Father's Day
My very thought as well. You cannot go wrong with garden stuff and it my age I have all the crap I reallyy need so and extra shirt, which doesn't fit, or pants, shorts, etc. tends to lead to more trips to a shopping areana is not fun to me.
Now if it something I want, I usually just buy it and hassle is over. But the block makers are a great idea to simplify the seed starting process and Bea has done an OUTSTANDING:cheers: job in demonstarating how these work. IMHO Johnny's should use here video on their website to promote the block makers. She has a much more in depth tutorial which I have bookmarked for future use.
Now Johnny's also has gift cards; how can one go wrong there if you need garden supplies as I do! So my father's day wish list is;
1) 2 inch block maker
2) 3/4 inch block maker + inserts
3) One Reotemp guage
4) One moisture guage
@Bea............you mention making your own potting mix for making blocks so I have some medium grade vermiculite, would this be a suitable substitute for perilite in your formula?

floyd1440- Posts : 815
Join date : 2011-06-21
Age : 70
Location : Washington, Pa. Zone 6a
Re: Soil Blocks: Tutorial In Photos
![]() Turan 3/8/2013, 12:55 pm
Turan 3/8/2013, 12:55 pm
 so I thought it a good time to bump my favorite seed starting threads. I learned so much from this.

Turan- Posts : 2618
Join date : 2012-03-29
Location : Gallatin Valley, Montana, Intermountain zone 4
Re: Soil Blocks: Tutorial In Photos
![]() quiltbea 3/8/2013, 1:52 pm
quiltbea 3/8/2013, 1:52 pm
llama mamma.......Rock phosphate and greensand are readily available at any feed and grain store. I got mine at Blue Seal feed. I never checked Walmart, Lowe's and Home Depot but they may also have it.
quiltbea- Posts : 4707
Join date : 2010-03-21
Age : 82
Location : Southwestern Maine Zone 5A
Re: Soil Blocks: Tutorial In Photos
![]() Turan 4/5/2014, 2:55 pm
Turan 4/5/2014, 2:55 pm
This is my third year using soil blocks and I still like them better tha nthe alternatives.
Turan- Posts : 2618
Join date : 2012-03-29
Location : Gallatin Valley, Montana, Intermountain zone 4
Re: Soil Blocks: Tutorial In Photos
![]() llama momma 4/5/2014, 8:02 pm
llama momma 4/5/2014, 8:02 pm
To make the block come out cleaner I wet the inside of the blocker and used more pressure to pack in the mix. At times it still wasn't perfect, so I gently pressed more wet 'soil' on top.
llama momma
Certified SFG Instructor- Posts : 4914
Join date : 2010-08-20
Location : Central Ohio zone 6a
Re: Soil Blocks: Tutorial In Photos
![]() Turan 4/5/2014, 8:43 pm
Turan 4/5/2014, 8:43 pm
You know most seeds contain oils in them already. I do not see how this could of hurt anything.
Turan- Posts : 2618
Join date : 2012-03-29
Location : Gallatin Valley, Montana, Intermountain zone 4
Re: Soil Blocks: Tutorial In Photos
![]() llama momma 4/5/2014, 8:47 pm
llama momma 4/5/2014, 8:47 pm
llama momma
Certified SFG Instructor- Posts : 4914
Join date : 2010-08-20
Location : Central Ohio zone 6a
Page 1 of 2 • 1, 2 ![]()
» Soil blocks
» Seed Starting!!
» Part II: Up-potting soil blocks
» Mix for making soil blocks