Search
Latest topics
» What do I do with tomato plants?by SMEDLEY BUTLER Yesterday at 8:53 pm
» N & C Midwest—May 2024
by OhioGardener Yesterday at 7:14 pm
» Ohio Gardener's Greenhouse
by OhioGardener Yesterday at 7:02 pm
» What Have You Picked From Your Garden Today
by OhioGardener 5/17/2024, 4:09 pm
» Compost not hot
by OhioGardener 5/17/2024, 8:05 am
» First timer in Central Virginia (7b) - newly built beds 2024
by flossy21 5/16/2024, 5:34 pm
» Help me correct my mistakes for next year please
by SMEDLEY BUTLER 5/16/2024, 4:46 pm
» Cabbage worms
by sanderson 5/16/2024, 1:34 am
» Complicated mixed up bunny poop!
by plantoid 5/14/2024, 7:20 pm
» They don't call 'em garden BEDS for nothing.
by sanderson 5/12/2024, 2:34 am
» Spring Flowers
by OhioGardener 5/9/2024, 12:02 pm
» Birds of the Garden
by OhioGardener 5/7/2024, 8:26 pm
» Greetings from Southport NC
by sanderson 5/6/2024, 4:36 am
» In the news: Biosolids in Texas.
by sanderson 5/6/2024, 4:19 am
» Rhubarb Rhubarb
by Scorpio Rising 5/5/2024, 7:57 pm
» Mark's first SFG
by markqz 5/4/2024, 12:08 am
» question about the digital tools from the sfg site.
by OhioGardener 5/2/2024, 4:50 pm
» Assistance Needed: Sugar Snap Peas Yellowing and Wilting
by Scorpio Rising 5/1/2024, 8:24 pm
» OMG, GMO from an unexpected place.
by sanderson 5/1/2024, 1:57 am
» N & C Midwest: March and April 2024
by Scorpio Rising 4/29/2024, 1:30 pm
» Lovage, has anyone grown, or used
by OhioGardener 4/29/2024, 12:27 pm
» New to SFG in Arlington, Tx
by sanderson 4/26/2024, 3:13 pm
» Soil Blocks: Tutorial In Photos
by OhioGardener 4/25/2024, 5:20 pm
» Manure tea overwintered outside - is it safe to use?
by Mhpoole 4/24/2024, 7:08 pm
» Advice on my blend
by donnainzone5 4/24/2024, 12:13 pm
» Senseless Banter...
by OhioGardener 4/24/2024, 8:16 am
» Kiwi's SFG Adventure
by sanderson 4/22/2024, 2:07 pm
» Sacrificial Tomatoes
by SMEDLEY BUTLER 4/22/2024, 10:36 am
» From the Admin - 4th EDITION of All New Square Foot Gardening is in Progress
by sanderson 4/21/2024, 5:02 pm
» Happy Birthday!!
by AtlantaMarie 4/21/2024, 6:56 am
Google
Building a Table Top SFG...some ideas
+22
Goosegirl
recoush
kelhami
merelydicta
bnoles
plantoid
shannon1
janezee
UnderTheBlackWalnut
hankyknot
CarolynPhillips
AprilakaCCIL
LittleGardener
jerzyjen
Furbalsmom
new2this
IzzysMom
ander217
mckr3441
chocolatepop
Cross_stitcher
boffer
26 posters
Page 2 of 3
Page 2 of 3 •  1, 2, 3
 Re: Building a Table Top SFG...some ideas
Thanks for the sharing boffer!boffer wrote:I'm a big TT SFG fan. Here's a thread listing some of the reasons you might want to try one.
https://squarefoot.forumotion.com/general-sfg-talk-f5/tabletops-take-sfg-to-a-higher-level-t41.htm
This thread is about building a TT SFG.
In it's simplest form, a TT is a SFG bed sitting off the ground, at the height of your preference. Kitchen counters are typically 36 inches high, and that is the height of most of my beds. For beds 4x4 and smaller, the simplest solution is to attach a piece of 3/4 inch plywood, with a couple 1/4 inch drain holes in each square, to the bottom of your box, and set it on something. It could be something free or cheap like cinder blocks, an old cabinet, old roll around toolbox, sawhorses, a table, an upside down cart, a trailer frame, a couple chairs, a picnic table or benches, a metal garbage can, a barrel, or the edge of a deck that's the right height; I'm sure you can think of others. Perhaps you want to experiment one summer with one box to see if you like TT SFG. These would all work, with little investment, in case you didn't like it.
Here's some ideas for a more permanent set-up. Cinder blocks are stable and sturdy if you like the look. If you place 2 of the block legs longwise in one direction, and the other 2 legs turned 90 degrees, you will eliminate most of the wiggle in the table. Always place your blocks with the holes up; this is the position they are designed to carry weight in.
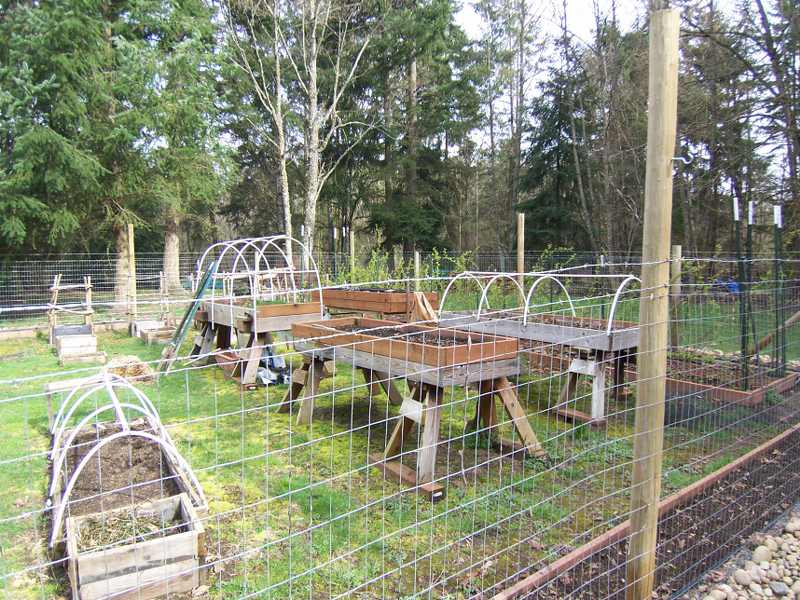
This is my neighbor's TT on saw horses. They are roughly 3x8. He spent a lot of time making quality saw horses, but now he is beginning to convert them to steel frames.
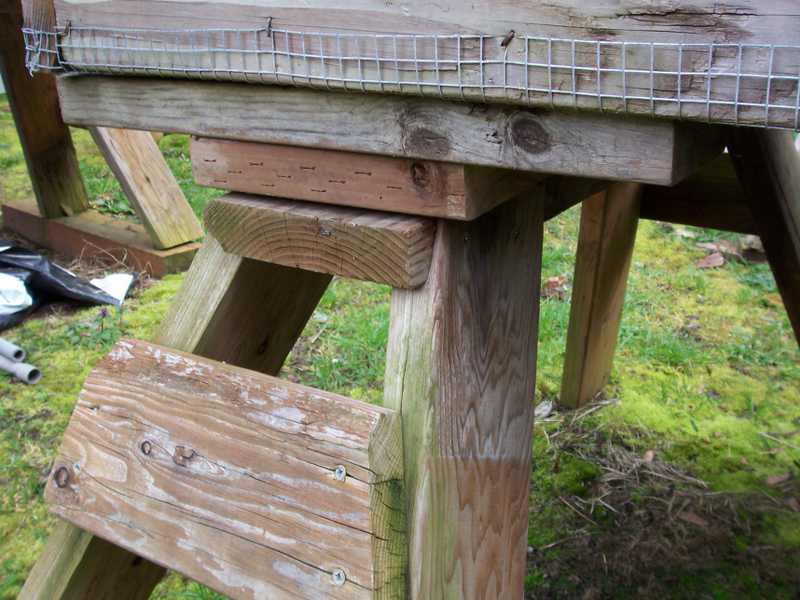
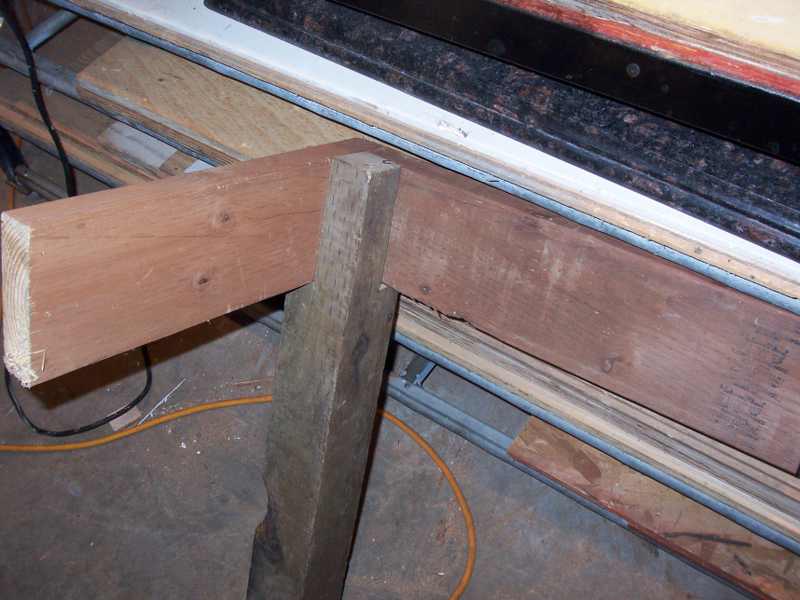
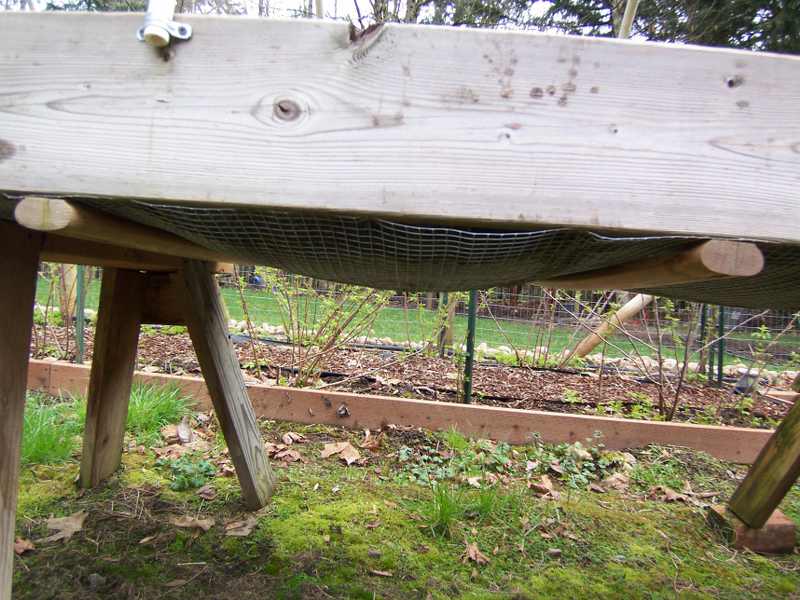
In the above picture, notice the the angle of the legs that create a large, stable footprint. In the picture below, the top of the leg has been notched to carry the load of the horizontal board. This is a technique that was perfected way back when carpenters wouldn't dream of buying a sawhorse. It's stable, solid, and doesn't wiggle. My neighbor did his the old school way-with hand tools. Notice the hardware cloth used for the bottom. More about that farther on.
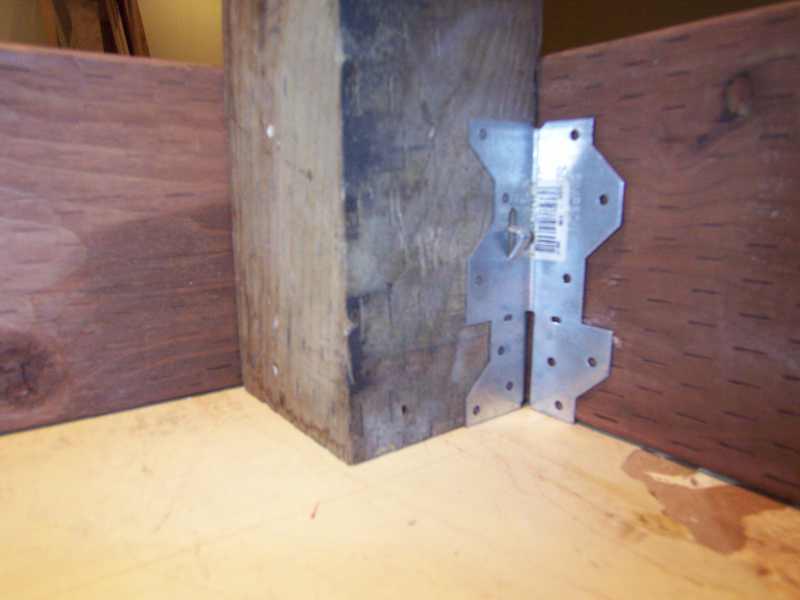
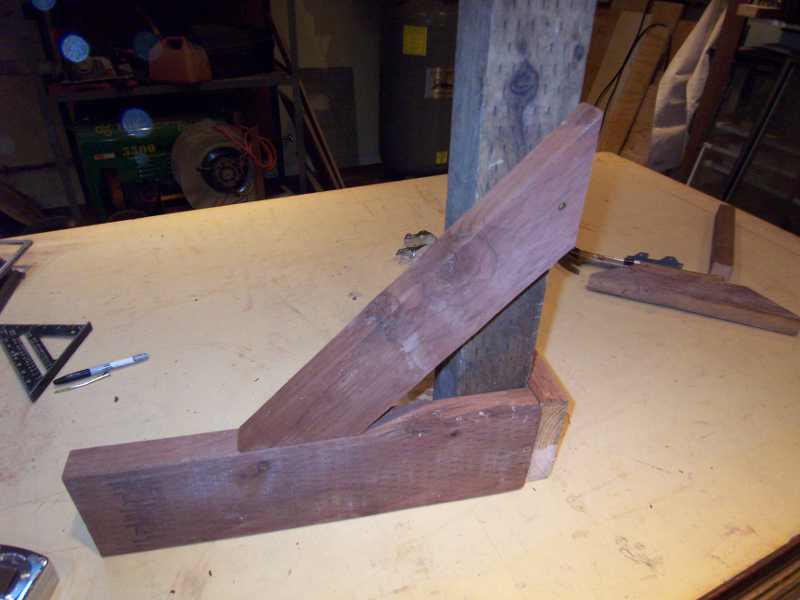
If saw horses don't strike your fancy, maybe using 4x4 posts for legs will. I have made TTs with 4x4 posts, but I don't have pictures of the finished product. I did take some pictures to show how to do it. Probably the simplest way is to use an angle hangar, available at your favorite hardware where all the other construction fasteners are located. You'll need eight, two per leg.
This box is upside down, with the leg sticking up in the air. I only had one angle hangar on hand for the picture, but each leg gets two. The hangars use special nails: 8d-10d, 11/4-11/2 inches long. You'll find them near where you found the hangars. Important: every nail hole in the hangar must be used (I think there's 12 per hangar). The weight of the SFG bed is under the max load of the hangar, but still, be safe, do it right.
The hangars will carry the weight OK, but they'll tend to wiggle. Put on knee braces. They look like this, 2 per leg.
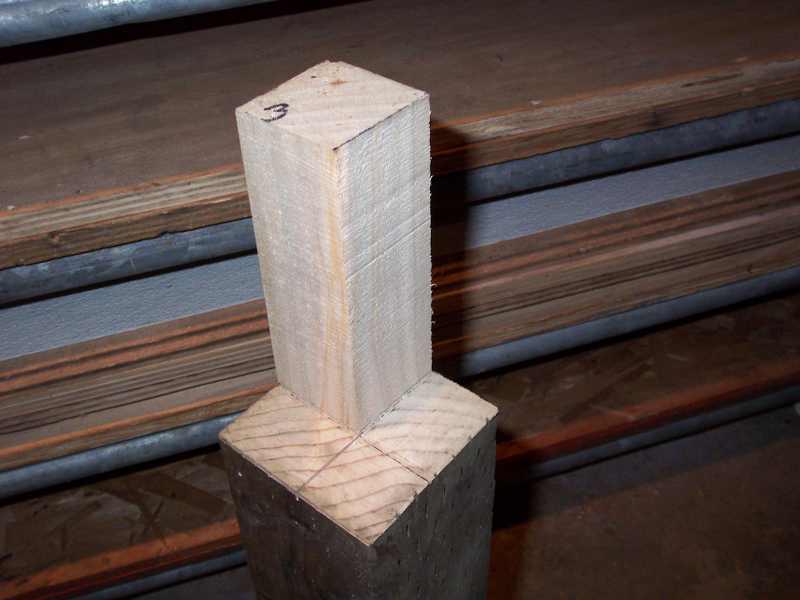
But, if you're handy with tools, hand or power, and you would enjoy the satisfaction of making something the old school way, cut corner tenons on your leg tops.
See how the weight of the box sits on top of the post; this way nails and screws aren't carrying the weight. Each corner should have knee braces on it. Another plus, the 4x4 takes up less space inside the box.
These two methods of attaching posts are simple to do, and I feel comfortable recommending them because I know they will hold the weight. rds1955 had mentioned to me the idea of using 4 inch pvc pipe for legs. Compression strength-wise they would work, but I haven't worked out attachment and fastening details that would be feasible for most everybody. I'd like to hear about your methods, if you've used other materials for legs.
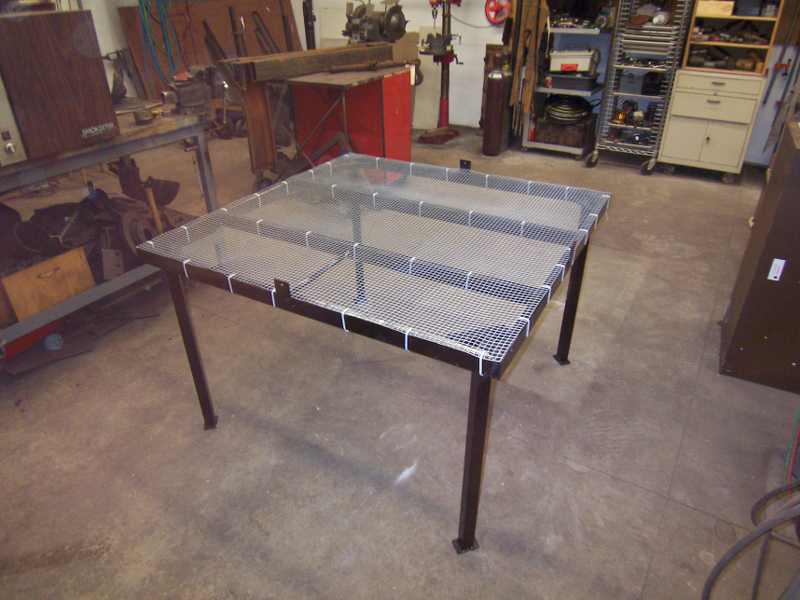
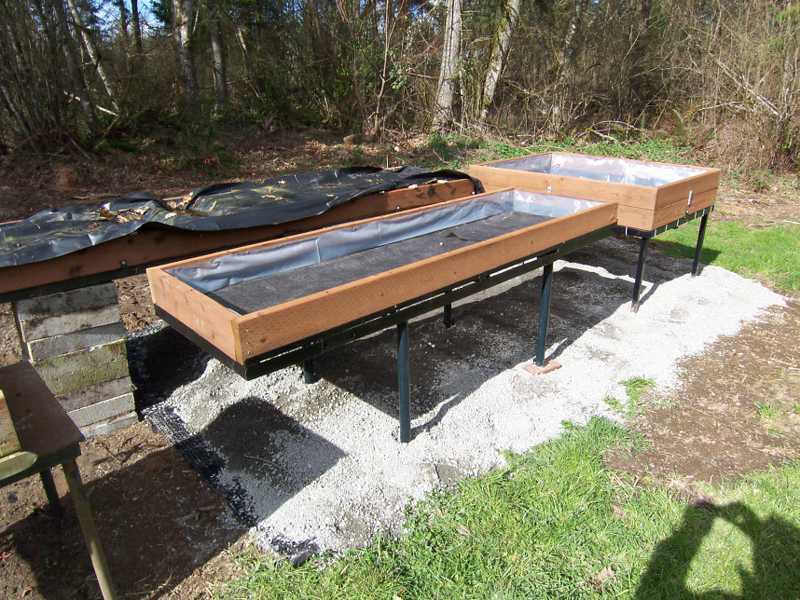
My last suggestion for TT legs is a steel frame table. Here's a sample:
Here it is with a box on it. I have plywood on this box because I'm using it for an experiment this summer. At the end of the season, I'll take the plywood off and just use the welded wire that I already put on the frame. (I'll lose the zip ties then, too)
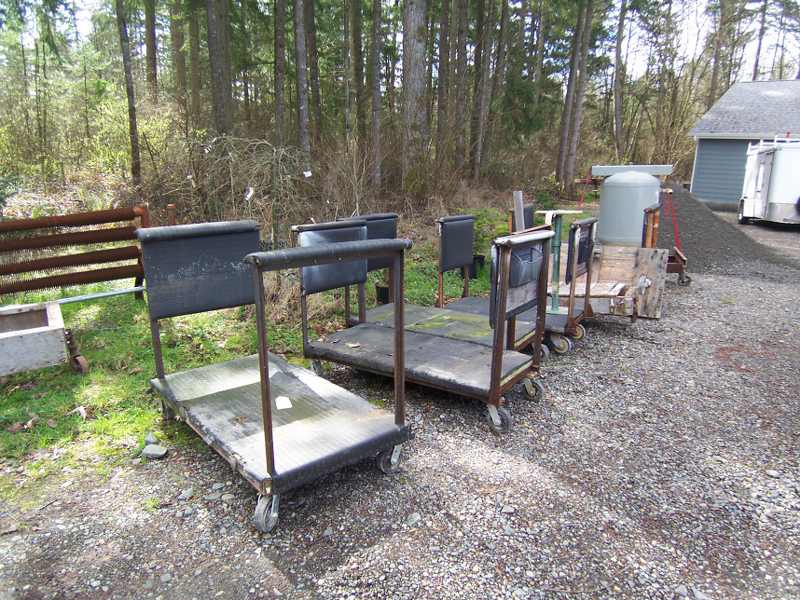
If you were to have one made, here's the cheapest way: use angle iron, 1 1/2 x 1 1/2 x 1/8 for the whole thing. Big ball park cost: 90 cents a foot for material, 1-2 hours of shoptime, depending on details. You could spend more for round or square legs, or you could you use pvc pipe as sleeves to cover the angle iron. Or you can keep your eyes open for stuff like one of these carts. It was a steal for a buck each. I figure one hour to strip it, flip it, remove the casters, and paint it. I could leave the casters on it, but I don't have any concrete in my SFG area.
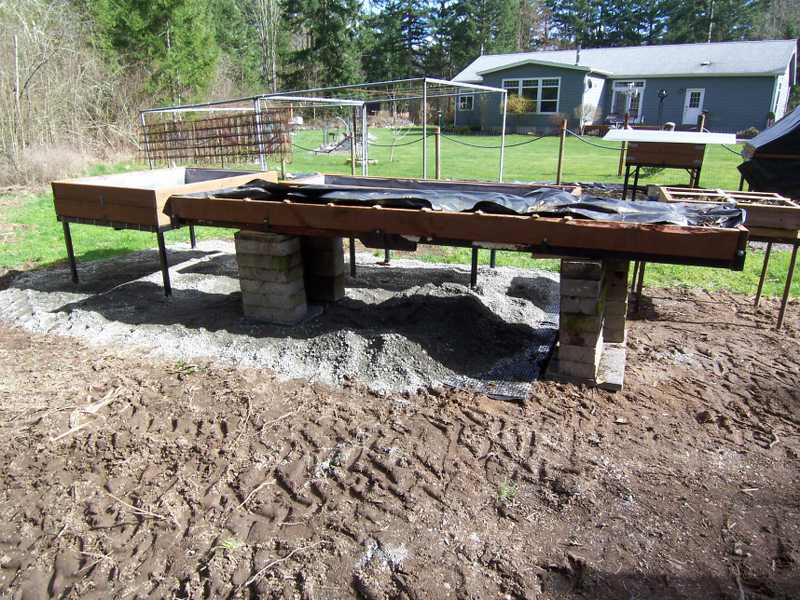
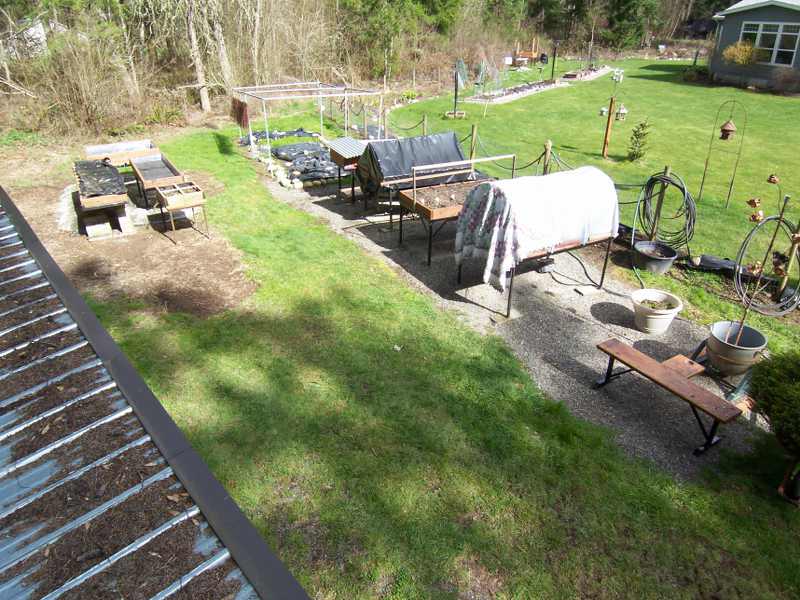
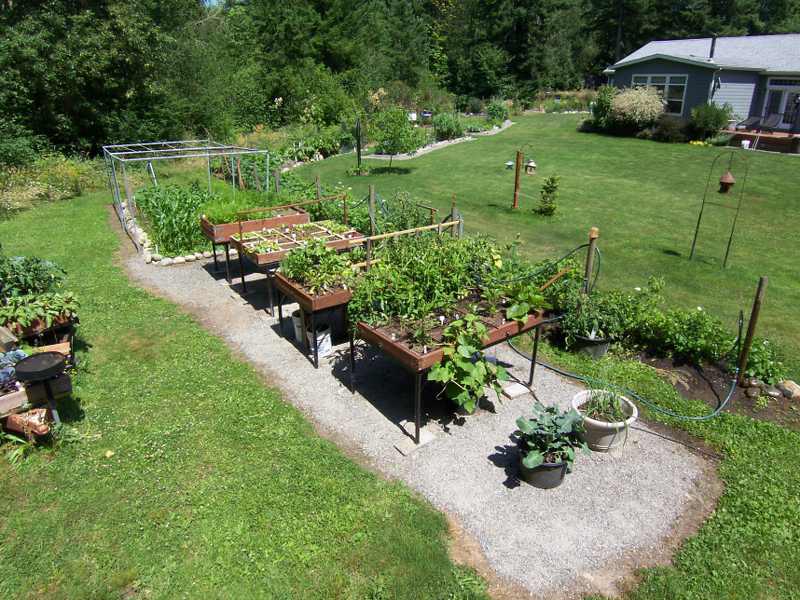
Here's some of my steel framed TTs. I'm trying to get them consolidated this year so I can put up deer fencing. Table sizes are all different, based strictly on what materials I had available when it was time to make a box. TT's can be spaced closer together than beds on the ground.
TT SFG bottoms: Plywood vs. hardware cloth
I've heard a number of folks say they've had plywood bottoms on their TTs for over 5 years, and I believe them. But in my climate, it would never happen. That's why I use hardware cloth for my bottoms. All my boxes are made of pressure treated 2x's lined with 6 mil plastic.
Folks with plywood bottoms also say their boxes warm up just as quickly as their boxes on the ground. I would say my hardware cloth bottoms warm up a little slower. Maybe 7-10 days. For my gardening practices, it's irrelevant.
Don't try to save money using chicken wire. It won't work. Hardware cloth can be attached with screws with washers, nails bent over, wire fence staples, or ?. I space mine every 5 inches or so.
For a 6 inch tall box I recommend putting in 3 bottom supports on 12 inch centers, using 2x2s. If the box is taller, you could use 2x4s on 16 inch centers. I mount mine inside the box using 2x4 hangars. The hangar comes with nail holes for 2x4s. You'll have to drill a hole where marked for 2x2s. With a little patience, all the fasteners can be hidden on the inside of the box. Be sure to fasten to the bottom supports, too.
I waited till my neighbor was at church so I didn't have to tell him I needed some 'what not to do pictures". Here he used old hand railing which is OK. But, the spacing is way too wide, and it's secured with one screw. Nails and screws aren't intended to carry weight like this. If you put your supports inside the box, there's no visible sag.
Here's an old bed frame. The springs offer enough support to use chicken wire..
For TT beds bigger than 4x4, you're on your own. A 4x8 bed holds over half a yard, and when the soil is saturated-we're starting to talk about some serious weight. Personally, for a 4x8 bed I would increase the size of the boards. So unless you have free/cheap wood on hand, two 4x4s are probably cheaper and easier to build than a 4x8.
These are just some ideas to get you going. If you have suggestions that have worked for you, please post them.
This is such a great resource to me!

merelydicta-
 Posts : 49
Join date : 2013-08-07
Location : Singapore
 I bought supplies based on this plan, then forgot what I was doing. HELP!
Ok, so last year, Id planned to make four 4x4 boxes. They werent going to be table top, per say, but I wanted them slightly elevated on cinder blocks, so that, in case we move, the bottoms would still be in good condition (not rotted or whatnot). Not even sure if that makes sense. For some reason I cant remember exactly what I was planning/how I was gonna put this together. Can someone help me please?
16 2x4's (4' long, 2" thick): Outer frames of SFGs
12 1x4's (4' long, 1" thick) : Bottom supports of SFGs
1 roll of thick clear plastic (I assume this and the next 3 are for the bottom, not sure what order to put them in. Also, did I buy the plastic to line the entire inside of the boxes or...?)
1 roll of welded fencing: see above
1 roll of weed blocker material: see above
1 bundle lathes/sticks: Grid over box
1 box wooden deck screws (to assembled the boxes?)
1 box poultry net staples (for the fencing on the bottom of the box?)
1 box small nails (to nail the laths to frame?)
several small bags of machine screws with washers (to screw the laths together?)
I think the main things confusing me is the bottom... if the plastic, fencing, weed blocker, and wood supports are all for the bottom, what order do they go in and how am I attaching it all? And since I didnt buy cinder blocks, maybe I wasnt going to do them??? I dunno. Very confused, but need to get this project finished today.
Im thinking:
TOP OF BOX
plastic (along inside of box also?)
weed blocker (this seems out of place, not sure why I have this, maybe something to do with blocking the drainage holes through the plastic so the dirt doesnt fall out?)
fencing
wood supports
BOTTOM OF BOX
Advice is appreciated.

kelhami- Posts : 8
Join date : 2013-05-01
Location : Wichita, KS
 Re: Building a Table Top SFG...some ideas
Boffer,
Excellent article thank you, also thank you for telling me how to search for this
as Table Tops
Also excellent about the weight of the material (sagging) all excellent suggestions
Cheers to you

Excellent article thank you, also thank you for telling me how to search for this
as Table Tops
Also excellent about the weight of the material (sagging) all excellent suggestions
Cheers to you


recoush-
 Posts : 105
Join date : 2014-03-01
Location : United States, Illinois, zone 5
 Re: Building a Table Top SFG...some ideas
Excellent How-To pics Boffer!
GG
GG

Goosegirl-
 Posts : 3435
Join date : 2011-02-16
Age : 59
Location : Zone 4A - NE SD
 Re: Building a Table Top SFG...some ideas
You're welcome, recoush. Thank you, GG.
I have the materials to make more TTs, but I don't need any more.
I've been waiting nearly two years for an organization in town to get a community garden up and running so I can donate and setup a couple TTs. I know that they're working on it, but it's been a slooooow process. Maybe this year; maybe next!
 Re: Building a Table Top SFG...some ideas
How do you attach the plywood to the bottom? do you screw it in under the 2x's or do you attach a ledge on the inside.
I am trying to decide what to do with the one I built

ralitaco-
 Posts : 1314
Join date : 2010-04-04
Location : Southport , NC
 Re: Building a Table Top SFG...some ideas
Screw it to the bottom with support at least every 2'. Simple support sitting on 4" x 6". 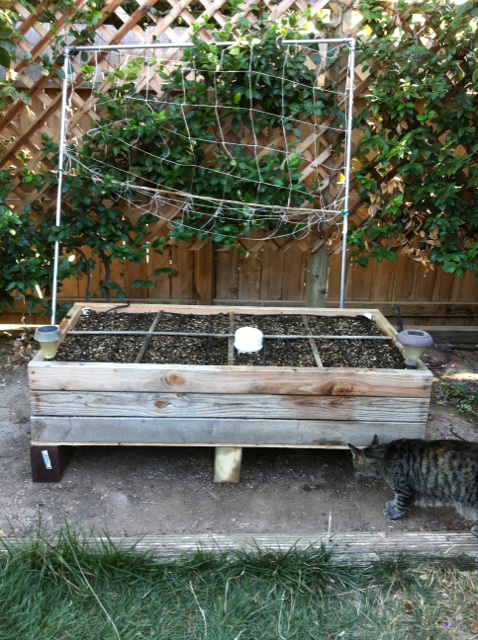
Table top style #1:
Table top style 1 underneath supports: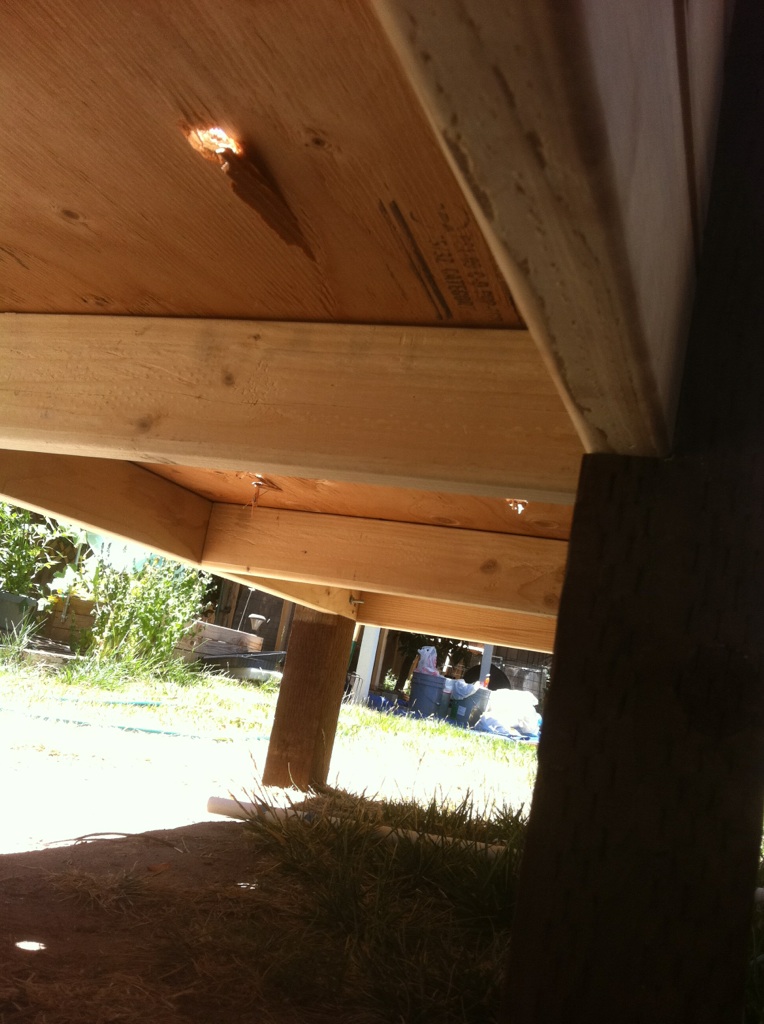
Short table top / raised bed style #2, my favorite style:
Closeup corner construction of style #2: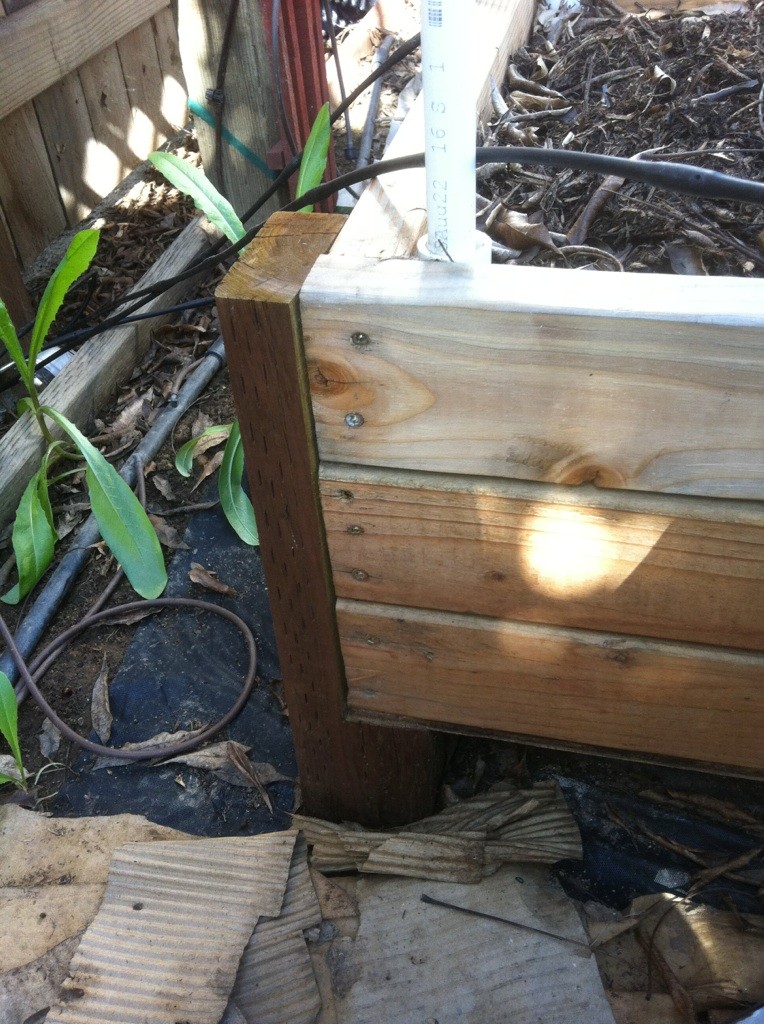
Inside the box, there is a flat 2 x 4 screwed to the sides at the midpoint (2' mark), flush with the bottom edge. The plywood is then screwed down to it when the box is upside down. Probably not the longest lasting design but should hold for 3-4 years. The beds are 10 1/2" deep so the 2 x 4 does take up much space to be of any concern.

Table top style #1:

Table top style 1 underneath supports:

Short table top / raised bed style #2, my favorite style:

Closeup corner construction of style #2:

Inside the box, there is a flat 2 x 4 screwed to the sides at the midpoint (2' mark), flush with the bottom edge. The plywood is then screwed down to it when the box is upside down. Probably not the longest lasting design but should hold for 3-4 years. The beds are 10 1/2" deep so the 2 x 4 does take up much space to be of any concern.
 Re: Building a Table Top SFG...some ideas
Boffer - did you find that the foam insulation worked in helping to heat the box?

moswell-
 Posts : 366
Join date : 2011-04-28
Age : 47
Location : Delaware County, PA
 Re: Building a Table Top SFG...some ideas
Ralitaco - just had to tell you I LOVE your avatar!!!

Goosegirl-
 Posts : 3435
Join date : 2011-02-16
Age : 59
Location : Zone 4A - NE SD
 Re: Building a Table Top SFG...some ideas
moswell wrote:Boffer - did you find that the foam insulation worked in helping to heat the box?
Ummm...I haven't checked.
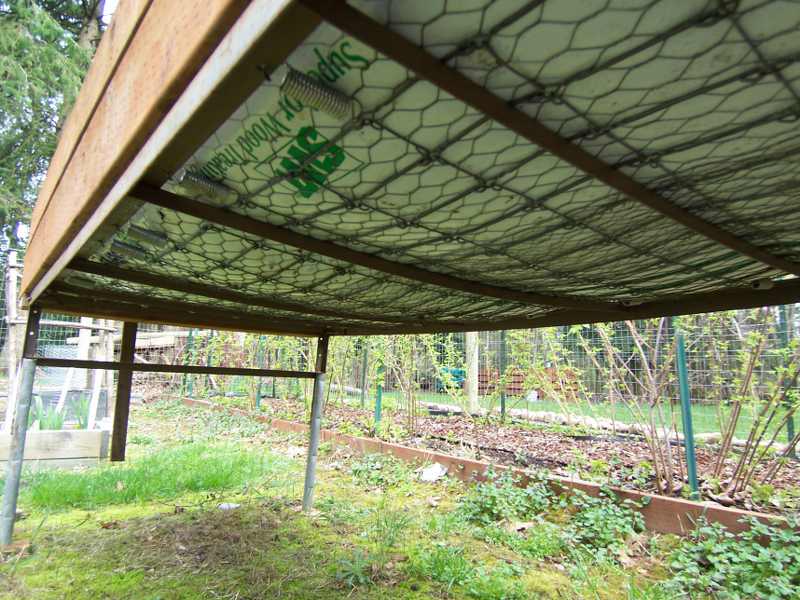
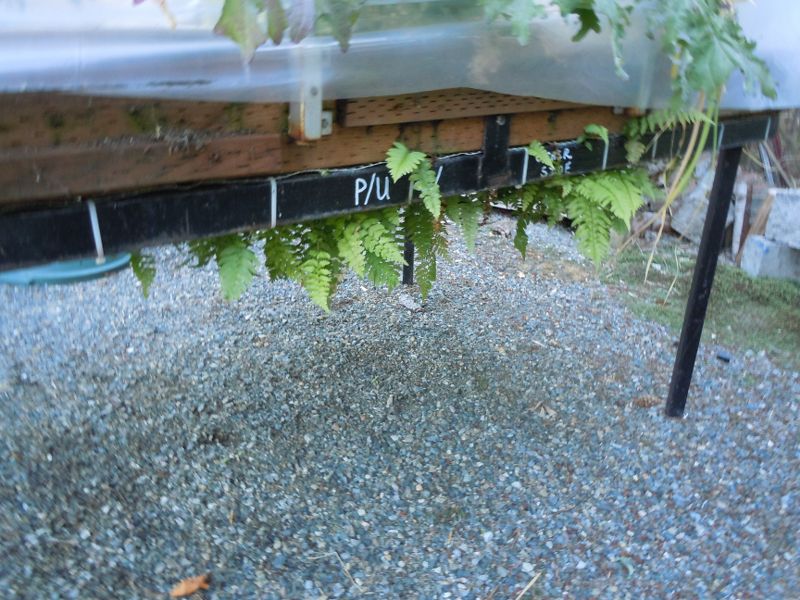
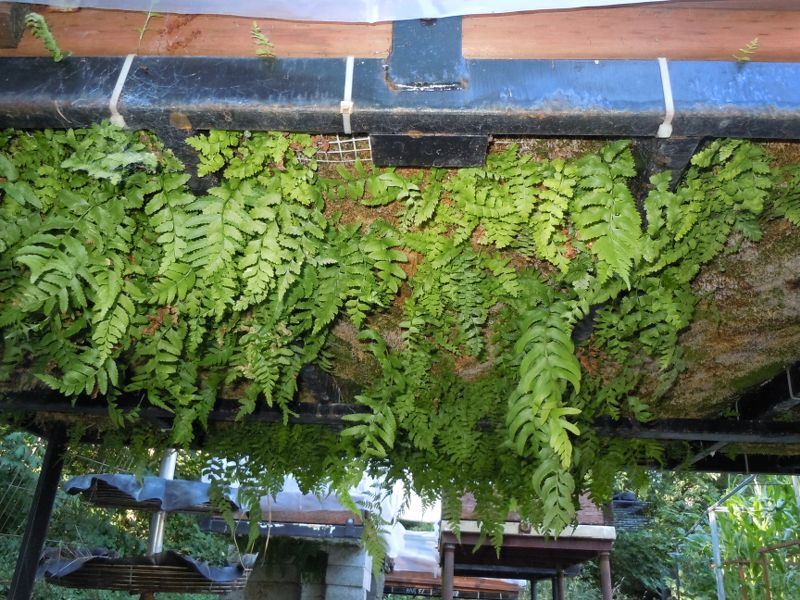
However, I've reduced water usage due to evaporation on the bottom side, and the foam has eliminated a problem I was having with ferns growing on the bottom side of the boxes along with a nice upside down moss carpet.
 Re: Building a Table Top SFG...some ideas
Ferns for flower arrangements!  And, here I have to grow them in a shady corner. . .
 Re: Building a Table Top SFG...some ideas
I sure love all of these ideas, and pictures are fantastic.

jimmy cee
Certified SFG Instructor-
 Posts : 2215
Join date : 2013-02-16
Age : 88
Location : Hatfield PA. zone 6b
 Re: Building a Table Top SFG...some ideas
Goosegirl wrote:Ralitaco - just had to tell you I LOVE your avatar!!!
Thank you. I was on a Star Trek / Borg kick at the time...

Although I have been binging on Dr Who recently so I may need to make a new avatar.
Boffer,
I am trying to understand why you have ferns growing out the bottom of your garden. I am presuming since you only used wire and cloth that the ferns were able to root through the weed cloth. But it also looks like a lot of soil is present on the underside...what am I missing there?

ralitaco-
 Posts : 1314
Join date : 2010-04-04
Location : Southport , NC
 Re: Building a Table Top SFG...some ideas
What looks like soil is actually dead moss. I have an abundance of wild ferns on my property, and moss grows anywhere damp and shady.
I grew up in the mid-west, and we learned in Boy Scouts to find our bearings by looking for moss which grows on the north side of trees. When I moved to the PNW, I did a lot of walking around in circles because moss grows all the way around a tree!
This is a bit out of focus, but it might give you a better idea.

 Re: Building a Table Top SFG...some ideas
boffer wrote:
Boffer et al,
I am planning on building 2 more 4x4 TableTops and am thinking about trying the Hardware cloth, Foam & Weed cloth for the bottom. I will be building it out of wood and was wondering what method you find works best to secure the Hardware cloth to the wood. (staples, screws w/ washers) Also how far apart do you space them?
In the above picture I see it wraps up on the outside of the box...any structural reason for this as opposed to having it on the inside? I am guessing not, but just thought I'd ask.
boffer wrote:For a 6 inch tall box I recommend putting in 3 bottom supports on 12 inch centers, using 2x2s. If the box is taller, you could use 2x4s on 16 inch centers. I mount mine inside the box using 2x4 hangars. The hangar comes with nail holes for 2x4s. You'll have to drill a hole where marked for 2x2s. With a little patience, all the fasteners can be hidden on the inside of the box. Be sure to fasten to the bottom supports, too.
Using the above setup, obviously the hardware cloth goes above the 2x2, but do you keep it at that height for the entire length of the box thereby allowing the eventual sag to be somewhat hidden by the sides? (Did that question make sense?)
Which foam board do you use? Is it the Blue stuff? Does it prevent any of the sagging? Do you cover it with plastic? How long has it lasted?
Also, Thanks for the explanation of the Moss/Fern issue Boffer, I understand now.

ralitaco-
 Posts : 1314
Join date : 2010-04-04
Location : Southport , NC
 Re: Building a Table Top SFG...some ideas
I got the answer to most of my questions in another thread.
Longevity of Table Top Boxes thread
How is that foam board working out?
I have a new question now...
Does anyone have a 4x4 TT with plywood that is only support along the outer edges?
I was looking at some that Pappy Slip made and couldn't tell how the bottom was made or supported.
Longevity of Table Top Boxes thread
How is that foam board working out?
I have a new question now...
Does anyone have a 4x4 TT with plywood that is only support along the outer edges?
I was looking at some that Pappy Slip made and couldn't tell how the bottom was made or supported.
Pappy Slip wrote:
Pappy

ralitaco-
 Posts : 1314
Join date : 2010-04-04
Location : Southport , NC
 Re: Building a Table Top SFG...some ideas
Ralitaco, All of mine have a support every 2 feet. On some, the 2x4s underneath are hidden and secured to a "skirt', others have a flat 2 x 4 screwed to the inside wall and the plywood screwed to it from underneath, and one box rests on three 4x6 treated wood "logs." But, all, except one, TTs are only 2 feet wide and 3-8 feet long. The widest is 2 1/2 feet x 4 feet.
 Re: Building a Table Top SFG...some ideas
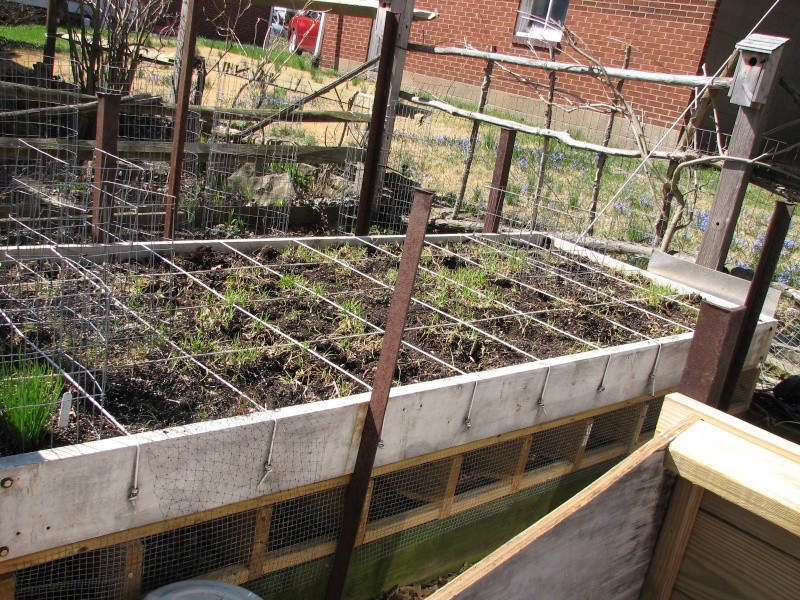
I recently elevated my beds and omitted the hardware wire..
With 3/4" flooring along with 15 inches off the ground I'm not at all concerned
about anything coming up from under.. I did apply a good quality weed barrier and that was just to keep the mix in
With 3/4" flooring along with 15 inches off the ground I'm not at all concerned
about anything coming up from under.. I did apply a good quality weed barrier and that was just to keep the mix in


jimmy cee
Certified SFG Instructor-
 Posts : 2215
Join date : 2013-02-16
Age : 88
Location : Hatfield PA. zone 6b
 Re: Building a Table Top SFG...some ideas
That's my neighbor's box, and it's still functional after 5 years. The wire is on the outside just because it was easier to install. I think he used Romex staples. I use galvanized wire fence staples or screws/washers spaced every 6-8 inchesralitaco wrote:...what method you find works best to secure the Hardware cloth to the wood. (staples, screws w/ washers) Also how far apart do you space them?
In the above picture I see it wraps up on the outside of the box...any structural reason for this as opposed to having it on the inside?...
It will sag some regardless, but the foam board reduces it.ralitaco wrote:...do you keep it at that height for the entire length of the box thereby allowing the eventual sag to be somewhat hidden by the sides?...
I've used the white, foil-faced white, pink, and blue. It was a matter of what I had on hand, or if I had to buy, what was cheapest. Don't use foil-faced; the foil kinda disintegrates. Even though they cost a bit more, the pink and blue don't make nearly the mess while cutting that the white does. The sharper your cutting tool, the less the mess. I don't use plastic or weedcloth liners with the foam. After the box is built, I take a screwdriver and randomly poke holes in the foam for drainage.ralitaco wrote:...Which foam board do you use? Is it the Blue stuff? Does it prevent any of the sagging? Do you cover it with plastic? How long has it lasted?...
My oldest box with foam is 6 years; no deterioration at all. I'd recommend using at least 2x8's or stacked 2x4's to regain the depth lost to the foam board. Especially if you foresee the use of mulch in your gardening.
I know plywood is convenient and easy, and folks sound cavalier about replacing it when it rots out. But I have over 20 boxes off the ground, and the thought of replacing all those bottoms is enough to make me give up gardening!
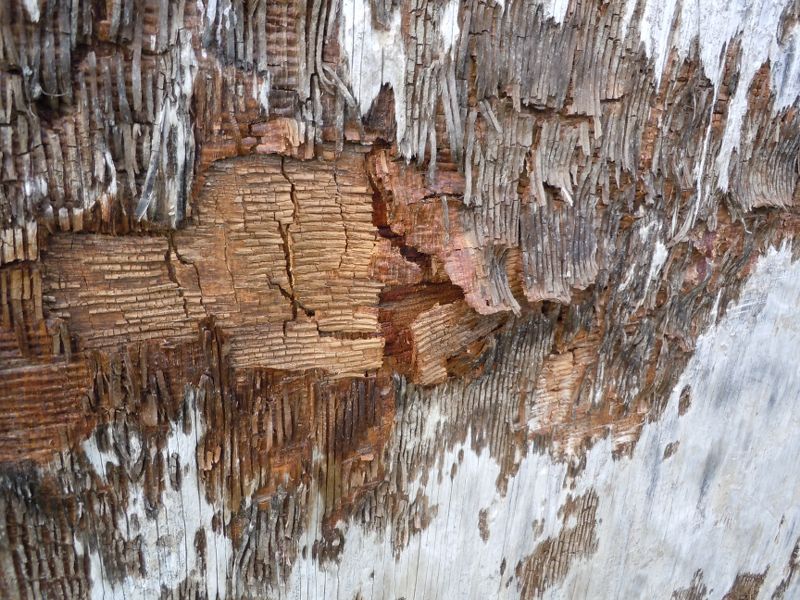
Plywood, in general, doesn't fare well in my climate. I did do one experiment with a plywood bottom and setting the box on cinder blocks to get it off the ground. Here's what the plywood looks like after 3 years.

It's rotted through the middle ply.
 Re: Building a Table Top SFG...some ideas
boffer wrote:See how the weight of the box sits on top of the post; this way nails and screws aren't carrying the weight. Each corner should have knee braces on it. Another plus, the 4x4 takes up less space inside the box.
These two methods of attaching posts are simple to do, and I feel comfortable recommending them because I know they will hold the weight.
This is essentially how I built my box. How do you attach the plywood to that frame? Or do you install joists and build a box to sit on top of that set up like you did with the metal below.
In other words is the picture above demonstating how to build the box or how to build a table for the box to sit on? I think the answer to that question will really clear things up in my mind.
boffer wrote:My last suggestion for TT legs is a steel frame table. Here's a sample:
Here it is with a box on it. I have plywood on this box because I'm using it for an experiment this summer. At the end of the season, I'll take the plywood off and just use the welded wire that I already put on the frame. (I'll lose the zip ties then, too)

ralitaco-
 Posts : 1314
Join date : 2010-04-04
Location : Southport , NC
 Re: Building a Table Top SFG...some ideas
(See here to get an idea about the amount of weight we're dealing with.)
I'd notch the plywood corners to fit around the posts. Then I'd use 1/4x2 or 2½ galvie lags spaced 6-8 inches around the plywood perimeter to attach it to the 2x frame.
Then I'd sit in the middle of box and ask my wife if she could live with the little bit of sagging that she saw!
My wife's not that picky, but if she was, and didn't like a little sag, I'd put a stiffener in. A piece of old bed frame (angle iron) laid across the middle inside the box, fastened every 5-6 inches with nuts and bolts. It would be out of sight and not take up any space to speak of.
 Re: Building a Table Top SFG...some ideas
boffer wrote:I'd notch the plywood corners to fit around the posts. Then I'd use 1/4x2 or 2½ galvie lags spaced 6-8 inches around the plywood perimeter to attach it to the 2x frame.
Then I'd sit in the middle of box and ask my wife if she could live with the little bit of sagging that she saw!
I installed a ledge all the way around with outdoor deck screws spaced about 8" apart.
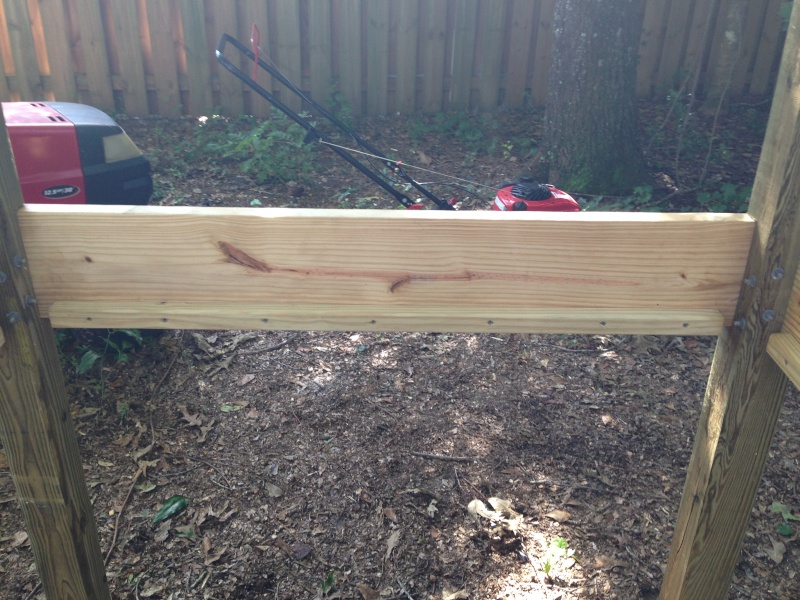
With the plywood supported ONLY by those ledges, I filled the box with MM and completely saturated it. I saw no sagging of the plywood.
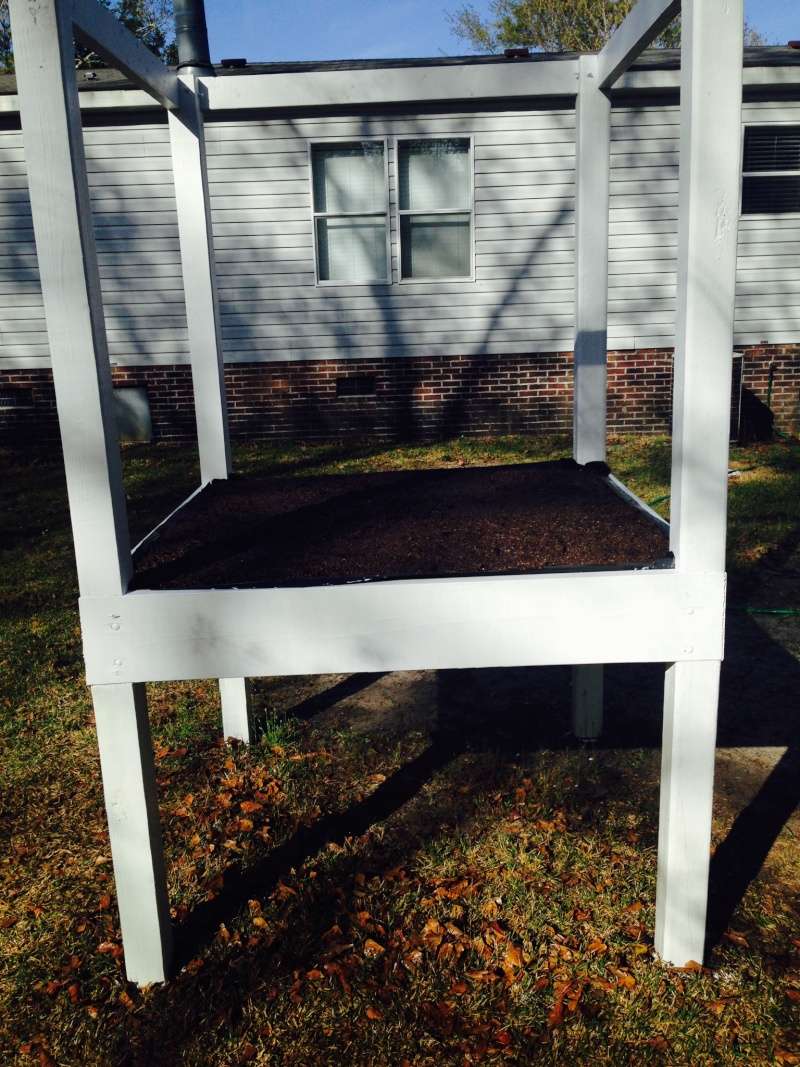
If the plywood would not rot and I didn't read in one of the threads about needing support every 2', I would not worry about it. However, since I saw your photo of the rotted plywood and the underside would be the last to show signs of rot, I felt like I needed something under it to support it in the event it rots through.
And thanks to your FANTASTIC test I think I am going to put 2 pieces of conduit under the plywood. I believe I can do that with the least amount of trouble and expense. When it comes time to replace the plywood, I will look at doing something different. Also, if after some time I don't think the conduit is going to work, I could notch out the 4x4's some more and put in a 2x4 "table" for the plywood to rest on.
Almost forgot, I am going to screw the plywood into the ledges too. I found a Sag Calculator and there seemed to be a big difference if the "shelf" is Fixed or Floating.
Anyway, thanks for your help as always.
Last edited by ralitaco on 4/12/2015, 11:41 pm; edited 1 time in total (Reason for editing : Sagulator link)

ralitaco-
 Posts : 1314
Join date : 2010-04-04
Location : Southport , NC
 Re: Building a Table Top SFG...some ideas
It looks like you have 2x6's spaced every foot supporting the plywood, is that correct?jimmy cee wrote:I recently elevated my beds and omitted the hardware wire..
With 3/4" flooring along with 15 inches off the ground I'm not at all concerned
about anything coming up from under.. I did apply a good quality weed barrier and that was just to keep the mix in

ralitaco-
 Posts : 1314
Join date : 2010-04-04
Location : Southport , NC
 Re: Building a Table Top SFG...some ideas
I wanted to comment on height of table tops but it would have highjacked the topic is was reading earlier. I don't remember what the title of the post was, though! Everyone has been so active today that the Latest Topics I read earlier (in blue) have already rolled off my screen!
The top of my tallest TT is 24" which looks really nice but is not really comfortable when planting,even for this 5'3" woman. But, they look nice and the plants can get to 4' (6' from the ground) and still be comfortable for me to reach. When the boxes were on the ground, I could reach plants 5 1/2' tall, and now for my "just off the ground" plants, I can reach those are 5' tall.
My point being, I don't think there is a perfect height for backs and for knees and for keeping us older folks off ladders. It is a personal preference as to which is the most important need for the individual. If I had a real garden area, I would have boxes at different heights for different types of plants. But, never on the surface because of invasive roots.
Page 2 of 3 •  1, 2, 3
 Similar topics
» of table top box building, carrots and such
» Building a trellis
» Mid-South in April: 2015
» New SFGardener
» Building a bed with a 3 year old
» Building a trellis
» Mid-South in April: 2015
» New SFGardener
» Building a bed with a 3 year old
Page 2 of 3
Permissions in this forum:
You cannot reply to topics in this forum


