


by OhioGardener Yesterday at 5:20 pm
» New to SFG in Arlington, Tx
by Scorpio Rising Yesterday at 2:28 pm
» Manure tea overwintered outside - is it safe to use?
by Mhpoole 4/24/2024, 7:08 pm
» Advice on my blend
by donnainzone5 4/24/2024, 12:13 pm
» Senseless Banter...
by OhioGardener 4/24/2024, 8:16 am
» Rhubarb Rhubarb
by sanderson 4/23/2024, 8:52 pm
» What Have You Picked From Your Garden Today
by OhioGardener 4/23/2024, 1:53 pm
» What do I do with tomato plants?
by SMEDLEY BUTLER 4/23/2024, 1:36 am
» N & C Midwest: March and April 2024
by Scorpio Rising 4/22/2024, 4:57 pm
» Kiwi's SFG Adventure
by sanderson 4/22/2024, 2:07 pm
» Sacrificial Tomatoes
by SMEDLEY BUTLER 4/22/2024, 10:36 am
» From the Admin - 4th EDITION of All New Square Foot Gardening is in Progress
by sanderson 4/21/2024, 5:02 pm
» Seedling Identification
by AuntieBeth 4/21/2024, 8:00 am
» Happy Birthday!!
by AtlantaMarie 4/21/2024, 6:56 am
» Three Sisters Thursday
by sanderson 4/20/2024, 5:25 pm
» Recommended store bought compost - Photos of composts
by sanderson 4/20/2024, 3:08 pm
» Compost not hot
by Guinevere 4/19/2024, 11:19 am
» Maybe a silly question but...
by sanderson 4/18/2024, 11:22 pm
» Hi from zone 10B--southern orange county, ca
by sanderson 4/18/2024, 12:25 am
» Asparagus
by OhioGardener 4/17/2024, 6:17 pm
» problems with SFG forum site
by OhioGardener 4/16/2024, 8:04 am
» Strawberries per square foot.
by sanderson 4/16/2024, 4:22 am
» What are you eating from your garden today?
by sanderson 4/16/2024, 4:15 am
» April is Kids Gardening Month!
by sanderson 4/15/2024, 2:37 pm
» Creating A Potager Garden
by sanderson 4/15/2024, 2:33 pm
» Butter Beans????
by OhioGardener 4/13/2024, 5:50 pm
» Companion planting
by sanderson 4/13/2024, 4:24 pm
» First timer in Central Virginia (7b) - newly built beds 2024
by sanderson 4/13/2024, 4:16 pm
» California's Drought
by sanderson 4/10/2024, 1:43 pm
» Anyone Using Agribon Row Cover To Extend The Growing Season?
by sanderson 4/8/2024, 10:28 pm
Hoop House Tutorial
Page 1 of 4 • 1, 2, 3, 4 ![]()

Hoop House Tutorial
![]() MoneyMan94 10/15/2011, 3:08 pm
MoneyMan94 10/15/2011, 3:08 pm
1- Get some feedback on adjustments that I can make to improve it
2- Help out others that are in the same boat as I was a few weeks ago
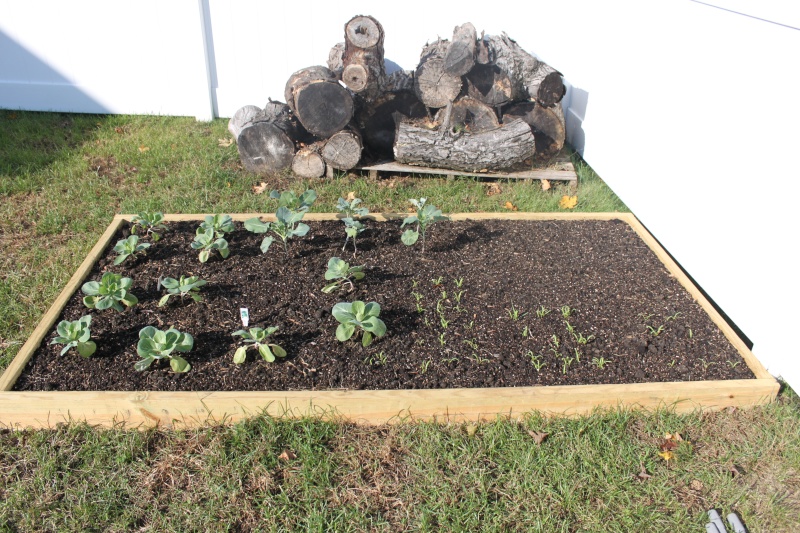
I planted only 1 raised bed for this season. I will be adding 4 more in the spring so this was my first attempt into square foot gardening. I do not have the grid on top because I am getting the material for free (tomorrow) but I didn’t want it to delay my planting and I didn’t want to buy the materials if I can get them for free.
Here is my 1st bed. It is made from 2x6 pressure treated lumber. I lined the inside of the box with plastic to prevent any chemicals from leaching out into the soil. The finished box is 48” x 96”. I lined the bottom of the soil with newspaper (no color ink used). The box is filled with 1/3 each of vermiculite, peat moss and a mixture of 5 composts.
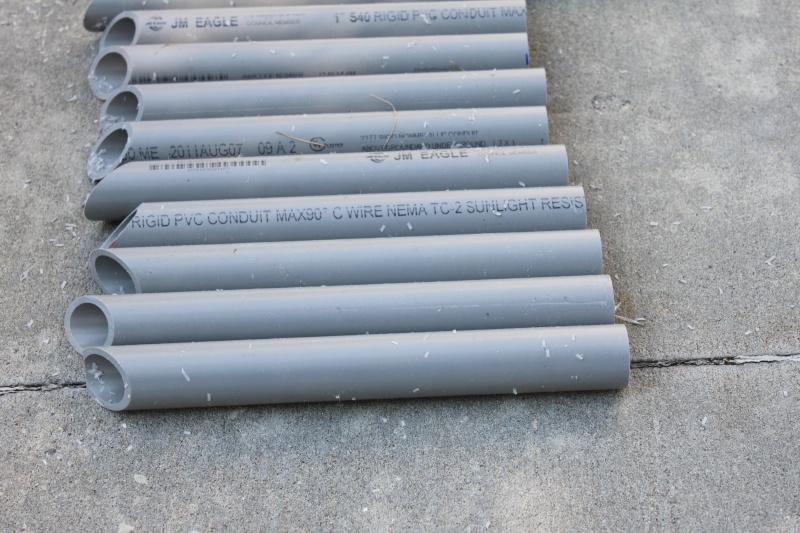
I used electrical PVC pipe (gray not white) because it was a little cheaper than the white was. I used 1" diameter that I cut down to 11" long and I made 1 side 45 degrees to hammer into the ground easier. The pipe inserted into it was 1/2" diameter. These were almost 10 feet long. The reason for almost is (as you will see in the picture below) that one end of the electrical conduit has on one side a wider opening to accept another pipe.


I decided to attach the 1" pipe on the outside of the 2x6 box. This will protect the box from rain and snow. I drove the 11" pipes into the ground until they were flush with the top of the box.

If you look in the picture above you will see a straight edge in the bed. I put the 1" pipes into the ground on one side and then I transferred the lines over to the other side.
Next insert the 1/2" PVC pipes into the 1" supports. Then I took a 1x2 furring strip and screwed it into the bottom of the 1/2" pipes to offer a little more support. I used galvanized screws through out the project.


Next I tied (using twine) to the pipes a 1x3 furring strip on each side of the frame. This allows more support to the plastic cover . Because the board is tied on with twine I can slide it up and down when I am trying to get into the garden and I dont have to climb over it.

The next step was to put the plastic cover on. I used a 3.5 mil thickness (10' x 25") found in Home Depot. I cut it to 17 feet long and placed the cover over the pipes. Once it was in place I put bricks onto the bottom of the plastic to hold it in place. The next step was to screw down boards on top of the plastic to the 1x2 that was under the PVC pipes. I measured the distance between each PVC hoop and made hold downs from 1x2 and cut them to 1" shorter than the distance between the hoops. So my distance was 23" so I cut the 1x2 to 22". This will prevent the plastic from crimping and cutting the plastic.
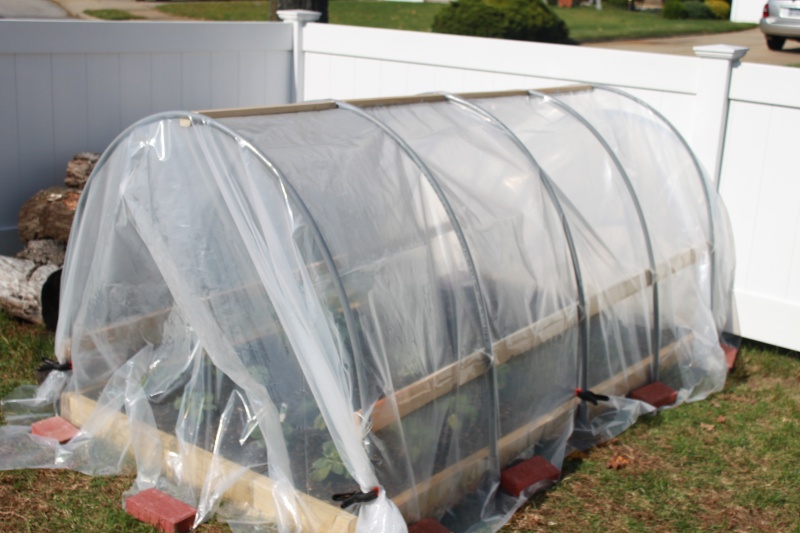

I also used a few plastic spring clamps (found at Home Depot) to hold the plastic to the PVC pipes. I will be picking up more of these (when I see them on sale) as they seem to work better than the bricks. By the way I stapled the plastic to the frame (from the inside) on the side of my hoop house against the white fence. I stapled it because there was no room to get bricks in there with the fence so close.
The last picture was taken 20 minutes after I had the plastic secured and if you look closely you will see the moisture on the inside of the plastic building up from the heat.

Well I hope you find it helpful and please any feedback from the seasoned pros out there would be appreciated.

MoneyMan94-
 Posts : 38
Join date : 2011-09-19
Location : Zone 6B -


madnicmom-
 Posts : 567
Join date : 2011-01-26
Age : 54
Location : zone 6, North of Cincinnati
Re: Hoop House Tutorial
![]() boffer 10/15/2011, 4:28 pm
boffer 10/15/2011, 4:28 pm
Just some supporting ideas:
It's amazing how hot a hoop house can get when the sun shines on it. The only thing I would do differently is figure out how to vent the end next to the fence. Maybe lifting up a bottom corner will be enough.
Another reason for using the gray electrical PVC is it's UV stabilized and will last longer in the sunshine than the white plumbing PVC.
In case your box isn't exactly a two foot increment, I have found that hoop spacing of 22-32 inches works good. Much smaller and I can't get between them to work; much bigger and the plastic starts sagging and flapping in the wind.
I use a ½ PVC pipe as my horizontal ridge piece. I secure it with two zip ties at each hoop. I don't 'clamp' the plastic to the ridge; it just lays across.
Personally, I too like using the one inch PVC 'sleeve' to slide the hoop into. They are easier to use than trying to clamp the hoop itself to the box. If you want to put hoops on a tabletop, use metal straps to fasten the one inch PVC to the box. Then fasten a 1x2 piece of wood inbetween the hoops to fasten the plastic to the box.
I like the plastic spring clamps too. But when you get a bunch of boxes, the cost starts adding up. If you're a DIYer, you can make a 'clamp' out of ¾ inch PVC. Cut pieces about 2 inches long; then cut out about 1/3 of the pipe wall. They snap over the plastic and ½ PVC. I do it on a band saw.

boffer- Posts : 7392
Join date : 2010-02-26
Age : 71
Location : yelm, wa, usa -
Re: Hoop House Tutorial
![]() gwennifer 10/15/2011, 11:04 pm
gwennifer 10/15/2011, 11:04 pm
1. What keeps the whole contraption from racking back and forth in the wind (along the same line as the ridge piece)?
2. Has anyone ever attempted painting these PVC tubes, just to add some fun color to the garden? If yes, does it last, or would I just be asking for a maintenance nightmare?
Also, courtesy of Territorial Seed, here is a picture of row cover clamps like Boffer described making himself (you're so handy Boffer!):


gwennifer
Certified SFG Instructor- Posts : 1414
Join date : 2011-05-11
Location : Vancouver, WA -
Re: Hoop House Tutorial
![]() arla 10/16/2011, 12:21 am
arla 10/16/2011, 12:21 am

arla- Posts : 109
Join date : 2011-09-09
Location : El Cerrito, CA
Re: Hoop House Tutorial
![]() boffer 10/16/2011, 1:26 am
boffer 10/16/2011, 1:26 am
The same principle that applies to plywood/OSB roof sheathing that ties the rafters together across the length of the ridgeline. The plastic actually adds strength. I get heavy winds every late fall. I've measured 60+ mph. No problems with my hoop houses, although fir trees start falling down if we've had enough rain.gwennifer wrote:1. What keeps the whole contraption from racking back and forth in the wind (along the same line as the ridge piece)?
I haven't painted conduit for outside use. Last year, I think it was Icemaiden (tell me if I"m wrong) , posted pictures of using multi-colored hula hoops in place of PVC conduit. They were fun looking! It's only PVC conduit; paint them and see!gwennifer wrote:2. Has anyone ever attempted painting these PVC tubes, just to add some fun color to the garden? If yes, does it last, or would I just be asking for a maintenance nightmare?
Thanks. Those are the ones.gwennifer wrote:Also, courtesy of Territorial Seed, here is a picture of row cover clamps like Boffer described making himself ...
For ten foot hoops on a SFG box, they just don't need much fastener strength where they connect to the ridge pole/board. I used zip ties and MM94 used screws, but Duct tape or baling wire would be just as effective. I've put ten foot lengths of ½ inch PVC on box widths from 2.5 to 4 feet without them snapping or crimping.arlo wrote:Better than my first attempt, I just tried to make one, and I guess my holes that I drilled were too big, so when I tried to bend the 10ft pipes over, one of them snapped in the middle...
boffer- Posts : 7392
Join date : 2010-02-26
Age : 71
Location : yelm, wa, usa -
re:hoop house tutorial
![]() 1orangething 10/16/2011, 6:52 am
1orangething 10/16/2011, 6:52 am
1orangething- Posts : 72
Join date : 2011-04-12
Age : 65
Location : Spring Hill Florida
Re: Hoop House Tutorial
![]() MoneyMan94 10/16/2011, 7:16 am
MoneyMan94 10/16/2011, 7:16 am
boffer wrote:
It's amazing how hot a hoop house can get when the sun shines on it. The only thing I would do differently is figure out how to vent the end next to the fence. Maybe lifting up a bottom corner will be enough.
Good point on the vent, I plan to raise the covers on the sides slightly where the bricks are holding the plastic down to remove too much heat. I went to a local dollar store and bought 2 thermometers and put one inside the hoop house and one outside to compare the temperatures.
boffer wrote:Another reason for using the gray electrical PVC is it's UV stabilized and will last longer in the sunshine than the white plumbing PVC.
I have used the gray (for electrical) for years and I was unaware of that. The price was a very small difference but having the material last longer is a home run.
boffer wrote:In case your box isn't exactly a two foot increment, I have found that hoop spacing of 22-32 inches works good. Much smaller and I can't get between them to work; much bigger and the plastic starts sagging and flapping in the wind.
Funny that you mention the spacing I tested what size I am able to comfortably fit in and I came up with 24" spacing on my hoops.
boffer wrote:I like the plastic spring clamps too. But when you get a bunch of boxes, the cost starts adding up. If you're a DIYer, you can make a 'clamp' out of ¾ inch PVC. Cut pieces about 2 inches long; then cut out about 1/3 of the pipe wall. They snap over the plastic and ½ PVC. I do it on a band saw.
I agree with the cost factor. I had a few of the clamps lying around my shop so I used them. They were originally purchased from Harbor Freight for under $1.00 each. They are 1 3/4" Plastic spring clamps made by Pittsburgh.
With that said I like the idea of using PVC pipe to make my own. I think I have some shorts of pipe in my shop so I will give it a shot. Thanks for the feedback.
MoneyMan94- Posts : 38
Join date : 2011-09-19
Location : Zone 6B -
Re: Hoop House Tutorial
![]() MoneyMan94 10/16/2011, 7:25 am
MoneyMan94 10/16/2011, 7:25 am
gwennifer wrote:
1. What keeps the whole contraption from racking back and forth in the wind (along the same line as the ridge piece)?
The 1/2" pipes are set 6" down in the 1" pipe so there is not enough room for the wind to make one side come out by itself. The hoop house needs to be lifted straight up to come out of the 1" holders. Strapping the hoops together with some sort of support (I used a 1x2) helps with the wind as well. Yesterday was a good test for me, we had wind gusts of 60 mph (of course the day I chose to install the house we have big winds) and it held up very well to it.
gwennifer wrote:
2. Has anyone ever attempted painting these PVC tubes, just to add some fun color to the garden? If yes, does it last, or would I just be asking for a maintenance nightmare?
I have not tried to paint them but it seems you could add some originality to your space by doing so.
I did have an afterthought on the pipes though. What if the pipes were hooked together and made into a drip system or a mister. You could water your plants from above, any thoughts?
MoneyMan94- Posts : 38
Join date : 2011-09-19
Location : Zone 6B -
Re: Hoop House Tutorial
![]() camprn 10/16/2011, 8:56 am
camprn 10/16/2011, 8:56 am
My first thought is this would probably lead to disease and fungus and rot...MoneyMan94 wrote:
I did have an afterthought on the pipes though. What if the pipes were hooked together and made into a drip system or a mister. You could water your plants from above, any thoughts?
43 years a gardener and going strong with SFG.
https://squarefoot.forumotion.com/t3574-the-end-of-july-7-weeks-until-frost
There are certain pursuits which, if not wholly poetic and true, do at least suggest a nobler and finer relation to nature than we know. The keeping of bees, for instance. ~ Henry David Thoreau
https://squarefoot.forumotion.com/t1306-other-gardening-books

camprn
Forum Moderator Certified SFG Teacher- Posts : 14169
Join date : 2010-03-06
Age : 61
Location : Keene, NH, USA ~ Zone 5a -
Re: Hoop House Tutorial
![]() sherryeo 10/16/2011, 12:25 pm
sherryeo 10/16/2011, 12:25 pm
I think camprn is right. I haven't been sfgardening for very long, but I have had lots of trouble with powdery mildew, which can be brought on or aggravated by getting the leaves of vegetable plants wet. There are other diseases and conditions that can be caused by this, too. Most folks do drip systems that allow the water to soak into the Mel's Mix without getting all the leaves so wet, which allows for a much healthier growing environment.
Search the "topics" search engine (under the latest topics list, to the left) for irrigation systems or drip irrigation to find lots of posts about these watering methods. I don't have one, yet, but would love to.

sherryeo- Posts : 850
Join date : 2011-04-03
Age : 72
Location : Mississippi Gulf Coast Zone 8B
Re: Hoop House Tutorial
![]() MoneyMan94 10/16/2011, 12:34 pm
MoneyMan94 10/16/2011, 12:34 pm
MoneyMan94- Posts : 38
Join date : 2011-09-19
Location : Zone 6B -
Re: Hoop House Tutorial
![]() BackyardBirdGardner 10/16/2011, 1:28 pm
BackyardBirdGardner 10/16/2011, 1:28 pm
- Very thourough job on the tutorial. l like your design and explanations. Thanks a ton.
- Ventilation can be done by raising the sides ever so slightly, too. Anything over 40$deg in the sunshine and you will need to ventilate cool season plants. And, it takes about 20 minutes of sunshine for your temps to spike up to 50-60° above ambient temps. Be watchful.
- Ventilation2 could fashion a "smoke stack" type vent on the fenced side. Some small plastic "edging" to keep the plastic from ripping and a 6mm plastic "sleeve" that could be spring clamped shut when you want to keep the heat inside but opened when you want to let the heat out of the top.
- Misting and watering from above leads to fungus, true. But, I've seen lots of videos of people using this technique....so they never need to open the plastic in winter...and none of them have complained about disease. I think the colder weather slows fungal growth, too.
- I would also wrap my plastic around my wooden side-braces and drop them all the way to the base of the structure. This would allow you to open up one side in one sweeping motion to work underneath....making life much easier than having to pull your plastic taught all the time you were opening and closing the hoops. Which leads to...
- Keep your high maintanence plantings on the outsides, preferrably on the ends of the hoops, too. That way when if it gets really cold....or cloudy....you can work with minimal heat loss and work quickly. High plants should go in the middle because if they so much as touch the plastic, all heat retention is lost to that leaf virtually immediately.
- If it gets really cold at night, I would toss a floating row cover inside the hoops to give yourself one more cushion/layer of air. This alone can get you down into the upper 20s at night without any damage whatsoever. The floating row can be anything from another layer of plastic to newspapers to a blanket. Anything that will form a uniform layer and wont be too heavy for the plants. Cloches are amazing when used as a 2nd layer to a hoop house....more of a spring time thing because of plant sizes.
That's all that popped into my head. You can make this single topic as simple or as complex as you want. You're off to a great start!

BackyardBirdGardner- Posts : 2727
Join date : 2010-12-25
Age : 50
Location : St. Louis, MO
Re: Hoop House Tutorial
![]() MoneyMan94 10/16/2011, 8:32 pm
MoneyMan94 10/16/2011, 8:32 pm
BackyardBirdGardner wrote: - Ventilation can be done by raising the sides ever so slightly, too. Anything over 40$deg in the sunshine and you will need to ventilate cool season plants. And, it takes about 20 minutes of sunshine for your temps to spike up to 50-60° above ambient temps. Be watchful.
- Ventilation2 could fashion a "smoke stack" type vent on the fenced side. Some small plastic "edging" to keep the plastic from ripping and a 6mm plastic "sleeve" that could be spring clamped shut when you want to keep the heat inside but opened when you want to let the heat out of the top.
Great points I checked the temp inside the hoop house today compared to the temp outside and there was a 17 degree difference, and boy was it warm in there.
BackyardBirdGardner wrote: - Misting and watering from above leads to fungus, true. But, I've seen lots of videos of people using this technique....so they never need to open the plastic in winter...and none of them have complained about disease. I think the colder weather slows fungal growth, too.
I love tinkering with things, that is where this idea comes from. Also I know if I throw the idea out there others will chime in and help to improve upon it. So a misting / drip system might possibly be used for fall plantings, something to consider.
BackyardBirdGardner wrote:- I would also wrap my plastic around my wooden side-braces and drop them all the way to the base of the structure. This would allow you to open up one side in one sweeping motion to work underneath....making life much easier than having to pull your plastic taught all the time you were opening and closing the hoops. Which leads to...
- Keep your high maintanence plantings on the outsides, preferrably on the ends of the hoops, too. That way when if it gets really cold....or cloudy....you can work with minimal heat loss and work quickly. High plants should go in the middle because if they so much as touch the plastic, all heat retention is lost to that leaf virtually immediately.
I love the idea, I will look to test it out next year on my new beds I wil lbe installing. The side wood slats are installed with twine to make it possible to slide up and down easily. The problem I am running into there is the twine on the ends of the wood keeps falling off. I need to look into another solution for this, I wonder if plastic zip ties can be used for this?
BackyardBirdGardner wrote: - If it gets really cold at night, I would toss a floating row cover inside the hoops to give yourself one more cushion/layer of air. This alone can get you down into the upper 20s at night without any damage whatsoever. The floating row can be anything from another layer of plastic to newspapers to a blanket. Anything that will form a uniform layer and wont be too heavy for the plants. Cloches are amazing when used as a 2nd layer to a hoop house....more of a spring time thing because of plant sizes.
I have Agribon 30 on order, actually I got my confirmation today that it shipped so I will have it soon. I plan on using it as a second layer for that exact reason. Also in another post staf74 suggested using Christmas lights in the bed to add a little heat to it, I am looking now for my old lights to test this out. I would think that could reduce the temp by a few additional degrees.
Thanks for the great imput, each time someone comments it helps improve the finished product and draw out other ideas as well as questions.
MoneyMan94- Posts : 38
Join date : 2011-09-19
Location : Zone 6B -
Re: Hoop House Tutorial
![]() BackyardBirdGardner 10/17/2011, 9:28 am
BackyardBirdGardner 10/17/2011, 9:28 am
Boffer has a couple of neat posts about heating his TTs, too. Search for them. I wish I could point you to them myself but I'm on the way out the door to take kids to school.
Keep us updated on how things go and the changes you make.
BackyardBirdGardner- Posts : 2727
Join date : 2010-12-25
Age : 50
Location : St. Louis, MO
Re: Hoop House Tutorial
![]() sherryeo 10/17/2011, 10:49 am
sherryeo 10/17/2011, 10:49 am
I have lightweight insect covers on my fall boxes and find it a bit of a chore to have to lift it from the pvc supports on one side to water, so the idea of not having to do that is very appealing.
sherryeo- Posts : 850
Join date : 2011-04-03
Age : 72
Location : Mississippi Gulf Coast Zone 8B
Re: Hoop House Tutorial
![]() UnderTheBlackWalnut 10/17/2011, 12:05 pm
UnderTheBlackWalnut 10/17/2011, 12:05 pm
BackyardBirdGardner wrote:
Boffer has a couple of neat posts about heating his TTs, too. Search for them. I wish I could point you to them myself but I'm on the way out the door to take kids to school.
Here is one of Boffer's H3 posts...when you search, it helps to search for "H3" as that's what he calls them, Heated Hoop Houses..."H...H...H" therefore "H3".
https://squarefoot.forumotion.com/t6953-heated-hoop-houses

UnderTheBlackWalnut- Posts : 559
Join date : 2011-04-18
Age : 57
Location : Springfield (central), IL, on the line between 5b and 6a
Re: Hoop House Tutorial
![]() Kelejan 10/17/2011, 1:58 pm
Kelejan 10/17/2011, 1:58 pm
I have located 1/2" Electrical conduit in Canadian Tire and I have to drive there. The conduit comes in 12ft lengths so how do I get it my little car? How much will it bend without snapping?
I tried two Building stores within walking distance of my home but they do not stock electrical conduit so it means I have to drive to Canadian Tire.

Kelejan- Posts : 6016
Join date : 2011-04-24
Age : 89
Location : Castlegar, British Columbia -
Re: Hoop House Tutorial
![]() BackyardBirdGardner 10/17/2011, 2:26 pm
BackyardBirdGardner 10/17/2011, 2:26 pm
sherryeo wrote:BBG, Just out of curiousity (and future reference) - I don't have any immediate plans to install an irrigation system - wouldn't the "soaker" type irrigation systems installed into the boxes allow you to leave the cover in place during cold weather? You know, the ones that water from below, rather than overhead. I thought you just turned the system on and it carried water to the boxes.
I have lightweight insect covers on my fall boxes and find it a bit of a chore to have to lift it from the pvc supports on one side to water, so the idea of not having to do that is very appealing.
Absolutely! The advantage of watering through the hoophouse, though, is laziness and expense. You just buy a 3/4" section of PVC, drill holes in it about every 12", make sure one end is threaded and the other is capped, and screw in your hose. Presto! For about $2 you have an automated watering system.
Drip irrigation and soaker hoses are probably more beneficial to the garden, especially in terms of fungal infestation, but most of us need to run out and spend another $25+ on new materials....again.
To each his/her own.
BackyardBirdGardner- Posts : 2727
Join date : 2010-12-25
Age : 50
Location : St. Louis, MO
Re: Hoop House Tutorial
![]() MoneyMan94 10/17/2011, 3:18 pm
MoneyMan94 10/17/2011, 3:18 pm
Kelejan wrote:Thanks for this tutorial, MoneyMan.
I have located 1/2" Electrical conduit in Canadian Tire and I have to drive there. The conduit comes in 12ft lengths so how do I get it my little car? How much will it bend without snapping?
I tried two Building stores within walking distance of my home but they do not stock electrical conduit so it means I have to drive to Canadian Tire.
Kelejan you can use regular white PVC if it is easier to get your hands on.
As for how far will it bend without snapping, my bed is 4 feet wide and I was able to take the 10 foot length and loop it around to fit on the outside of the box without any problem.
Let me know how you make out with yours
MoneyMan94- Posts : 38
Join date : 2011-09-19
Location : Zone 6B -
Re: Hoop House Tutorial
![]() MoneyMan94 10/17/2011, 3:19 pm
MoneyMan94 10/17/2011, 3:19 pm
BackyardBirdGardner wrote:I can't speak for zipties. I can tell you that the twine, over time, will loosen and could become problematic. But, it's an easy fix....more cowbell....errrrr twine.
Boffer has a couple of neat posts about heating his TTs, too. Search for them. I wish I could point you to them myself but I'm on the way out the door to take kids to school.
Keep us updated on how things go and the changes you make.
Thanks I will search for this later on today, much appreciated.
MoneyMan94- Posts : 38
Join date : 2011-09-19
Location : Zone 6B -
Re: Hoop House Tutorial
![]() sherryeo 10/17/2011, 9:45 pm
sherryeo 10/17/2011, 9:45 pm
If I ever do install an irrigation system, I would want it to be able to serve for all seasons, not just the cool months (which we don't have an awful lot of here). I wouldn't want to do separate ones for different seasons. I would absolutely have to consider the fungus diseases and such with our humidity. I agree - "to each his own" - thank goodness we have different ideas and opinions - that helps all of us learn new things! That's what makes this forum so awesome!
sherryeo- Posts : 850
Join date : 2011-04-03
Age : 72
Location : Mississippi Gulf Coast Zone 8B
Re: Hoop House Tutorial
![]() staf74 10/18/2011, 11:03 am
staf74 10/18/2011, 11:03 am
I will be soon joining you in some good ole season extension. Its a blast (if you are obviously into this sort of thing) but can sometimes keep you up at nights....lol. Going out in the freezing early AM before the winter sun has risen in pyjama's and a flashlight checking on the hoop house becomes a hobby. Those few nights we get here in the teens really tested my will power. The lowest the outside temp we got here last year was 11 if my memory serves me correct but it was still a balmy 33 under the covers.
How long do you hope to go for?

staf74- Posts : 554
Join date : 2010-11-24
Age : 49
Location : York, SC
Re: Hoop House Tutorial
![]() MoneyMan94 10/18/2011, 2:11 pm
MoneyMan94 10/18/2011, 2:11 pm
staf74 wrote:Gr8 stuff so far MoneyMan,
I will be soon joining you in some good ole season extension. Its a blast (if you are obviously into this sort of thing) but can sometimes keep you up at nights....lol. Going out in the freezing early AM before the winter sun has risen in pyjama's and a flashlight checking on the hoop house becomes a hobby. Those few nights we get here in the teens really tested my will power. The lowest the outside temp we got here last year was 11 if my memory serves me correct but it was still a balmy 33 under the covers.
How long do you hope to go for?
I completely understand. My garden is outside of my 2nd floor bedroom window. So if I get up in the middle of the night or when I wake in the early am I head right for the window to sneak a peek.
It will get a little colder here in NY it makes it into single digits (usually 1 to 3 nights) but we will have a few months before that happens.
As for how long I want to go for, I will be happy if we can get enough to reap the harvest of my vegies in the bed. Since this is my first time trying any cold weather vegies I am not sure what to expect. While I was searching for my 5 composts I visited dozens of garden centers and green houses and each gave me a slightly different answer as to what I can expect.
MoneyMan94- Posts : 38
Join date : 2011-09-19
Location : Zone 6B -
Re: Hoop House Tutorial
![]() gwennifer 10/19/2011, 2:16 am
gwennifer 10/19/2011, 2:16 am
I found the thread Boffer. It was rosiejoe who posted her Hula Hoop SFG's. I admit - I am enhanted! I was even already planning on getting the green bridal tulle. (I better not show my girls in case I can't find pretty hula hoops for a reasonable price.)boffer wrote:Last year, I think it was Icemaiden (tell me if I"m wrong) , posted pictures of using multi-colored hula hoops in place of PVC conduit. They were fun looking! It's only PVC conduit; paint them and see!
gwennifer
Certified SFG Instructor- Posts : 1414
Join date : 2011-05-11
Location : Vancouver, WA -
Page 1 of 4 • 1, 2, 3, 4 ![]()
» DIY PVC Growlight Stand
» New Beds finally done
» What's in the garden right now??
» Need some hoop house help, please!
|
|
|