


by sanderson Yesterday at 3:13 pm
» Soil Blocks: Tutorial In Photos
by OhioGardener 4/25/2024, 5:20 pm
» Manure tea overwintered outside - is it safe to use?
by Mhpoole 4/24/2024, 7:08 pm
» Advice on my blend
by donnainzone5 4/24/2024, 12:13 pm
» Senseless Banter...
by OhioGardener 4/24/2024, 8:16 am
» Rhubarb Rhubarb
by sanderson 4/23/2024, 8:52 pm
» What Have You Picked From Your Garden Today
by OhioGardener 4/23/2024, 1:53 pm
» What do I do with tomato plants?
by SMEDLEY BUTLER 4/23/2024, 1:36 am
» N & C Midwest: March and April 2024
by Scorpio Rising 4/22/2024, 4:57 pm
» Kiwi's SFG Adventure
by sanderson 4/22/2024, 2:07 pm
» Sacrificial Tomatoes
by SMEDLEY BUTLER 4/22/2024, 10:36 am
» From the Admin - 4th EDITION of All New Square Foot Gardening is in Progress
by sanderson 4/21/2024, 5:02 pm
» Seedling Identification
by AuntieBeth 4/21/2024, 8:00 am
» Happy Birthday!!
by AtlantaMarie 4/21/2024, 6:56 am
» Three Sisters Thursday
by sanderson 4/20/2024, 5:25 pm
» Recommended store bought compost - Photos of composts
by sanderson 4/20/2024, 3:08 pm
» Compost not hot
by Guinevere 4/19/2024, 11:19 am
» Maybe a silly question but...
by sanderson 4/18/2024, 11:22 pm
» Hi from zone 10B--southern orange county, ca
by sanderson 4/18/2024, 12:25 am
» Asparagus
by OhioGardener 4/17/2024, 6:17 pm
» problems with SFG forum site
by OhioGardener 4/16/2024, 8:04 am
» Strawberries per square foot.
by sanderson 4/16/2024, 4:22 am
» What are you eating from your garden today?
by sanderson 4/16/2024, 4:15 am
» April is Kids Gardening Month!
by sanderson 4/15/2024, 2:37 pm
» Creating A Potager Garden
by sanderson 4/15/2024, 2:33 pm
» Butter Beans????
by OhioGardener 4/13/2024, 5:50 pm
» Companion planting
by sanderson 4/13/2024, 4:24 pm
» First timer in Central Virginia (7b) - newly built beds 2024
by sanderson 4/13/2024, 4:16 pm
» California's Drought
by sanderson 4/10/2024, 1:43 pm
» Anyone Using Agribon Row Cover To Extend The Growing Season?
by sanderson 4/8/2024, 10:28 pm
My First SFG...Work in progress
Page 1 of 3 • 1, 2, 3 ![]()

My First SFG...Work in progress
![]() clm2112 5/12/2015, 12:52 pm
clm2112 5/12/2015, 12:52 pm
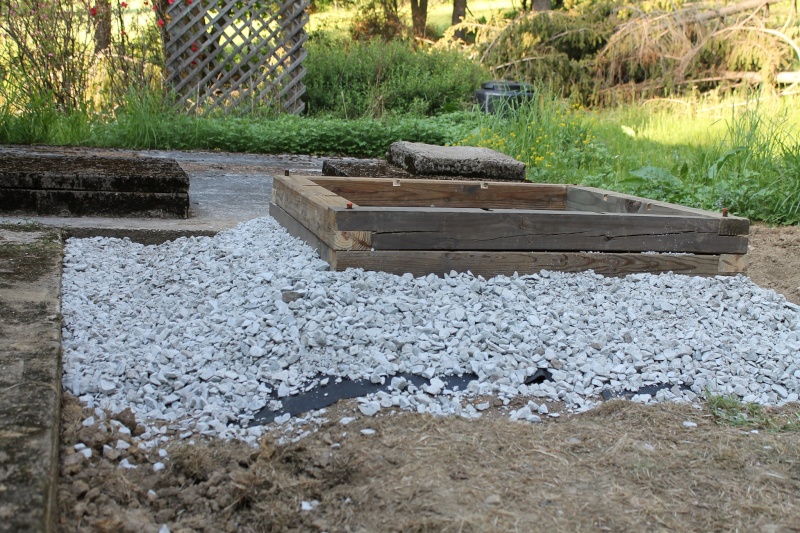
First, a little background: This is where I'm starting, what was in years past, my Grandmother's kitchen garden. Bounded by a cistern in the back, and a foundation pad in the forground (where the roto-tiller is sitting). On the right side is a fairly steep hill leading up to one of the fields. If I want to use that area in the future, I'll have to terrace the area. But for the moment, the mission is to get the ground cleaned up and adjust the grade so it will drain. Otherwise, it is on the South side of the house and gets plenty of sunlight.
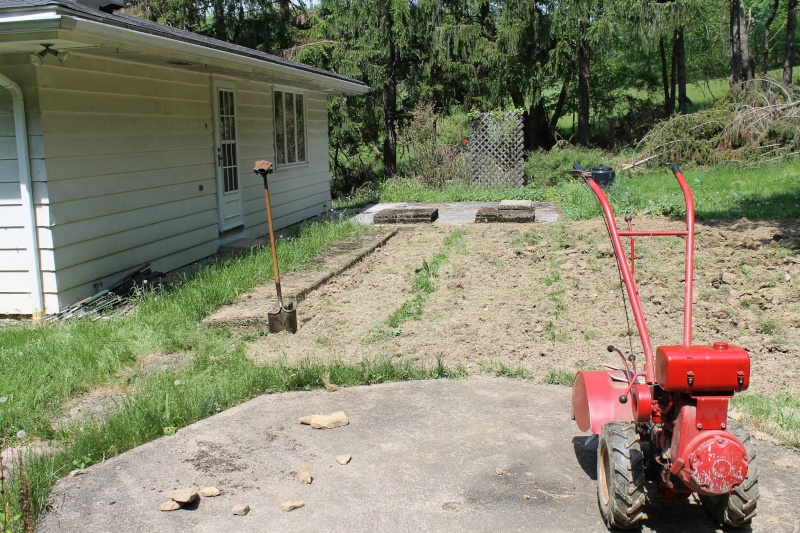
For frames, I started recycling old 4"x4" fence posts. I wanted to build 4' x 4' frames. But after going through the stack of old posts, most were pretty well chewed up where they had been planted into the ground. I decided to reduce the frames to 3' x 3', which gave me a size that I could recycle all of the fence posts with a minimum of wasted material. Each post was cut to 43" in length (36" + 7" for the overlap joint). The end were cut for a half-lap joint and a 3/4" hole bored through for a steel rebar pin. A scrap 1x6 was ripped into 3/4"square stock to form the 1' square planting grid. Here's the first one mocked up on the shop floor, ready to go into the garden.
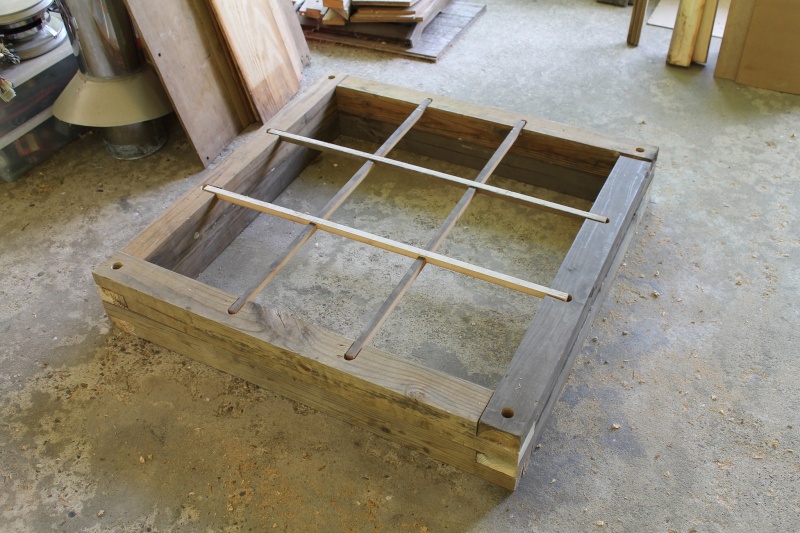
One down, three to go.... Getting to be a bit of an assembly line operation on the table saw. But so far the cost has been just a couple of dollars for rebar.

clm2112-
 Posts : 26
Join date : 2015-05-09
Age : 58
Location : Mon Valley, Pennsylvania
Re: My First SFG...Work in progress
![]() sanderson 5/12/2015, 1:13 pm
sanderson 5/12/2015, 1:13 pm

What a wonderful area for a garden. If you think you will have ANY drainage problems in that area, you can always elevate the beds on the remainders of the fence posts or free wood pallets. For the posts, just lay them down like railroad ties, every 2 feet for good support. Lay a sheet of plywood over them and drill good holes for drainage (See All New Square Foot Gardening by Mel Bartholomew) Set a frame of double 2x4s, line with weed fabric and fill. When and if you want to plant on the hill, there are many photos of conquering the slopes.


sanderson
Forum Administrator-
 Posts : 21547
Join date : 2013-04-21
Age : 75
Location : Fresno CA Zone 8-9 -

Re: My First SFG...Work in progress
![]() clm2112 5/12/2015, 2:00 pm
clm2112 5/12/2015, 2:00 pm
If this works as I think it will, any runoff will flow away from the beds in the gravel. Any rain that lands in the beds will be allowed to soak into the earth below the bed through the landscape cloth bottom.
(and yeah... I went a little overboard on the material, but the fence posts were free and they should last for my lifetime
clm2112- Posts : 26
Join date : 2015-05-09
Age : 58
Location : Mon Valley, Pennsylvania
Re: My First SFG...Work in progress
![]() trolleydriver 5/12/2015, 5:46 pm
trolleydriver 5/12/2015, 5:46 pm

trolleydriver
Forum Moderator- Posts : 5395
Join date : 2015-05-04
Age : 76
Location : Ottawa, Ontario, Canada
Re: My First SFG...Work in progress
![]() slimbolen99 5/12/2015, 6:07 pm
slimbolen99 5/12/2015, 6:07 pm

slimbolen99- Posts : 185
Join date : 2013-01-15
Location : Shawnee, KS
Re: My First SFG...Work in progress
![]() clm2112 5/12/2015, 7:12 pm
clm2112 5/12/2015, 7:12 pm
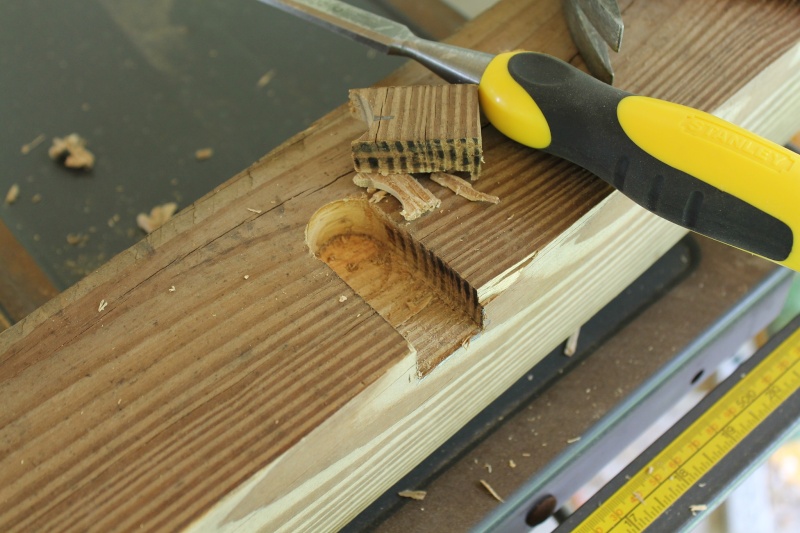
Yes, it did turn out pretty well and was really easy to do. Using the same 3/4" forstner bit I was using to drill the corner pin holes, I just drilled two holes at 1' intervals to a depth of 3/4". Used a saw to carry the edges of the hole to the edge of the piece, and popped the chunk out with a 1/2" chisel.
Took a break from making frame pieces and planted the first of the frames. Still have to finish adding stone around the sides of the mound, but looks like it will be ready for mix tomorrow.
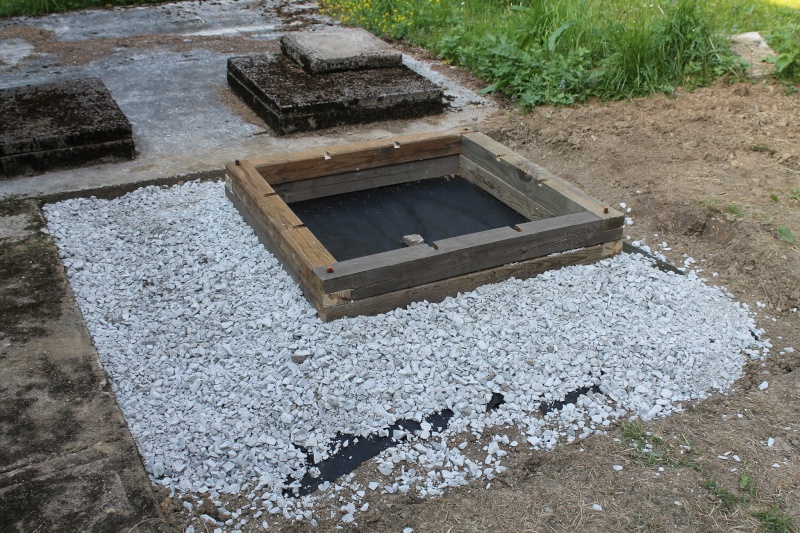
Looking at the photo, while it appears to be really close to the cistern, it is really the same distance from the cistern as it is from the sidewalk on the left. 24". Because the bed is so high above the surrounding area, it's an optical illusion. Here's a "worms eye" view to give you a sense of how high the beds are raised:
Last edited by clm2112 on 5/12/2015, 7:25 pm; edited 1 time in total (Reason for editing : Added an additional note & photo)
clm2112- Posts : 26
Join date : 2015-05-09
Age : 58
Location : Mon Valley, Pennsylvania
Re: My First SFG...Work in progress
![]() ralitaco 5/12/2015, 10:58 pm
ralitaco 5/12/2015, 10:58 pm
clm2112 wrote:Thanks,
Yes, it did turn out pretty well and was really easy to do. Using the same 3/4" forstner bit I was using to drill the corner pin holes, I just drilled two holes at 1' intervals to a depth of 3/4". Used a saw to carry the edges of the hole to the edge of the piece, and popped the chunk out with a 1/2" chisel.
That is very nice. It looks better than my slots I made using a router. I think you must be an experienced woodworker, that will come in handy for me, um I mean the forum.
Forstner Bit, hmm...Father's day is coming...

ralitaco- Posts : 1312
Join date : 2010-04-04
Location : Hampstead, NC
Re: My First SFG...Work in progress
![]() sanderson 5/13/2015, 1:27 am
sanderson 5/13/2015, 1:27 am
sanderson
Forum Administrator- Posts : 21547
Join date : 2013-04-21
Age : 75
Location : Fresno CA Zone 8-9 -
Re: My First SFG...Work in progress
![]() clm2112 5/13/2015, 8:10 am
clm2112 5/13/2015, 8:10 am
The cistern was cracked about 50 years ago when on of my great uncles was back-filling the earth around the foundation of the house. There has been repeated attempts to repair the cracks over the years. With repeated failures. Only 2/3rds of the capacity of the cistern is useable. Anything more and the water seeps into the soil and shows up in my basement. Still, 2/3rd of the tank capacity is plenty of water. There's a natural spring in the field above the house which I use to fill the cistern. I just have to be really careful to keep track of the water level.
Someday I'll remove the concrete top, install a pair of poly tanks in the chambers, then fill around them with gravel. That way I can plumb the filling of the poly tanks permanently to the spring and the gutters of the house without worrying about it overflowing into the basement. (Don't hate me Californians...water is never in short supply here
Am I an experienced wood-worker... Well, I got through shop class and I still have all ten fingers.
Forstner bits are not very expensive and I find that out of a set I keep using only one or two sizes all the time. They work like an old style auger bit, but have a smooth shoulder that cuts a perfect hole in wood. Down side is that you cannot bore a hole all the way through a piece without risking a lot of damage to the side the bit is exiting.
For example, to create the half lap & pin hole at the ends of each piece in the frame I only use the bit to drill halfway through the 4x4 post. The rest of the wood gets cut away. Like this:
Drill halfway through with a forstner bit. The wood that is going to be removed has already been sliced a few times on the table saw.

Stand the piece on end and tap the wood with a hammer to break away the bulk of the wood being removed:
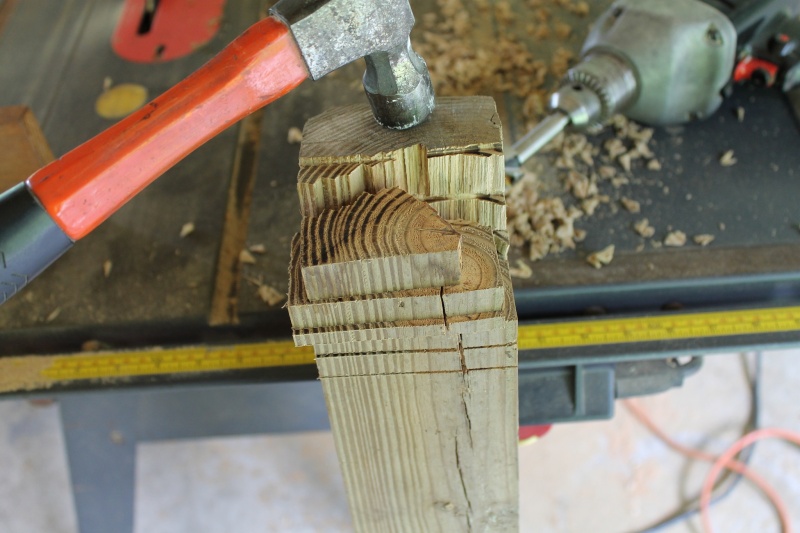
Then clean up with a chisel to pare away any wood that didn't break off with the hammer taps:

Takes about 2 minutes start to finish. Not exactly like making furniture, but good enough for making overlapping joints for a timber frame.
Last edited by clm2112 on 5/13/2015, 8:22 am; edited 1 time in total (Reason for editing : correcting spelling)
clm2112- Posts : 26
Join date : 2015-05-09
Age : 58
Location : Mon Valley, Pennsylvania
Re: My First SFG...Work in progress
![]() clm2112 5/13/2015, 3:30 pm
clm2112 5/13/2015, 3:30 pm
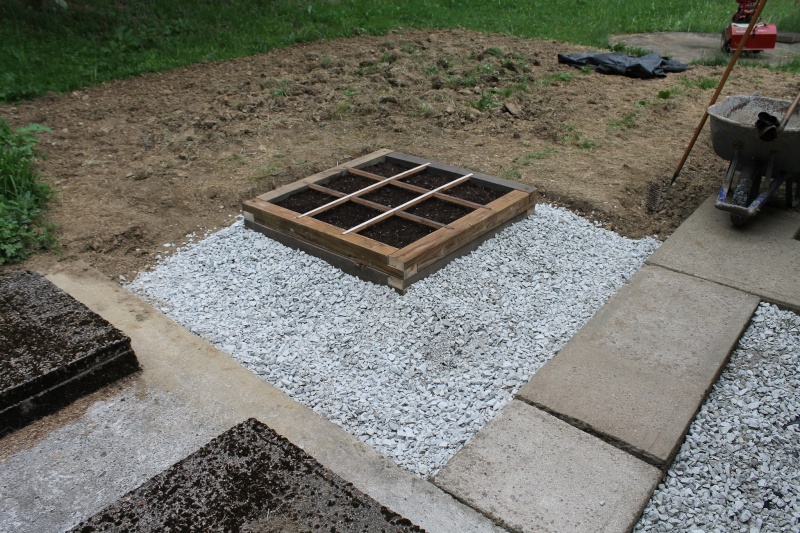
Managed to finish, take the picture, and cover the frame in plastic. It would seem that making chicken wire covers has bubbled up the priority stack sooner than I thought. Perhaps do that tonight while figuring out what to plant in the squares. I guess I'm going to get a staggered harvest whether I wanted it or not. It will be next week before the next frame is in place for planting.
clm2112- Posts : 26
Join date : 2015-05-09
Age : 58
Location : Mon Valley, Pennsylvania
Re: My First SFG...Work in progress
![]() mschaef 5/13/2015, 3:44 pm
mschaef 5/13/2015, 3:44 pm
mschaef- Posts : 598
Join date : 2012-03-12
Age : 38
Location : Hampton, Georgia
Re: My First SFG...Work in progress
![]() Windmere 5/13/2015, 4:05 pm
Windmere 5/13/2015, 4:05 pm

Windmere- Posts : 1425
Join date : 2013-02-26
Age : 55
Location : Fayetteville, GA - Zone 7B - 8A
Re: My First SFG...Work in progress
![]() clm2112 5/13/2015, 4:48 pm
clm2112 5/13/2015, 4:48 pm
mschaef wrote:Looking great..my 8 year old is trying to learn how to hand carve/ whittle. Its been hard figuring it out from books since no one we know knows how too.
Thanks, it's coming along.
I wish your child good luck. It's not as easy as it would first appear and difficult to learn from books. I'm very much an novice at carving. I can copy floral patterns on stocks and get a passing grade, but that's about it.
One piece of advice I can pass along... You have to learn to hone the tools razor sharp. In carving, you are constantly alternating between cutting across the grain and cleaving the wood fibers along the grain. Your knives, chisels, and gouges need a super-sharp edge to do that smoothly. The tools come from the factory with an OK edge, but it is up to the end user to hone them really sharp and keep them that way. (there's an adage that a wood worker spends as much time sharpening tools as using them. )
The rest comes down to practice by actually using the tools on wood over and over. You can study the techniques and motions from books (and get the basics right) but in the end, you have to feel the tool cutting & cleaving to get the hang of controlling it.
clm2112- Posts : 26
Join date : 2015-05-09
Age : 58
Location : Mon Valley, Pennsylvania
Re: My First SFG...Work in progress
![]() CapeCoddess 5/13/2015, 5:15 pm
CapeCoddess 5/13/2015, 5:15 pm
I gotta say, that is a really pretty box! Well done!clm2112 wrote:
CC

CapeCoddess- Posts : 6824
Join date : 2012-05-20
Age : 68
Location : elbow of the Cape, MA, Zone 6b/7a
Re: My First SFG...Work in progress
![]() sanderson 5/14/2015, 1:10 am
sanderson 5/14/2015, 1:10 am
sanderson
Forum Administrator- Posts : 21547
Join date : 2013-04-21
Age : 75
Location : Fresno CA Zone 8-9 -
Re: My First SFG...Work in progress
![]() clm2112 5/14/2015, 9:25 am
clm2112 5/14/2015, 9:25 am
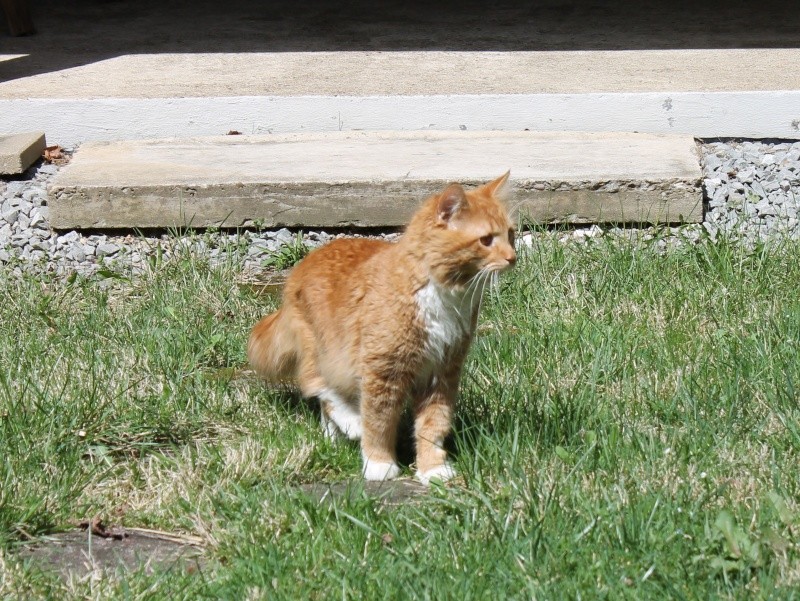
Building a litter box for him in the garden certainly wouldn't do any harm (might be handy to know where he is doing his business since he stopped using the litter box on the porch.)
clm2112- Posts : 26
Join date : 2015-05-09
Age : 58
Location : Mon Valley, Pennsylvania
Re: My First SFG...Work in progress
![]() sanderson 5/14/2015, 11:16 am
sanderson 5/14/2015, 11:16 am
sanderson
Forum Administrator- Posts : 21547
Join date : 2013-04-21
Age : 75
Location : Fresno CA Zone 8-9 -
Re: My First SFG...Work in progress
![]() Tilth 5/14/2015, 1:39 pm
Tilth 5/14/2015, 1:39 pm

Tilth- Posts : 41
Join date : 2015-04-24
Location : San Diego, CA
Re: My First SFG...Work in progress
![]() AtlantaMarie 5/14/2015, 2:12 pm
AtlantaMarie 5/14/2015, 2:12 pm
Everything looks fantastic!

AtlantaMarie
Certified SFG Instructor- Posts : 5602
Join date : 2014-03-18
Age : 60
Location : Buford, GA - Zones 7B/8A -
Re: My First SFG...Work in progress
![]() CitizenKate 5/14/2015, 10:32 pm
CitizenKate 5/14/2015, 10:32 pm
*Like*sanderson wrote:Furball is darling! Cats are actually social with their "servants" and like to be around your activities. Designating 'yes' areas up front can be a positive way to prevent 'no' activities in the garden. The Cat Whisperer

CitizenKate- Posts : 844
Join date : 2015-03-20
Location : Northeast KS, USA; Zone 6a
Re: My First SFG...Work in progress
![]() Kelejan 5/15/2015, 12:16 am
Kelejan 5/15/2015, 12:16 am
My cats always seem to love being around me whether I was in the house or the garden, and although we are their servants, I think they rather like us.

Kelejan- Posts : 6016
Join date : 2011-04-24
Age : 89
Location : Castlegar, British Columbia -
Re: My First SFG...Work in progress
![]() clm2112 5/24/2015, 12:01 pm
clm2112 5/24/2015, 12:01 pm
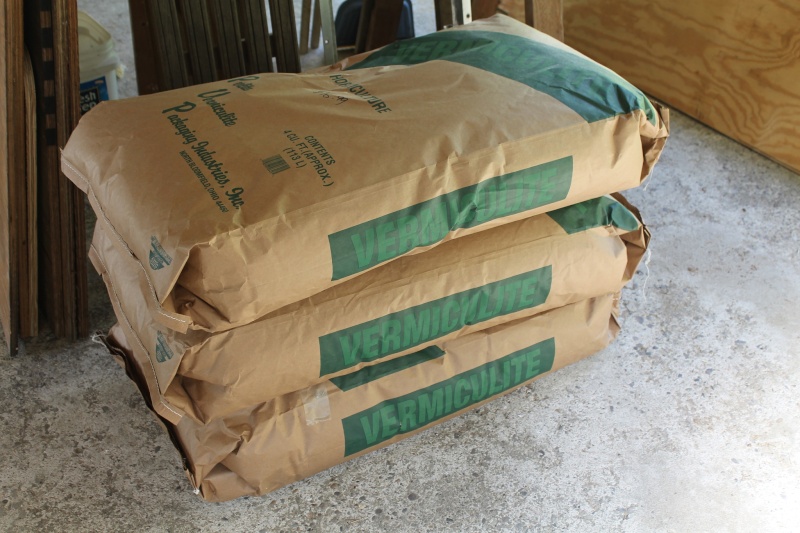
First, found a supplier for vermiculite in 4 cu ft bags. The Agway in Greensburg carried it. Had to make a 20 mile drive, so I got enough in the Subaru to make the trip worthwhile.
Explored the dark recesses of the fruit cellar and came up with a couple rolls of chicken wire (thanks Grandma, wherever you are) so another item off the list.
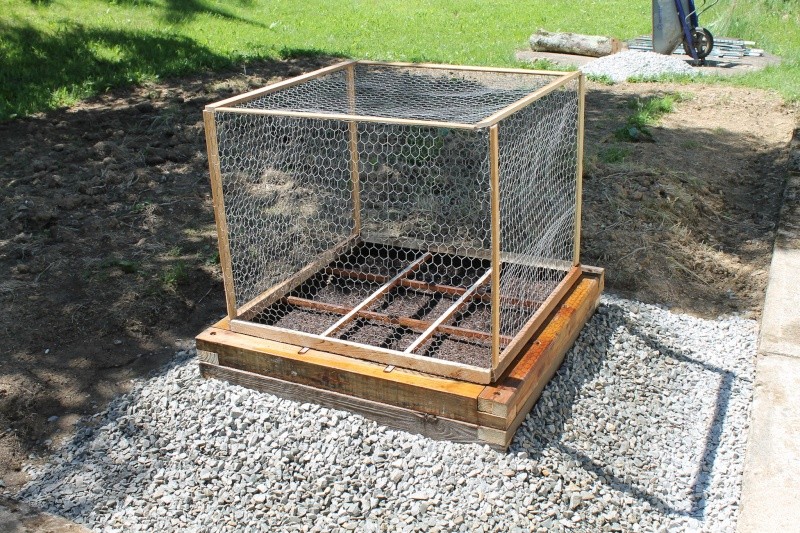
Made the first cover to keep the animals and birds out of the first frame. Pretty easy, but consumed a lot more time than I expected. The battens are just strips of scrap wood, mostly left-overs from ripping dimensional lumber.
Chicken wire is just stapled to the wood to form panels, then the cut ends of the wire panels twisted into the next panel. A little safety wire twisted into the non-cut ends to the panels to join them together into a 3' x 3' x 2.5' cube cover.
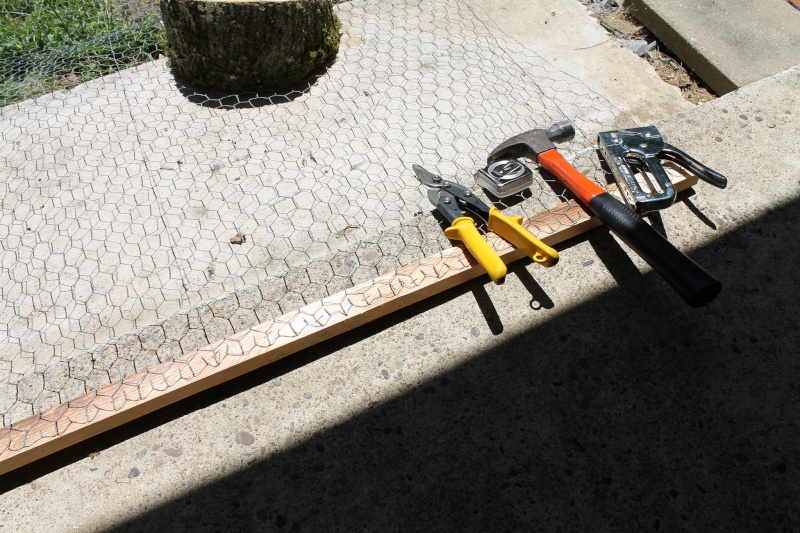
After the first couple panels, I got a little smarter... stapling the battens to the loose end of the chicken wire roll *BEFORE* cutting the wire from the roll is a lot easier than trying to wrestle with the wire that keeps wanting to roll back on itself.
So, this Memorial Day weekend is all about assembling the next two frames, planting seeds, and moving a bunch of rock to finish landscaping around the beds.
clm2112- Posts : 26
Join date : 2015-05-09
Age : 58
Location : Mon Valley, Pennsylvania
AtlantaMarie
Certified SFG Instructor- Posts : 5602
Join date : 2014-03-18
Age : 60
Location : Buford, GA - Zones 7B/8A -
Re: My First SFG...Work in progress
![]() sanderson 5/24/2015, 3:37 pm
sanderson 5/24/2015, 3:37 pm
sanderson
Forum Administrator- Posts : 21547
Join date : 2013-04-21
Age : 75
Location : Fresno CA Zone 8-9 -
Re: My First SFG...Work in progress
![]() trolleydriver 5/24/2015, 4:24 pm
trolleydriver 5/24/2015, 4:24 pm
trolleydriver
Forum Moderator- Posts : 5395
Join date : 2015-05-04
Age : 76
Location : Ottawa, Ontario, Canada
Page 1 of 3 • 1, 2, 3 ![]()
» Weight Issues and Wooden Bottom Thickness Question
» Progress so far
» Progress
» Stalled
|
|
|