


Search
Latest topics
» Soil Blocks: Tutorial In Photosby OhioGardener Yesterday at 5:20 pm
» New to SFG in Arlington, Tx
by Scorpio Rising Yesterday at 2:28 pm
» Manure tea overwintered outside - is it safe to use?
by Mhpoole 4/24/2024, 7:08 pm
» Advice on my blend
by donnainzone5 4/24/2024, 12:13 pm
» Senseless Banter...
by OhioGardener 4/24/2024, 8:16 am
» Rhubarb Rhubarb
by sanderson 4/23/2024, 8:52 pm
» What Have You Picked From Your Garden Today
by OhioGardener 4/23/2024, 1:53 pm
» What do I do with tomato plants?
by SMEDLEY BUTLER 4/23/2024, 1:36 am
» N & C Midwest: March and April 2024
by Scorpio Rising 4/22/2024, 4:57 pm
» Kiwi's SFG Adventure
by sanderson 4/22/2024, 2:07 pm
» Sacrificial Tomatoes
by SMEDLEY BUTLER 4/22/2024, 10:36 am
» From the Admin - 4th EDITION of All New Square Foot Gardening is in Progress
by sanderson 4/21/2024, 5:02 pm
» Seedling Identification
by AuntieBeth 4/21/2024, 8:00 am
» Happy Birthday!!
by AtlantaMarie 4/21/2024, 6:56 am
» Three Sisters Thursday
by sanderson 4/20/2024, 5:25 pm
» Recommended store bought compost - Photos of composts
by sanderson 4/20/2024, 3:08 pm
» Compost not hot
by Guinevere 4/19/2024, 11:19 am
» Maybe a silly question but...
by sanderson 4/18/2024, 11:22 pm
» Hi from zone 10B--southern orange county, ca
by sanderson 4/18/2024, 12:25 am
» Asparagus
by OhioGardener 4/17/2024, 6:17 pm
» problems with SFG forum site
by OhioGardener 4/16/2024, 8:04 am
» Strawberries per square foot.
by sanderson 4/16/2024, 4:22 am
» What are you eating from your garden today?
by sanderson 4/16/2024, 4:15 am
» April is Kids Gardening Month!
by sanderson 4/15/2024, 2:37 pm
» Creating A Potager Garden
by sanderson 4/15/2024, 2:33 pm
» Butter Beans????
by OhioGardener 4/13/2024, 5:50 pm
» Companion planting
by sanderson 4/13/2024, 4:24 pm
» First timer in Central Virginia (7b) - newly built beds 2024
by sanderson 4/13/2024, 4:16 pm
» California's Drought
by sanderson 4/10/2024, 1:43 pm
» Anyone Using Agribon Row Cover To Extend The Growing Season?
by sanderson 4/8/2024, 10:28 pm
Google
Seed starting and light question
+10
pattipan
bullfrogbabe
ayanefan
quiltbea
camprn
scoobe
Wild Bill
junequilt
choksaw
castoral
14 posters
Page 1 of 1

Seed starting and light question
![]() castoral 3/31/2010, 1:11 pm
castoral 3/31/2010, 1:11 pm
I know I'm a tad behind on this (for zone 5b) but it's been super busy at our house and I didn't want to start anything till we got back from vacation.
Anyway, we have several shop lights in our basement already that I was planning on using for starting seeds. I honestly have no idea what type of lights are currently in them though....
My plan is to use both the Jiffy Seed starter kits, as well as peat pots with organic starter mix/eggs shells with organic seed starter mix (in a large plastic container) and to hang the shop lights so they are about 6" above the seeds.
Will these regular shop lights work okay this time around?
Next time I'll probably invest in some grow lights, but my husband is already less than thrilled with the expense of everything else I've been buying and complaining that it would just be cheaper to buy this stuff at a farmer's market.

castoral-
 Posts : 34
Join date : 2010-03-25
Location : Dayton, OH - zone 5b -

Re: Seed starting and light question
![]() choksaw 3/31/2010, 1:27 pm
choksaw 3/31/2010, 1:27 pm
Lowes and home depot both carry replacement bublbs for the shop lights that simulate the day light spectrum i fnot mistaken they are relativly inexpensive as well im on my way to the store now will check it out and report back

choksaw-
 Posts : 459
Join date : 2010-03-02
Age : 49
Location : New Port Richey FL.
Seed starting and light question
![]() junequilt 3/31/2010, 1:43 pm
junequilt 3/31/2010, 1:43 pm
Wow, if you have several shop lights available, you are ahead of me! I've been working with just one for a long time. It hangs on a frame made of PVC, which sits on a table top. I can raise the light as the seedlings grow. A piece of reflective insulation is propped up against the light frame. It creates a sort of tent and helps keep light focused on the seedlings.
IMHO, the most important things about growing under fluorescents are 1) getting the seedlings close enough to the light source, and 2) replacing the light bulbs every year. I use regular cheap-o fluorescent bulbs and keep the seedlings within an inch or two of the bulb. It's amazing how close they really need to be.
IMHO, the most important things about growing under fluorescents are 1) getting the seedlings close enough to the light source, and 2) replacing the light bulbs every year. I use regular cheap-o fluorescent bulbs and keep the seedlings within an inch or two of the bulb. It's amazing how close they really need to be.

junequilt- Posts : 319
Join date : 2010-03-22
Location : Columbia, SC (Zone 8)
Re: Seed starting and light question
![]() Wild Bill 3/31/2010, 3:46 pm
Wild Bill 3/31/2010, 3:46 pm
Why would you need to replace the light bulbs every year? I get the bulbs specially designed to emit in the red spectrum for plant growth.
castoral: The thing about it is, once you buy most of this stuff, you won't need to buy it next year, etc.
castoral: The thing about it is, once you buy most of this stuff, you won't need to buy it next year, etc.
Wild Bill- Posts : 43
Join date : 2010-03-15
Seed starting and light question
![]() junequilt 3/31/2010, 4:04 pm
junequilt 3/31/2010, 4:04 pm
Within a certain number of lighting hours, fluorescents lose a significant amount of the light spectrum needed by plants. If you haven't had that problem with red spectrum bulbs, I will go out and buy some today! (Well, next year. I already have this year's bulbs.)
Standard flourescents are cheap. And, of course, even after they've outlived their usefulness as seedling lights, they are still usable for regular lighting. You don't notice any difference. I hang onto them to use in the kitchen and workshop.
My husband rigged up a portable fan to blow air gently on our seedlings so they will be nice and stocky!
junequilt- Posts : 319
Join date : 2010-03-22
Location : Columbia, SC (Zone 8)
Re: Seed starting and light question
![]() Wild Bill 3/31/2010, 4:50 pm
Wild Bill 3/31/2010, 4:50 pm
Well, I haven't noticed any problem with using my grow lights so far. My seedlings seem to do fine with them. I've been using them for at least 2 years.
Wild Bill- Posts : 43
Join date : 2010-03-15
Re: Seed starting and light question
![]() choksaw 3/31/2010, 6:05 pm
choksaw 3/31/2010, 6:05 pm
Back from lowes and walmart here are some pics of what i found including prices
Walmart

Lowes

Lowes
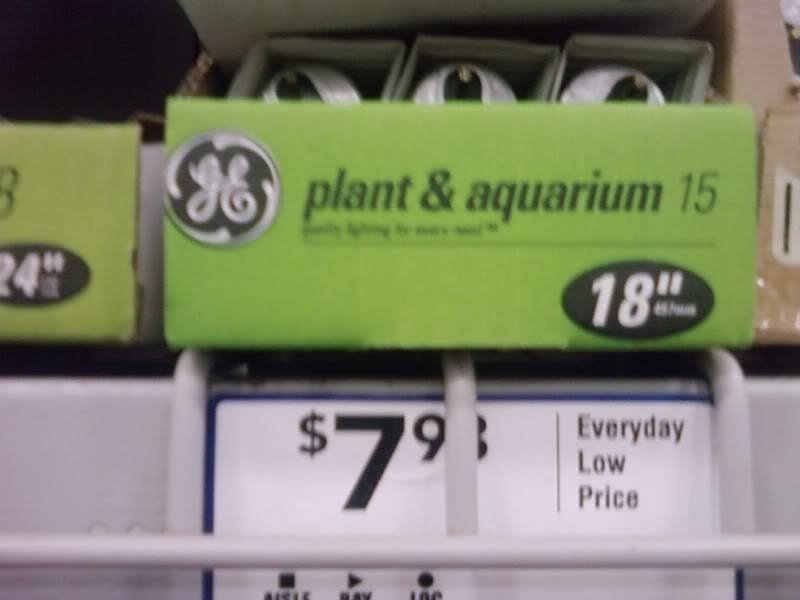
Lowes

hope this helps
Walmart
Lowes
Lowes
Lowes
hope this helps
choksaw- Posts : 459
Join date : 2010-03-02
Age : 49
Location : New Port Richey FL.
Re: Seed starting and light question
![]() scoobe 3/31/2010, 7:38 pm
scoobe 3/31/2010, 7:38 pm
I must have the best dumb luck out there. All I do to start seeds is put them in the expanded peat pellets cover them and in about a week bam little sprouts. I wait for two full sets of leaves and transplant.
scoobe- Posts : 24
Join date : 2010-03-08
Location : South Florida
Re: Seed starting and light question
![]() camprn 3/31/2010, 7:56 pm
camprn 3/31/2010, 7:56 pm
well, your location certainly helps!!scoobe wrote:I must have the best dumb luck out there. All I do to start seeds is put them in the expanded peat pellets cover them and in about a week bam little sprouts. I wait for two full sets of leaves and transplant.

camprn
Forum Moderator Certified SFG Teacher- Posts : 14169
Join date : 2010-03-06
Age : 61
Location : Keene, NH, USA ~ Zone 5a -
Re: Seed starting and light question
![]() scoobe 3/31/2010, 8:01 pm
scoobe 3/31/2010, 8:01 pm
camprn wrote:well, your location certainly helps!!scoobe wrote:I must have the best dumb luck out there. All I do to start seeds is put them in the expanded peat pellets cover them and in about a week bam little sprouts. I wait for two full sets of leaves and transplant.
Awww come on. you mean because it is summer here 9 months out of the year? Hey we had a bad winter here this year. Our overnight lows are still in the 50's.
 Don't be jealous.
scoobe- Posts : 24
Join date : 2010-03-08
Location : South Florida
Re: Seed starting and light question
![]() quiltbea 3/31/2010, 8:27 pm
quiltbea 3/31/2010, 8:27 pm
I only have one grow light that's 18" long so I'm in need of more shop lights.
I plan to go to Lowe's tomorrow to get a couple of shop lights and the daylight tubes for them. I'm starting more seeds this year and need them. I have plenty of room in the furnace room to hang them over a pair of banquet tables.
I start my seeds in the dark under a dome. When they germinate, they go under the lights. The lights are about an inch or two above the top of the plants at all times. I leave them on from 7 a.m. til 11 p.m.

quiltbea- Posts : 4712
Join date : 2010-03-21
Age : 82
Location : Southwestern Maine Zone 5A
Re: Seed starting and light question
![]() ayanefan 3/31/2010, 9:47 pm
ayanefan 3/31/2010, 9:47 pm
Quiltbea has it right. Do not put the seeds under light before they have germinated, somewhere there is a philosophy that says: "seeds need to grown down before they grow up. "
I have the peat pellets and tray with the heating mat but if you have a warm area in the house (top of the fridge it it's older) then put the tray with seeded expanded pellets in the warm location, cover with the dome and, for good measure, put a towel on top so the seeds are in the dark.
Tomatoes will germinate in less than 4 days in my experience, 2 weeks for lettuce. Flowers will do well within a week and herbs will be the same (except for parsley for some reason, it seems to take a bit longer. ) Check every day.
Remove the germinated pellet pods and put them under the lights, very close to the lights. Any non-germinated pellets will stay in the tray, in the dark. Keep it moist if it dries out.
My best advice for now.
Last edited by ayanefan on 3/31/2010, 9:48 pm; edited 1 time in total (Reason for editing : typo)

ayanefan- Posts : 65
Join date : 2010-03-02
Age : 53
Location : Like, super awesome place that's cold.
Re: Seed starting and light question
![]() bullfrogbabe 3/31/2010, 10:21 pm
bullfrogbabe 3/31/2010, 10:21 pm
I just built a new wooden frame to hang my 2 - 36" fluorescent shoplights last weekend. After doing some reading online I learned that growing strong seedlings requires lights with cool/blue lighting 5000-6500K to simulate natural sunshine. Warm/yellow-red approx 3000-4000K lighting is needed to promote flowers and fruit production once plants get bigger. Since we are putting our started plants outside to do the flowering and fruiting, we only need the cool/blue lights to start and strengthen our plants. I leave the lights on about 18 hrs a day, and give them a few hrs of dark.
I bought shoplights with chains so I can raise/lower the lights. They are supposed to be kept nearly touching the tops of the leaves to maximize exposure to the light, slowly raising the lights as the plants grow taller. Keep plants coolish so they grow slowly and thicker, rather then being warm and growing too fast and spindly. Water as needed to keep soil moist but not soaked, preferably in way that soaks the pot from the bottom to encourage deep/longer roots.
I use an old heating pad under a seed starting tray that has a plastic dome to hold in the moisture too help speed along germination. Once the seeds sprout, I remove the dome, let them dry out a bit, and lower the light to just above the pots. I use soiless seed starting mix that is very simlar to Mels mix in large jiffy pots so the plants have lots of room to grow (so I don't have to transplant them) and I can plant them directly into the garden in the pot (it just breaks down and leaves roots undisturbed). I just put 2 staggered / centered seeds in each pot and let them germinate directly in the pot. If both seeds germinate I either move one to its own pot or eventually just snip off the weaker one with scissors when the first real leaves start to bud. The first "seed leaves" are not true leaves, they contain the food from the seed that helps get the seedling going until it turns green and starts photosynthesis. Depending on the veggie, sometimes the seed leaves turn brown and die after the first set of real leaves grow (broccoli) and sometimes they don't.

bullfrogbabe- Posts : 189
Join date : 2010-03-03
Age : 53
Location : Petawawa, Ontario, Canada Zone 4a
Re: Seed starting and light question
![]() quiltbea 4/1/2010, 10:06 am
quiltbea 4/1/2010, 10:06 am
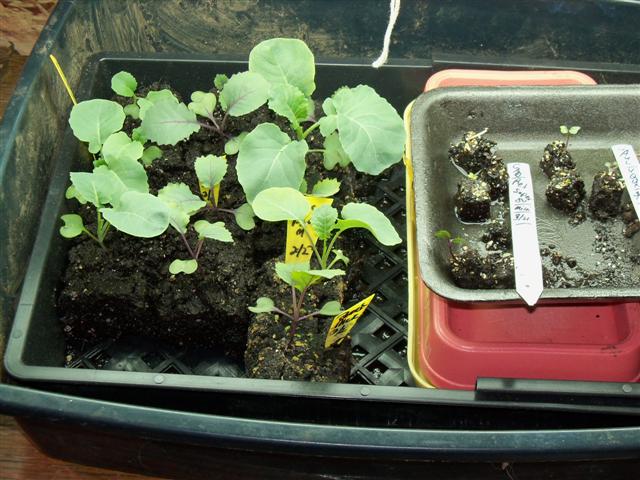
My latest seeds under the dome in a dark corner germinated in good time, 3 days for Crispino lettuce and Specialty eggplant, 4 for Bright Lights Swiss Chard (the Chard seed I got as a gift in 2008).
Mine are sitting on a heat mat and kept moist with spraying.
I started them with a dilute green tea in the spray bottle.
I don't know it it helped, but it didn't hurt.
Heat a cup of tea over a minute in the micro,
Add one tea bag and let it steep for 4-5 mins.
Remove the tea bag and drink the tea. We don't want waste.
Stick the used bag in another cup of hot water to steep again.
Remove the tea bag. Save the teabag for the compost pile or worm condo.
Pour the tea water into a spray bottle and add 4 more cups of room temperature water to it.
Spray the seedling blocks after the seeds have been covered with Vermiculite. The next day I sprayed with regular room temp water.
I kept the unused tea in the fridge to use for later starts.
I'm off to Lowe's for a shop light or two.
quiltbea- Posts : 4712
Join date : 2010-03-21
Age : 82
Location : Southwestern Maine Zone 5A
Re: Seed starting and light question
![]() pattipan 4/5/2010, 12:45 am
pattipan 4/5/2010, 12:45 am
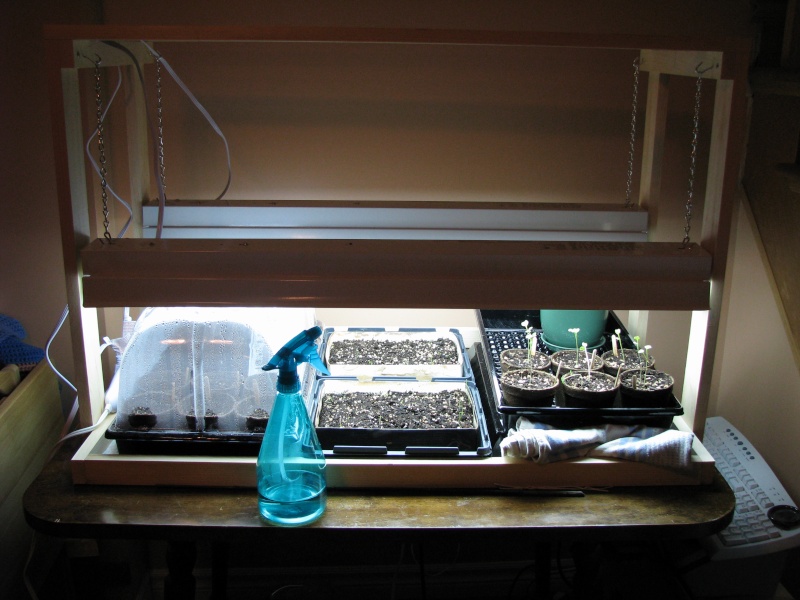
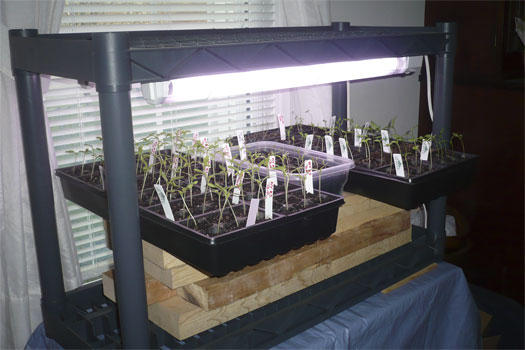
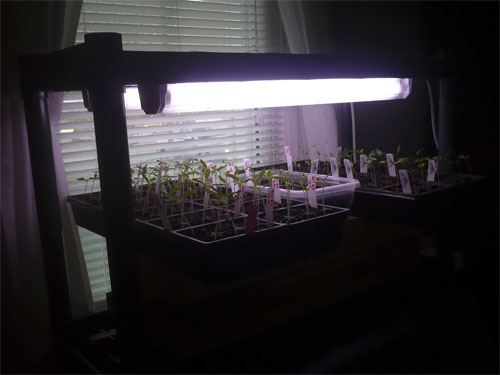
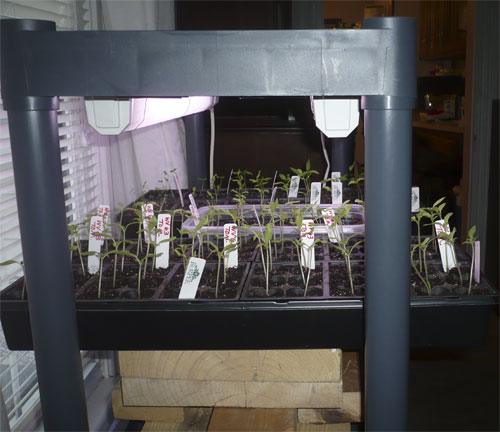
Whew! Finally found this thread! I began to wonder if I was imagining it. Anyway...I wanted to share my "fancy" grow light system. An alternative if you're on a budget. I had the shelving already, so all I had to buy was the plant lights. Got those cheap at Walmart.
I removed the top two shelves of a pvc-type shelving (very sturdy thing), hung the lights from the top, set it on a table, stacked some boards (that's the fancy raising/lowering system) and my plants are looking very happy. I think they are a little leggy, but they're healthy. I probably need some more boards, eh?
As for starting my seeds, I used Mel's suggestions from his newest book. Started them in a little vermiculite in margarine tubs with a hole cut in the bottom. Set them on top of our upright freezer for warmth. Germination was near 100%, except for the Opalka paste tomato. I did loose a few seedlings when lifting them out of the vermiculite with the pencil, finally changed to a tapered chopstick which worked much better for me. Next year, I'm going to dedicate the whole shelf to seed starting.
Patti
pattipan- Posts : 808
Join date : 2010-03-04
Location : WV -- Zone 6a -
Re: Seed starting and light question
![]() titans01 4/5/2010, 1:06 am
titans01 4/5/2010, 1:06 am
Patti, that looks great. Are those 2 foot lights? I've ran out of room under mine and was thinking about building another one but this gives me an idea to put all of them on one shelf.
titans01- Posts : 122
Join date : 2010-03-10
Age : 52
Location : Nebraska (Zone 5a) -
Re: Seed starting and light question
![]() pattipan 4/5/2010, 1:31 am
pattipan 4/5/2010, 1:31 am
titans01 wrote:Patti, that looks great. Are those 2 foot lights? I've ran out of room under mine and was thinking about building another one but this gives me an idea to put all of them on one shelf.
Yes, they are two-foot lights. I wish the shelf was a little deeper, but it's working okay. My shelf is sitting in front of a south facing window, as well as having the lights. I rotate the flats daily.
Patti
pattipan- Posts : 808
Join date : 2010-03-04
Location : WV -- Zone 6a -
Re: Seed starting and light question
![]() junequilt 4/5/2010, 1:02 pm
junequilt 4/5/2010, 1:02 pm
I'd be interested to know what others are using to feed their seedlings, especially organic solutions.
I had two seedlings damp off over the weekend and am hoping the rest don't follow suit . . .
I had two seedlings damp off over the weekend and am hoping the rest don't follow suit . . .
junequilt- Posts : 319
Join date : 2010-03-22
Location : Columbia, SC (Zone 8)
Seedling damping - off
![]() Jola 4/5/2010, 1:35 pm
Jola 4/5/2010, 1:35 pm
You can prevent damping-off with chamomile tea. Bring to boil 1 cup of water, then remove it from heat and stir in 2 teaspoons of dried chamomile flowers (You can use a bag of herbal chamomile tea from your local store too, but it must be pure chamomile tea). Cover and allow the mixture to come to room temperature. Strain the liquid if you used loose dried flowers.
Dampen potting soil mix with the tea before you plant your seeds. Later spray the soil lightly every day with chamomile tea instead of water.
Stronger antifungal tea can be used on establish plants showing signs of fungal disease. You get stronger solution by adding 2 teaspoons of dried horstail (Equisetum arvense) to the water and chamomile.

Jola- Posts : 107
Join date : 2010-03-23
Location : Lansing area, MI (5b)
Re: Seed starting and light question
![]() dixie 4/5/2010, 2:44 pm
dixie 4/5/2010, 2:44 pm
Thanks for tip on the chamomile tea - I currently use a VERY dilute mixture of bleach & water, although I don't usually have an issue after I can take the cover off of the greenhouse tray.

dixie- Posts : 814
Join date : 2010-03-02
Age : 75
Location : Southeast Tennessee -
Re: Seed starting and light question
![]() chocolatepop 4/5/2010, 2:54 pm
chocolatepop 4/5/2010, 2:54 pm
I know some that use peroxide and water also.
chocolatepop- Posts : 768
Join date : 2010-03-11
Age : 44
Location : Flint Area, Michigan (zone 5a-5b) -
» Light bulb question (for seed starting)
» Seed Starting - How much light?
» Question on seed starting cell size
» Three seed starting questions (light, heat, soil)
» Starting plants with seed starting kit
» Seed Starting - How much light?
» Question on seed starting cell size
» Three seed starting questions (light, heat, soil)
» Starting plants with seed starting kit
Page 1 of 1
Permissions in this forum:
You cannot reply to topics in this forum|
|
|