Search
Latest topics
» Assistance Needed: Sugar Snap Peas Yellowing and Wiltingby sanderson Today at 3:39 pm
» Mark's first SFG
by markqz Today at 11:23 am
» N & C Midwest—May 2024
by Scorpio Rising Today at 10:48 am
» OMG, GMO from an unexpected place.
by sanderson Today at 1:57 am
» Greetings from Southport NC
by ralitaco 4/29/2024, 9:47 pm
» N & C Midwest: March and April 2024
by Scorpio Rising 4/29/2024, 1:30 pm
» Lovage, has anyone grown, or used
by OhioGardener 4/29/2024, 12:27 pm
» Ohio Gardener's Greenhouse
by OhioGardener 4/28/2024, 10:20 am
» New to SFG in Arlington, Tx
by sanderson 4/26/2024, 3:13 pm
» Soil Blocks: Tutorial In Photos
by OhioGardener 4/25/2024, 5:20 pm
» Manure tea overwintered outside - is it safe to use?
by Mhpoole 4/24/2024, 7:08 pm
» Advice on my blend
by donnainzone5 4/24/2024, 12:13 pm
» Senseless Banter...
by OhioGardener 4/24/2024, 8:16 am
» Rhubarb Rhubarb
by sanderson 4/23/2024, 8:52 pm
» What Have You Picked From Your Garden Today
by OhioGardener 4/23/2024, 1:53 pm
» What do I do with tomato plants?
by SMEDLEY BUTLER 4/23/2024, 1:36 am
» Kiwi's SFG Adventure
by sanderson 4/22/2024, 2:07 pm
» Sacrificial Tomatoes
by SMEDLEY BUTLER 4/22/2024, 10:36 am
» From the Admin - 4th EDITION of All New Square Foot Gardening is in Progress
by sanderson 4/21/2024, 5:02 pm
» Seedling Identification
by AuntieBeth 4/21/2024, 8:00 am
» Happy Birthday!!
by AtlantaMarie 4/21/2024, 6:56 am
» Three Sisters Thursday
by sanderson 4/20/2024, 5:25 pm
» Recommended store bought compost - Photos of composts
by sanderson 4/20/2024, 3:08 pm
» Compost not hot
by Guinevere 4/19/2024, 11:19 am
» Maybe a silly question but...
by sanderson 4/18/2024, 11:22 pm
» Hi from zone 10B--southern orange county, ca
by sanderson 4/18/2024, 12:25 am
» Asparagus
by OhioGardener 4/17/2024, 6:17 pm
» problems with SFG forum site
by OhioGardener 4/16/2024, 8:04 am
» Strawberries per square foot.
by sanderson 4/16/2024, 4:22 am
» What are you eating from your garden today?
by sanderson 4/16/2024, 4:15 am
Google
Hurt but Happy!
+12
Theresa
timwardell
mckr3441
martha
ander217
happyfrog
new2this
NancyD
Ellie0505
AFLfan
Retired Member 1
Shoda
16 posters
Page 1 of 1
 Hurt but Happy!
Last year my three kids and I had our first vegetable garden together. We enjoyed it more then we could have imagined except got frustrated with the gophers, squirrels and raccoons who wanted part of the action. So, we decided to start over from scratch and build raised garden beds. The SFG method seemed perfect for us!
We redesigned our garden area so that it would have 3-foot wide paths and a more interesting layout. Here is our plan.
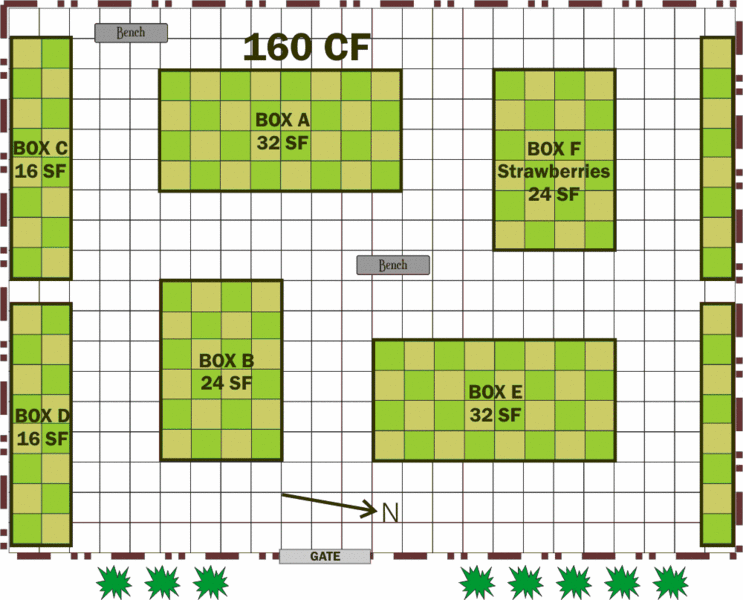
We split the work into three phases. Phase one involves building, setting up and planting boxes A, B and C. Once those are growing, we will setup boxes D and E. Box F setup will wait until our strawberries are finished for the season and then we will move them into the new garden box.
As many of you may already know from my previous posts, I am doing this project alone with the infrequent help of my kids. I am really enjoying it and have not had to ask my husband for help other then the cutting of the PVC hoop supports (I am still afraid of the power miter).
After three days of very hard work and pain due to sore back, bruises, cuts on hands and smashed fingers, phase one is ready for Mel's Mix. Each box is made of 2 x 6 finished redwood that has been sealed with a clear soy based product. They are stacked two high so that we can grow root vegetables wherever we want and to make it a little easier to maintain. The sides and corners are secured with metal brackets because the boxes were not lining up and a few of my boards were warped. I also wanted to be sure the two layers didn't shift once filled. The boxes have hardware cloth bottoms secured with staples in order to keep the gophers and moles away (hence the cut hands and smashed fingers). The water supply is underground and we will be using the buried soaker hose technique this year.
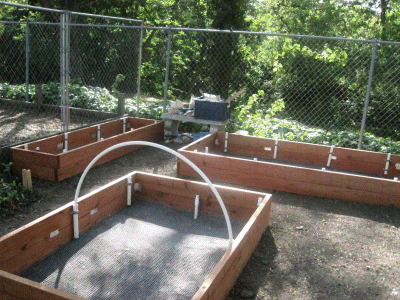
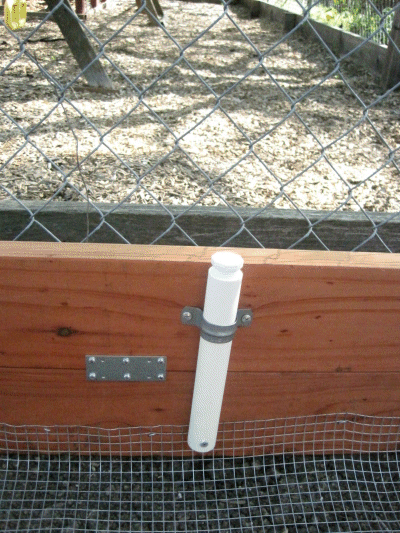
I also added PVC hoop supports to the sides of each box. Because our boxes are longer than 4 feet, we could not use the crisscrossed technique that Mel describes in his book. Here is a close-up of the bracket:
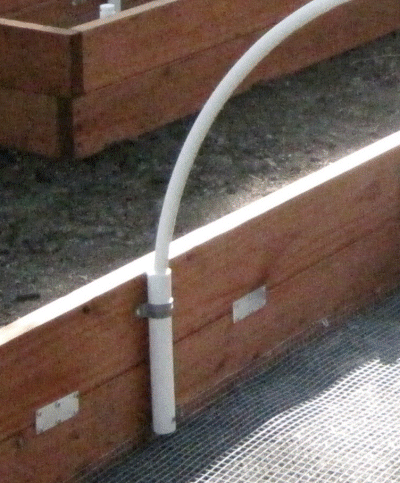
And the bracket in use:
As of this posting, we have added some Mel's Mix to the bottoms of the boxes but we ran out of time and it started to rain. Probably for the best as my body needs a few days off to recover.
I have included more pictures in the gallery for those who are interested. https://squarefoot.forumotion.com/gallery/Personal-album-of-shoda/Personal-album-of-shoda-cat_u638.htm
Thanks for looking at my garden!
We redesigned our garden area so that it would have 3-foot wide paths and a more interesting layout. Here is our plan.

We split the work into three phases. Phase one involves building, setting up and planting boxes A, B and C. Once those are growing, we will setup boxes D and E. Box F setup will wait until our strawberries are finished for the season and then we will move them into the new garden box.
As many of you may already know from my previous posts, I am doing this project alone with the infrequent help of my kids. I am really enjoying it and have not had to ask my husband for help other then the cutting of the PVC hoop supports (I am still afraid of the power miter).
After three days of very hard work and pain due to sore back, bruises, cuts on hands and smashed fingers, phase one is ready for Mel's Mix. Each box is made of 2 x 6 finished redwood that has been sealed with a clear soy based product. They are stacked two high so that we can grow root vegetables wherever we want and to make it a little easier to maintain. The sides and corners are secured with metal brackets because the boxes were not lining up and a few of my boards were warped. I also wanted to be sure the two layers didn't shift once filled. The boxes have hardware cloth bottoms secured with staples in order to keep the gophers and moles away (hence the cut hands and smashed fingers). The water supply is underground and we will be using the buried soaker hose technique this year.

I also added PVC hoop supports to the sides of each box. Because our boxes are longer than 4 feet, we could not use the crisscrossed technique that Mel describes in his book. Here is a close-up of the bracket:

And the bracket in use:

As of this posting, we have added some Mel's Mix to the bottoms of the boxes but we ran out of time and it started to rain. Probably for the best as my body needs a few days off to recover.
I have included more pictures in the gallery for those who are interested. https://squarefoot.forumotion.com/gallery/Personal-album-of-shoda/Personal-album-of-shoda-cat_u638.htm
Thanks for looking at my garden!
 Re: Hurt but Happy!
That is a wonderful looking garden. I wished my boxes looked even a half as good, not stratch that -- I wish they looked 1/4th as good.
Hope your children will become more involved now that the "grunt" work is over.
Hope your children will become more involved now that the "grunt" work is over.

Retired Member 1-
 Posts : 904
Join date : 2010-03-03
Location : USA
 Re: Hurt but Happy!
Awesome stuff! I love that you have a fenced-in area, dedicated to the veggie gardens. Very cool! I hope your kids enjoy working with you. I am trying to get my boys into it (ages 6 and  , but they are hesitant at-best.

AFLfan-
 Posts : 29
Join date : 2010-04-11
Age : 51
Location : La Mesa, CA - ZONE 8B
 Re: Hurt but Happy!
It looks awesome! You're doing a great job.

Ellie0505-
 Posts : 22
Join date : 2010-04-05
Age : 38
Location : SE Washington state
 Re: Hurt but Happy!
Your garden looks awesome! I only have 2 4x4 beds right now, and am trying to design something more interesting looking before I add more. Your garden is very inspiring!!
Nancy
Nancy

NancyD- Posts : 16
Join date : 2010-04-07
Location : Eastern Panhandle, WV
 Re: Hurt but Happy!
That is so awesome, Shoda....all of that hard work! Wow....I can't wait to see more pictures in a few weeks! Thanks for sharing.

new2this-
 Posts : 215
Join date : 2010-03-05
Age : 49
Location : southeast MN, zone 4a
 Re: Hurt but Happy!
i LOVE your boxes!
and your hoop holders - thanks for sharing close up pics of that.
what size pvc did you use for the pvc holders and what size pvc for the hoops?
i want to copy you correctly. *grin*
bettyann
who is working on garden box expansion as well. and now i want it to look like yours!
and your hoop holders - thanks for sharing close up pics of that.
what size pvc did you use for the pvc holders and what size pvc for the hoops?
i want to copy you correctly. *grin*
bettyann
who is working on garden box expansion as well.

happyfrog-
 Posts : 625
Join date : 2010-03-04
Location : USA
 Re: Hurt but Happy
Your garden looks wonderful. Good for you, doing it all yourself!

ander217-
 Posts : 1450
Join date : 2010-03-16
Age : 69
Location : Southeastern Missouri (6b)
 Re: Hurt but Happy!
You are an inspiration!

martha-
 Posts : 2188
Join date : 2010-03-03
Age : 67
Location : Acton, Massachusetts Zone 5b/6a
 Re: Hurt but Happy!
Lovely! Absolutely lovely! 
Claire
Claire

mckr3441
Certified SFG Instructor-
 Posts : 765
Join date : 2010-03-05
Age : 84
Location : Cleveland Heights, Ohio (5b)
 Re: Hurt but Happy!
Thank you for all your kind comments!
Happyfrog - I got the hoop holder idea from the Sunset Garden website. The hoop holders are 1" PVC and the PVC for the hoop is a 6' long piece of 1/2" PVC. Here is a link to the Sunset raised bed instructions where I got the idea. http://www.sunset.com/garden/perfect-raised-bed-00400000039550/ I think it is on instruction page 3 or 4. I also purchased some 3/4" PVC Threaded plugs to put in the top holes of the hoop holders when not in use so they don't fill up with dirt and stuff.
We are expecting a sunny weekend so I plan on getting those beds finished and planted!
 Re: Hurt but Happy!
Congratulations shoda! You have a very impressive set up and should be very proud of yourself! Well done. You earn a dancing banana, the forums highest honor. 

 Re: Hurt but Happy!
You have done some outstanding work! The SFGs look great and I can't wait to see all the great things to come!

Theresa
FOUNDER SFG forum 2009
certified SFG instructor-
 Posts : 211
Join date : 2010-02-26
Age : 70
Location : Illinois Z6
 Re: Hurt but Happy!
Tim -- Thank you for the honor of the dancing banana! (eyes misting over). What an honor!
 Re: Hurt but Happy!
Hi!
Great looking garden! What soy based stain did you use? It would be nice to have a natural stain that will protect the wood, and won't poison your veggies!
Have fun!
Paul
Great looking garden! What soy based stain did you use? It would be nice to have a natural stain that will protect the wood, and won't poison your veggies!
Have fun!
Paul

pauliek-
 Posts : 1
Join date : 2010-04-22
Location : Central MA
 Re: Hurt but Happy!
I used Clear Soyguard. I am not sure how welll it will hold up. The product said to only apply one coat and it took a couple days for the oil of the product to dry. They also said to re-coat in 2 years. They do offer it with color so we figured if the beds needed color help in a few years we would put redwood color on them. For now, they look pretty good the way they are.
I live in the SF Bay area. I could not find this product in the East Bay where I live but found it easily in Berkely at the Ace Hardware store there. It can also be ordered over the net. It was rather pricey (I think it was $40 for a gallon) but I only used half of that for the first phase of our project.
I live in the SF Bay area. I could not find this product in the East Bay where I live but found it easily in Berkely at the Ace Hardware store there. It can also be ordered over the net. It was rather pricey (I think it was $40 for a gallon) but I only used half of that for the first phase of our project.
 Updated Pictures
I finished the first three beds last weekend. The kids and I have been slowly planting the seedlings we started months ago along with new seeds. Here is an updated picture.
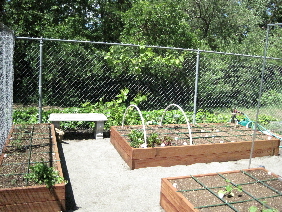
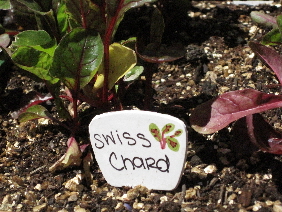
My 15 year old daughter enjoys making the plant markers something special.
For more pictures see my personal album.
https://squarefoot.forumotion.com/gallery/Personal-album-of-Shoda/Personal-album-of-Shoda-cat_u638.htm

My 15 year old daughter enjoys making the plant markers something special.

For more pictures see my personal album.
https://squarefoot.forumotion.com/gallery/Personal-album-of-Shoda/Personal-album-of-Shoda-cat_u638.htm
 New to SFG
Hi Shoda,
I have rented an allotment from the City of Toronto. My plot is 28 ft by 22 ft and has not been worked in years by the looks of it. My new garden plot is covered with weeds of every description.
This past week at work a co-worker introduce me to the concept of sfg which intriged me and thought this could work nicely for me. Before leaving to tackle my weeds yesterday I decided to do some more research on sfg which I came across your blog.
That was it - I just love what you have done - I love the creativity you have brought to sfg with the different size, shape and irregular layout of your containers. Brilliant.
Before I embark on the design of my own garden can you please confirm if I am correct in assuming that each square of your design layout accounts for one square foot. Hence, your garden measures approximately 24 ft x 18 ft.
Thank you for your time.
Linda

Linda-
 Posts : 2
Join date : 2010-05-01
Age : 77
Location : Toronto Canada
 Re: Hurt but Happy!
Linda, thank you for the complements! Yes, in the garden layout each square is one square foot. It is approx. 18x24. We have room for two 4x8 beds, 2 4x6 beds and several smaller beds as shown.
I love the way our garden is turning out and I feel driven to do more garden beds to finish it up. I am trying very hard to control myself for a week because my housework has gotten behind, my work is calling and my body is still sore from the physical labor. But it is SO worth it! All I have to do is sit in the corner of my garden and I am filled with joy watching everything growing.
The only thing I might do differently with the next bed is the buried soaker hose. Our beds are 11" deep and I put the soaker hose at 6" down. This is too far down considering Mel's Mix is below the hoses. What is happening is that no matter how long we run the hoses, the top 2" say dry.
For the remaining beds, I think I will put them 3" down. I have the hoses running directly under the grid lines so as not to interfere with the planting. I am then going to test them out before I plant anything to make sure that the water is able to soak upward.
For the beds I already planted, I think I am just going to have to do some surface watering until the seedlings put down roots far enough to reach my water source.
Please share your garden pictures with us when you get going. We love seeing everyones garden as it keeps us all inspired!
 Re: Hurt but Happy!
I love the layout and the planning...looks like it is coming together well.
You, no doubt, will be handily rewarded.
Tim
You, no doubt, will be handily rewarded.
Tim

timcos- Posts : 21
Join date : 2010-03-15
 Similar topics
» If you can't find Vermiculite.....
» Are vegetables hurt by too much light?
» will spinosad hurt frogs
» camprn - It's your birthday!!! Happy, Happy!!!
» Mel's Mix at Lowes and Home Depot
» Are vegetables hurt by too much light?
» will spinosad hurt frogs
» camprn - It's your birthday!!! Happy, Happy!!!
» Mel's Mix at Lowes and Home Depot
Page 1 of 1
Permissions in this forum:
You cannot reply to topics in this forum|
|
|


