


Search
Latest topics
» N & C Midwest—May 2024by OhioGardener Today at 2:25 pm
» Birds of the Garden
by Scorpio Rising Today at 2:05 pm
» Ohio Gardener's Greenhouse
by OhioGardener Yesterday at 3:36 pm
» Greetings from Southport NC
by sanderson Yesterday at 4:36 am
» In the news: Biosolids in Texas.
by sanderson Yesterday at 4:19 am
» Rhubarb Rhubarb
by Scorpio Rising 5/5/2024, 7:57 pm
» What Have You Picked From Your Garden Today
by Scorpio Rising 5/5/2024, 7:55 pm
» Complicated mixed up bunny poop!
by jemm 5/5/2024, 7:24 pm
» Mark's first SFG
by markqz 5/4/2024, 12:08 am
» question about the digital tools from the sfg site.
by OhioGardener 5/2/2024, 4:50 pm
» Assistance Needed: Sugar Snap Peas Yellowing and Wilting
by Scorpio Rising 5/1/2024, 8:24 pm
» OMG, GMO from an unexpected place.
by sanderson 5/1/2024, 1:57 am
» N & C Midwest: March and April 2024
by Scorpio Rising 4/29/2024, 1:30 pm
» Lovage, has anyone grown, or used
by OhioGardener 4/29/2024, 12:27 pm
» New to SFG in Arlington, Tx
by sanderson 4/26/2024, 3:13 pm
» Soil Blocks: Tutorial In Photos
by OhioGardener 4/25/2024, 5:20 pm
» Manure tea overwintered outside - is it safe to use?
by Mhpoole 4/24/2024, 7:08 pm
» Advice on my blend
by donnainzone5 4/24/2024, 12:13 pm
» Senseless Banter...
by OhioGardener 4/24/2024, 8:16 am
» What do I do with tomato plants?
by SMEDLEY BUTLER 4/23/2024, 1:36 am
» Kiwi's SFG Adventure
by sanderson 4/22/2024, 2:07 pm
» Sacrificial Tomatoes
by SMEDLEY BUTLER 4/22/2024, 10:36 am
» From the Admin - 4th EDITION of All New Square Foot Gardening is in Progress
by sanderson 4/21/2024, 5:02 pm
» Seedling Identification
by AuntieBeth 4/21/2024, 8:00 am
» Happy Birthday!!
by AtlantaMarie 4/21/2024, 6:56 am
» Three Sisters Thursday
by sanderson 4/20/2024, 5:25 pm
» Recommended store bought compost - Photos of composts
by sanderson 4/20/2024, 3:08 pm
» Compost not hot
by Guinevere 4/19/2024, 11:19 am
» Maybe a silly question but...
by sanderson 4/18/2024, 11:22 pm
» Hi from zone 10B--southern orange county, ca
by sanderson 4/18/2024, 12:25 am
Google
Business member new to SFG Community!
+3
AtlantaMarie
rabbithutch
LUAgriculture
7 posters
Page 1 of 1

Business member new to SFG Community!
![]() LUAgriculture 5/29/2014, 10:06 am
LUAgriculture 5/29/2014, 10:06 am
I just signed up for the SFG Instructor class and am really excited about it! I've been gardening for a long time and have used SFG in my own garden. My wife and I own a small business in the Dallas/Fort Worth area called Liberty Urban Agriculture where we build and install raised-bed and elevated vegetable gardens as well as backyard chicken coops.
Here are some photos of projects we've done for customers:


I hope to use the knowledge gained from an SFG certification to provide our customers with greater insight and better information about caring for their gardens as well as offer classes on SFG.
Glad to be here!
Here are some photos of projects we've done for customers:
I hope to use the knowledge gained from an SFG certification to provide our customers with greater insight and better information about caring for their gardens as well as offer classes on SFG.
Glad to be here!

LUAgriculture- Posts : 4
Join date : 2014-05-29
Location : United States
Re: Business member new to SFG Community!
![]() rabbithutch 5/29/2014, 10:46 am
rabbithutch 5/29/2014, 10:46 am
Those are some great looking beds, but they look suspiciously like the ones I designed and built.  I put the legs on the ends, not the sides, and I put stretchers down the length to support shelves.
What are the black boxes?
Welcome to SFG-TOF!
What are the black boxes?
Welcome to SFG-TOF!

rabbithutch-
 Posts : 293
Join date : 2014-02-08
Location : central TX USA Zone 8a
Re: Business member new to SFG Community!
![]() LUAgriculture 5/29/2014, 11:35 am
LUAgriculture 5/29/2014, 11:35 am
Thanks! Yeah, I've done a lot of research and developed a design that works well. But I guess there's nothing new under the sun right? 
The black boxes are mailboxes repurposed as garden tool boxes for holding your scissors, gloves, twine, etc.
Thanks for the welcome!
The black boxes are mailboxes repurposed as garden tool boxes for holding your scissors, gloves, twine, etc.
Thanks for the welcome!
LUAgriculture- Posts : 4
Join date : 2014-05-29
Location : United States
Re: Business member new to SFG Community!
![]() AtlantaMarie 5/29/2014, 1:15 pm
AtlantaMarie 5/29/2014, 1:15 pm
Hi LU. Welcome!
Interesting idea for the mailboxes...! I LIKE that.
Interesting idea for the mailboxes...! I LIKE that.

AtlantaMarie
Certified SFG Instructor-
 Posts : 5602
Join date : 2014-03-18
Age : 60
Location : Buford, GA - Zones 7B/8A -

Re: Business member new to SFG Community!
![]() sanderson 5/29/2014, 2:57 pm
sanderson 5/29/2014, 2:57 pm
They are all good looking. I love the mailboxes. It looks like you notched out one side of the top of the 4x4 post. ??

sanderson
Forum Administrator- Posts : 21554
Join date : 2013-04-21
Age : 75
Location : Fresno CA Zone 8-9 -
Re: Business member new to SFG Community!
![]() rabbithutch 5/29/2014, 3:53 pm
rabbithutch 5/29/2014, 3:53 pm
I'm having problems with an anti-malware program that is not letting me post a pic, but I'll try to describe what I did.
I used 2 pieces of 2x4. One is shorter than the other so that the sides of the box rest atop it while the longer one extends up the side. These 2x4s were glued face to face and clamped overnight. I also drove 2-1/2" screws from each of the opposing faces to ensure that they will remain together should the glue fail (I've never had a glue joint fail, but there is always a first time.). The portion of the longer 2x4 that extends along the side was drilled and 2 bolts were inserted to attach the leg to the bed.
Before I glued the faces of the 2x4s together, I routed out dadoes at the same distance from the bottom of the leg pieces. The dadoes were 3/4" deep so that when placed facing each other, there was a gap 1-1/2" into which I place a 2x4 that joins legs into pairs. That, too, was glued and screwed. With the box sides joined to the box ends and the whole turned upside down, I was able to use clamps to position a leg pair then attach it to the end of the bed and repeat the process at the other end.
I always overbuild everything for maximum strength and this was no exception. After attaching the leg pairs to each end, I then ran two 2x4 stretchers to connect the leg pairs to increase rigidity and strength. I then braced those stretcher to the legs adding even more strength and rigidity.
I'll get some pics up as soon as I figure out what the antimalware is doing to me.
Okay. Here is a jpg of my original concept design. I modified it as I went dropping the pair of legs at the center.
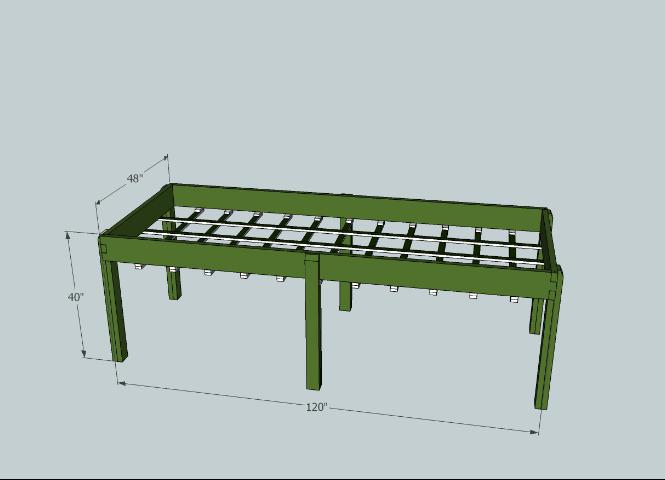
rabbithutch- Posts : 293
Join date : 2014-02-08
Location : central TX USA Zone 8a
Re: Business member new to SFG Community!
![]() rabbithutch 5/29/2014, 4:26 pm
rabbithutch 5/29/2014, 4:26 pm
This first pic shows the details of my leg construction and how I captured the stretcher between the two 2x4s to make a leg assembly. You can see the leg assembly bolted to the bed end. You can also see the stretchers that tie the leg assemblies together and the bracing added for strength and rigidity.

This one shows the entire length of the 4' by 10' bed. The narrow pieces run across the narrow dimension at 1 foot intervals. They are then supported by the 2x4 you see running from end to end.

This shows the detail of how the sides are connected. I used 2x8s for the sides but that is not deep enough for the MM and the mulch that I need; so I'll just add a 2x4 top perimeter fastened with the spikes

I used 1/2" hardware cloth for bottoms and strips every foot to further support the hardware cloth. Although not yet installed in this photo, landscape cloth was used to line the inside with one layer covering the narrow side and one layer covering the longer side and stapled up about an inch below the top edge. The unpainted strips are treated 1x2. Beneath them are 2x4s bolted to the ends with 2 going side to side. I think a small elephant would be supported by this arrangement. (Note: Before landscape fabric was installed.)

Here's a 4' by 4' bed with landscape fabric installed.

Finally, shot of the underside of the 4x4 showing the supports and hardware cloth, etc.

Because I'm the consumer here, the appearance was not a major consideration. LU's look much better than mine. The paint is the same color as the trim on the house. I will add shelves underneath and have designed a potting bench to be attached to one of the beds' ends.
This one shows the entire length of the 4' by 10' bed. The narrow pieces run across the narrow dimension at 1 foot intervals. They are then supported by the 2x4 you see running from end to end.
This shows the detail of how the sides are connected. I used 2x8s for the sides but that is not deep enough for the MM and the mulch that I need; so I'll just add a 2x4 top perimeter fastened with the spikes
I used 1/2" hardware cloth for bottoms and strips every foot to further support the hardware cloth. Although not yet installed in this photo, landscape cloth was used to line the inside with one layer covering the narrow side and one layer covering the longer side and stapled up about an inch below the top edge. The unpainted strips are treated 1x2. Beneath them are 2x4s bolted to the ends with 2 going side to side. I think a small elephant would be supported by this arrangement. (Note: Before landscape fabric was installed.)
Here's a 4' by 4' bed with landscape fabric installed.
Finally, shot of the underside of the 4x4 showing the supports and hardware cloth, etc.
Because I'm the consumer here, the appearance was not a major consideration. LU's look much better than mine. The paint is the same color as the trim on the house. I will add shelves underneath and have designed a potting bench to be attached to one of the beds' ends.
Last edited by rabbithutch on 5/29/2014, 4:28 pm; edited 1 time in total
rabbithutch- Posts : 293
Join date : 2014-02-08
Location : central TX USA Zone 8a
Re: Business member new to SFG Community!
![]() Marc Iverson 5/29/2014, 4:27 pm
Marc Iverson 5/29/2014, 4:27 pm
Nice looking boxes! I admire your craftsmanship.

Marc Iverson- Posts : 3638
Join date : 2013-07-05
Age : 62
Location : SW Oregon
Re: Business member new to SFG Community!
![]() rabbithutch 5/29/2014, 4:37 pm
rabbithutch 5/29/2014, 4:37 pm
Marc Iverson wrote:Nice looking boxes! I admire your craftsmanship.
You are too kind, Marc.
I consider these to be rather crude but very sturdy. Having worked as a youth helping framing crews build houses, I have some knowledge of the basics but I lack the patience for real finesse.
Thank you for the compliment.
rabbithutch- Posts : 293
Join date : 2014-02-08
Location : central TX USA Zone 8a
Potting Bench Addition to Table Top
![]() rabbithutch 5/29/2014, 4:56 pm
rabbithutch 5/29/2014, 4:56 pm
Here are a couple of concept drawings for the potting bench I will add to one of my TTs. The first pic shows it as it would be in use. The second shows how it attaches to the TT.

In the drawings, the dark, dark green is the leg assembly on the TT. Everything else is the potting bench and shelves. The bench will be built attached to a 2x4 cross piece which will be bolted to the leg assembly. The shelf supports are to be 2x4s bolted to the leg assembly on each side and to the bed. Not all shelf brackets are drawn but you can get the idea from the ones shown.

In the drawings, the dark, dark green is the leg assembly on the TT. Everything else is the potting bench and shelves. The bench will be built attached to a 2x4 cross piece which will be bolted to the leg assembly. The shelf supports are to be 2x4s bolted to the leg assembly on each side and to the bed. Not all shelf brackets are drawn but you can get the idea from the ones shown.
rabbithutch- Posts : 293
Join date : 2014-02-08
Location : central TX USA Zone 8a
Re: Business member new to SFG Community!
![]() LUAgriculture 5/29/2014, 6:03 pm
LUAgriculture 5/29/2014, 6:03 pm
sanderson wrote:They are all good looking. I love the mailboxes. It looks like you notched out one side of the top of the 4x4 post. ??
Hi Sanderson,
Yes, I notched out the 4x4 posts so the box rests in the notched area and then is screwed in from the side. I countersink the screws and plug the holes to give it a nice finished look.
Thanks for the compliments.
LUAgriculture- Posts : 4
Join date : 2014-05-29
Location : United States
Re: Business member new to SFG Community!
![]() ralitaco 9/13/2014, 2:55 pm
ralitaco 9/13/2014, 2:55 pm
LU and RH,
your boxes look great...I may have changed my mind on my design.
LU,
Your website mentions that you use "food grade hdpe plastic sheets" can you elaborate on what that is and where you get it.
Also, can you share some pictures of the interior of your box w/o soil.
Thanks,
Jim
your boxes look great...I may have changed my mind on my design.
LU,
Your website mentions that you use "food grade hdpe plastic sheets" can you elaborate on what that is and where you get it.
Also, can you share some pictures of the interior of your box w/o soil.
Thanks,
Jim

ralitaco- Posts : 1314
Join date : 2010-04-04
Location : Southport , NC
Re: Business member new to SFG Community!
![]() ralitaco 9/13/2014, 3:03 pm
ralitaco 9/13/2014, 3:03 pm
LU and RH,
your boxes look great...I may have changed my mind on my design.
LU,
Your website mentions that you use "food grade hdpe plastic sheets" can you elaborate on what that is and where you get it.
Also, can you share some pictures of the interior of your box w/o soil.
Thanks,
Jim
your boxes look great...I may have changed my mind on my design.
LU,
Your website mentions that you use "food grade hdpe plastic sheets" can you elaborate on what that is and where you get it.
Also, can you share some pictures of the interior of your box w/o soil.
Thanks,
Jim
ralitaco- Posts : 1314
Join date : 2010-04-04
Location : Southport , NC
Re: Business member new to SFG Community!
![]() FeedMeSeeMore 9/14/2014, 9:13 am
FeedMeSeeMore 9/14/2014, 9:13 am
I love how you made the boxes perfectly sit on the slanted brick walkway.

FeedMeSeeMore- Posts : 143
Join date : 2014-05-06
Location : Georgia
» Name this vermin...
» OCD business opportunity
» decided to go into business
» SFG as a Business from Home!
» The Plant Inn is open for business!
» OCD business opportunity
» decided to go into business
» SFG as a Business from Home!
» The Plant Inn is open for business!
Page 1 of 1
Permissions in this forum:
You cannot reply to topics in this forum|
|
|