


Search
Latest topics
» New to SFG in Arlington, Txby sanderson Today at 3:13 pm
» Soil Blocks: Tutorial In Photos
by OhioGardener Yesterday at 5:20 pm
» Manure tea overwintered outside - is it safe to use?
by Mhpoole 4/24/2024, 7:08 pm
» Advice on my blend
by donnainzone5 4/24/2024, 12:13 pm
» Senseless Banter...
by OhioGardener 4/24/2024, 8:16 am
» Rhubarb Rhubarb
by sanderson 4/23/2024, 8:52 pm
» What Have You Picked From Your Garden Today
by OhioGardener 4/23/2024, 1:53 pm
» What do I do with tomato plants?
by SMEDLEY BUTLER 4/23/2024, 1:36 am
» N & C Midwest: March and April 2024
by Scorpio Rising 4/22/2024, 4:57 pm
» Kiwi's SFG Adventure
by sanderson 4/22/2024, 2:07 pm
» Sacrificial Tomatoes
by SMEDLEY BUTLER 4/22/2024, 10:36 am
» From the Admin - 4th EDITION of All New Square Foot Gardening is in Progress
by sanderson 4/21/2024, 5:02 pm
» Seedling Identification
by AuntieBeth 4/21/2024, 8:00 am
» Happy Birthday!!
by AtlantaMarie 4/21/2024, 6:56 am
» Three Sisters Thursday
by sanderson 4/20/2024, 5:25 pm
» Recommended store bought compost - Photos of composts
by sanderson 4/20/2024, 3:08 pm
» Compost not hot
by Guinevere 4/19/2024, 11:19 am
» Maybe a silly question but...
by sanderson 4/18/2024, 11:22 pm
» Hi from zone 10B--southern orange county, ca
by sanderson 4/18/2024, 12:25 am
» Asparagus
by OhioGardener 4/17/2024, 6:17 pm
» problems with SFG forum site
by OhioGardener 4/16/2024, 8:04 am
» Strawberries per square foot.
by sanderson 4/16/2024, 4:22 am
» What are you eating from your garden today?
by sanderson 4/16/2024, 4:15 am
» April is Kids Gardening Month!
by sanderson 4/15/2024, 2:37 pm
» Creating A Potager Garden
by sanderson 4/15/2024, 2:33 pm
» Butter Beans????
by OhioGardener 4/13/2024, 5:50 pm
» Companion planting
by sanderson 4/13/2024, 4:24 pm
» First timer in Central Virginia (7b) - newly built beds 2024
by sanderson 4/13/2024, 4:16 pm
» California's Drought
by sanderson 4/10/2024, 1:43 pm
» Anyone Using Agribon Row Cover To Extend The Growing Season?
by sanderson 4/8/2024, 10:28 pm
Google
Best rain barrel instructions
+15
sanderson
PNG_Grandma
boffer
plantoid
Unmutual
Pepper
llama momma
westie
Goosegirl
camprn
Sunsanvil
mrwes40
stripesmom
Rob C
claudiamedic
19 posters
Page 2 of 2
Page 2 of 2 •  1, 2
1, 2
Re: Best rain barrel instructions
![]() PNG_Grandma 2/26/2014, 1:48 pm
PNG_Grandma 2/26/2014, 1:48 pm
Thanks for posting all this great information. Until very recently this isn't a subject I even thought about... but should have! A few weeks ago I read something about rain harvesting and began doing a bit of research. Al thought I was crazy and just laughed at me, until he watched some YouTube videos and read a few articles, then he said he was all in. Yay... true to my nature I didn't waste any time beginning a new project! Here's what we did, and why ... a bit lengthy with the photos and descriptions, but I hope it might help someone else.
Rain Harvesting Project, February 2014, Central Valley of CA
Due to the severe drought in California at this time, and the long-range forecasts for more of the same, we have decided to be proactive and build a Rain Harvesting system in our yard.
Our goal is to continue to water our backyard garden boxes and keep some if not all our flowering landscape alive, without using the City water.
The following pictures and descriptions will detail our progress, and the frustrations we've faced building our system. While YouTube videos are helpful they are not entirely descriptive!
The first step was to find the correct type of barrels to use. There are many types of rain-barrels available at all the big box stores with prices ranging from around $50 to well over $200 for a small system. The YouTube videos recommended using only food grade barrels or those containing soap. An extensive search on CraigsList provided many ads with many more prices. An ad for a local dealer connected us to a really great guy who delivered six 55 gallon blue food grade barrels to us. He advertised the barrels at $12 each but in the phone conversation he said it was an old ad and they were now $15. Not entirely pleased, but interested in him delivering the barrels for just $5 in gas money, I agreed to purchase the six barrels. We gave him $100 for his efforts, $5 more than he requested. The following day I contacted him again and we agreed to him delivering 8 more barrels for $12.50 each since the old ad was still running. He had only one blue barrel and 7 white barrels, which were not my preference since white barrels are reported to grow algae in the sunlight. He delivered the eight additional barrels and we now had 14 barrels... 7 blue and 7 white.
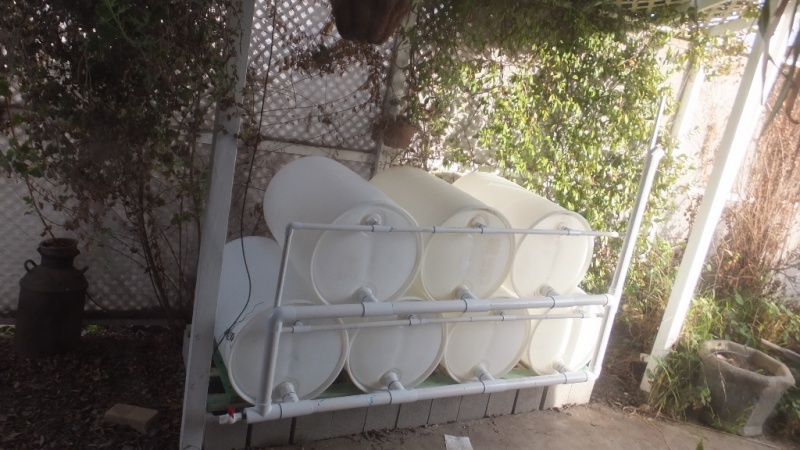
With the space limitations in our yard we chose to build two horizontal systems. Each system will be four barrels on the bottom row and three more stacked on top, all on their sides. One system will be on the east side of our house near the back of our awning at the downspout, and the other will be on the west side, again at the backside of the awning near the downspout. The white barrel system will be in the shady area on the east side, the blue barrels will be in full sun on the west side. Each system will harvest the rainwater from the entire roof and awnings of our home.
We began with the white barrels and the system on the shady east side of the house.
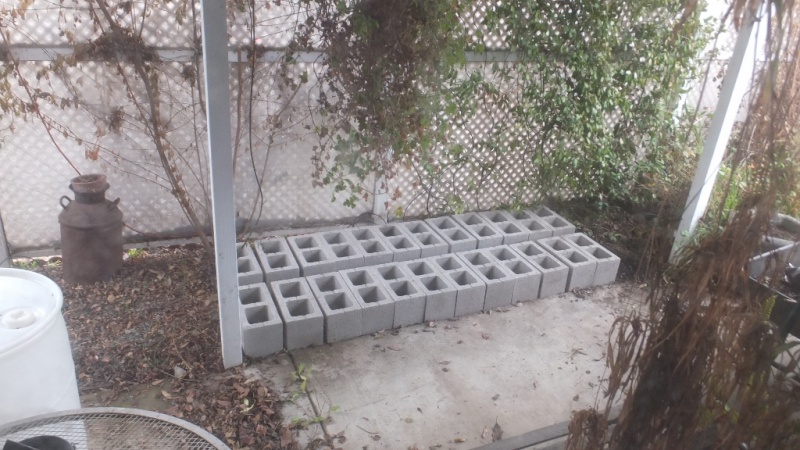
The area where the system will be built is a rocky ground cover so we purchased 24 - 8” x 8” x 16” concrete blocks for two rows, 12 blocks each, separated by 3-4” which provides a base 35” by approximately 48”.

Al began by placing the blocks on the rocky base, leveling as he made the two rows for the base.

The following day he completed the base.
To prevent the barrels from rolling Al made “cradles” for the barrels. These cradles will also support the weight of the water along the sides of the barrels... front, middle, and rear. These cradle strips were treated with a wood preservative to prevent rotting from the elements.

After watching many videos on the construction of these systems we decided to use 2” PVC pipe and fittings. Many other systems were built with 3/4” pipes and fittings but the builders later said the inflow of rainwater was much too fast for the 3/4” size to handle. Our 2” piping and fittings may be a bit large but we want to harvest every bit of rainwater available without overflowing.
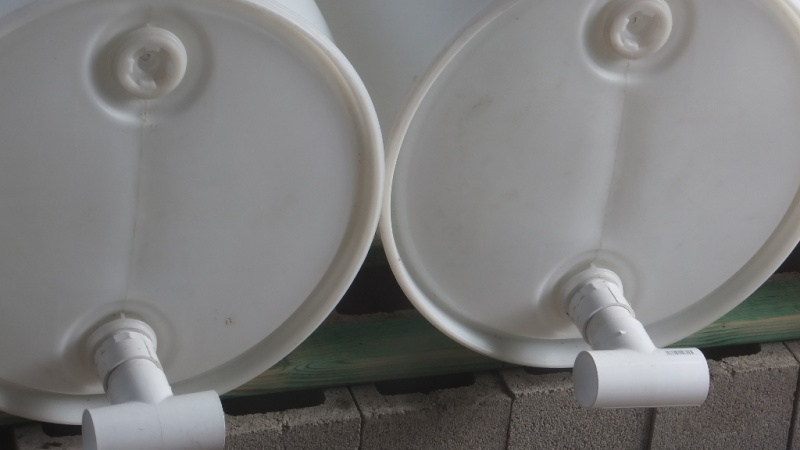
While at The Home Depot searching for fittings we realized that the “bungs” in the lids of each barrel have two different threads. One bung (the screw in caps on the lids of the barrels) has a regular pipe thread and the other has a very coarse thread. For the regular thread we used a 2” fitting. A short piece of pipe was then cut to attach the “tee” fitting to the screwed in cap fitting. This will allow the barrels to be connected together for the water to flow into each barrel. Here are the first four barrels lined up on the cradles with the first fittings in place.


With a fresh outlook and more determination we began again on our project. Even though it seemed a total waste of time and effort we “dry fitted” all the parts, most all of the parts.

The frustrations of trying to level every section EACH and EVERY time we moved even one small part … well, there were many moments of total silence, and a few with not so much silence!
Once we found the parts were fitting the way they should, as long as we straightened the barrels and leveled them vertically and horizontally … we began taking it all apart. Seems like a waste, but this is how we had to do it. Fit it all together, then take it all apart. The 2” pieces all fit. Because they do we took a chance that the 3/4” pieces would fit as well.
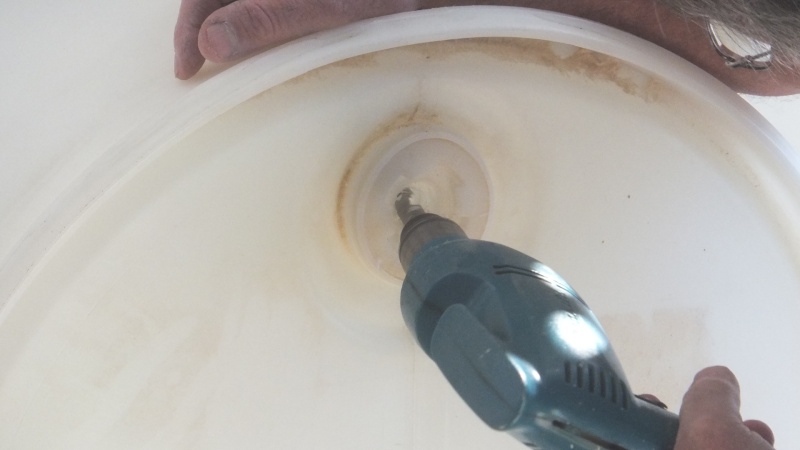
The 3/4” pipes and fittings were for the air venting. To allow the barrels to fill properly we must have vents for the air to escape. Remember when I described the two different bungs in the lids of these barrels? One had a regular pipe thread and the other had a much coarser thread. This coarse threaded bung is left in the barrel and just the center is drilled out. There is a 3/4” threaded area in the center of these bungs and when drilled out the remaining threads are a perfect fit for a 3/4” fitting. The challenge here is trying to get the centers drilled out without moving the darned barrels! Any pushing or pulling immediately misaligned the barrels both side to side and up and down. Grrrr.

Time for some deep breathing... we're about to jump off into the unknown... we're gonna use the glue!
This glue lets us have about 15 seconds to decide if we've got it right or not. If not...too bad, it's done. Yikes!
We took a little break, just sat down and talked about exactly how we'd go about putting the pieces together. Our first thought was to just start at one end and then move from barrel to barrel. Hmmm, not so fast! By starting with the center two barrels we would have the flexibility of moving each outside barrel just a wee bit to get the fittings in place before that glue dried. Not only were we gluing the fittings in place but we also had to level the fittings AND get the barrels into place … all in less than 15 seconds!!!
Lots of tight-lipped silence happening. Probably better than #%@&!!!, right???

Once the glue was set, and we took another short break to breathe again... we knew we had to seal every part that might possibly leak. We had purchased a couple of tubes of Gutter Adhesive, made for exactly this... well, almost exactly this application. The clear sealant pushed into all the little nooks and crannies and threaded areas of the fittings. This stuff stayed pliable while we moved it around and smooshed it into the areas most likely to leak.
Hey, we're almost finished!! The air vent is in place, we just have to connect to a downspout... somehow.
Because we live in a mobile home, or manufactured home... the fittings, parts, pieces, just about every single thing is a tiny bit different than a regular house. The downspout fittings are no exception. Not one single downspout had the same end piece as on our gutters. Not in stores, not online. We had to again get a bit creative … we bought a regular downspout accordion fit extender downspout with larger rectangular end pieces. Our gutter has a smallish square piece that attaches to the squarish downspout built for our house. The end of the new downspout was just gonna have to fit inside the hard rubber but somewhat flexible 3” to 2” fitting we bought. The 2” part had no problems fitting over our 2” PVC pipe and was clamped on with the built in screw-type clamp. One end working just fine. Well, with a bit of adjusting. I brought out my hair dryer, heated the end of the downspout and we stuffed the rectangular end inside the round fitting. HA, it worked! Clamped it down before it could change it's mind about cooperating, and one more part finished!

Al punched a small hole in the sidewall of the upper section of the downspout and put a large hook through it... hanging it from the gutter much the way we hang our plants. This is a temporary fix, doesn't look very pretty but it works!

We hope we're finished with this first rain harvesting system. We've watched a bunch of videos on YouTube with guys telling us all sorts of things … some very technical and other just plain outlandish! Not one video had a detailed guide along with a suggested shopping list. We stopped a couple of videos and printed still images to take to The Home Depot with us to find parts. Mostly we improvised and created our own system as we went along. We should harvest about 345 gallons of rainwater … hope our hard work pays off!

Please let us know what you think of our rain harvesting system.
Rain Harvesting Project, February 2014, Central Valley of CA
Due to the severe drought in California at this time, and the long-range forecasts for more of the same, we have decided to be proactive and build a Rain Harvesting system in our yard.
Our goal is to continue to water our backyard garden boxes and keep some if not all our flowering landscape alive, without using the City water.
The following pictures and descriptions will detail our progress, and the frustrations we've faced building our system. While YouTube videos are helpful they are not entirely descriptive!
The first step was to find the correct type of barrels to use. There are many types of rain-barrels available at all the big box stores with prices ranging from around $50 to well over $200 for a small system. The YouTube videos recommended using only food grade barrels or those containing soap. An extensive search on CraigsList provided many ads with many more prices. An ad for a local dealer connected us to a really great guy who delivered six 55 gallon blue food grade barrels to us. He advertised the barrels at $12 each but in the phone conversation he said it was an old ad and they were now $15. Not entirely pleased, but interested in him delivering the barrels for just $5 in gas money, I agreed to purchase the six barrels. We gave him $100 for his efforts, $5 more than he requested. The following day I contacted him again and we agreed to him delivering 8 more barrels for $12.50 each since the old ad was still running. He had only one blue barrel and 7 white barrels, which were not my preference since white barrels are reported to grow algae in the sunlight. He delivered the eight additional barrels and we now had 14 barrels... 7 blue and 7 white.
With the space limitations in our yard we chose to build two horizontal systems. Each system will be four barrels on the bottom row and three more stacked on top, all on their sides. One system will be on the east side of our house near the back of our awning at the downspout, and the other will be on the west side, again at the backside of the awning near the downspout. The white barrel system will be in the shady area on the east side, the blue barrels will be in full sun on the west side. Each system will harvest the rainwater from the entire roof and awnings of our home.
We began with the white barrels and the system on the shady east side of the house.
The area where the system will be built is a rocky ground cover so we purchased 24 - 8” x 8” x 16” concrete blocks for two rows, 12 blocks each, separated by 3-4” which provides a base 35” by approximately 48”.
Al began by placing the blocks on the rocky base, leveling as he made the two rows for the base.
The following day he completed the base.
To prevent the barrels from rolling Al made “cradles” for the barrels. These cradles will also support the weight of the water along the sides of the barrels... front, middle, and rear. These cradle strips were treated with a wood preservative to prevent rotting from the elements.
After watching many videos on the construction of these systems we decided to use 2” PVC pipe and fittings. Many other systems were built with 3/4” pipes and fittings but the builders later said the inflow of rainwater was much too fast for the 3/4” size to handle. Our 2” piping and fittings may be a bit large but we want to harvest every bit of rainwater available without overflowing.
While at The Home Depot searching for fittings we realized that the “bungs” in the lids of each barrel have two different threads. One bung (the screw in caps on the lids of the barrels) has a regular pipe thread and the other has a very coarse thread. For the regular thread we used a 2” fitting. A short piece of pipe was then cut to attach the “tee” fitting to the screwed in cap fitting. This will allow the barrels to be connected together for the water to flow into each barrel. Here are the first four barrels lined up on the cradles with the first fittings in place.
With a fresh outlook and more determination we began again on our project. Even though it seemed a total waste of time and effort we “dry fitted” all the parts, most all of the parts.
The frustrations of trying to level every section EACH and EVERY time we moved even one small part … well, there were many moments of total silence, and a few with not so much silence!
Once we found the parts were fitting the way they should, as long as we straightened the barrels and leveled them vertically and horizontally … we began taking it all apart. Seems like a waste, but this is how we had to do it. Fit it all together, then take it all apart. The 2” pieces all fit. Because they do we took a chance that the 3/4” pieces would fit as well.
The 3/4” pipes and fittings were for the air venting. To allow the barrels to fill properly we must have vents for the air to escape. Remember when I described the two different bungs in the lids of these barrels? One had a regular pipe thread and the other had a much coarser thread. This coarse threaded bung is left in the barrel and just the center is drilled out. There is a 3/4” threaded area in the center of these bungs and when drilled out the remaining threads are a perfect fit for a 3/4” fitting. The challenge here is trying to get the centers drilled out without moving the darned barrels! Any pushing or pulling immediately misaligned the barrels both side to side and up and down. Grrrr.
Time for some deep breathing... we're about to jump off into the unknown... we're gonna use the glue!
This glue lets us have about 15 seconds to decide if we've got it right or not. If not...too bad, it's done. Yikes!
We took a little break, just sat down and talked about exactly how we'd go about putting the pieces together. Our first thought was to just start at one end and then move from barrel to barrel. Hmmm, not so fast! By starting with the center two barrels we would have the flexibility of moving each outside barrel just a wee bit to get the fittings in place before that glue dried. Not only were we gluing the fittings in place but we also had to level the fittings AND get the barrels into place … all in less than 15 seconds!!!
Lots of tight-lipped silence happening. Probably better than #%@&!!!, right???
Once the glue was set, and we took another short break to breathe again... we knew we had to seal every part that might possibly leak. We had purchased a couple of tubes of Gutter Adhesive, made for exactly this... well, almost exactly this application. The clear sealant pushed into all the little nooks and crannies and threaded areas of the fittings. This stuff stayed pliable while we moved it around and smooshed it into the areas most likely to leak.
Hey, we're almost finished!! The air vent is in place, we just have to connect to a downspout... somehow.
Because we live in a mobile home, or manufactured home... the fittings, parts, pieces, just about every single thing is a tiny bit different than a regular house. The downspout fittings are no exception. Not one single downspout had the same end piece as on our gutters. Not in stores, not online. We had to again get a bit creative … we bought a regular downspout accordion fit extender downspout with larger rectangular end pieces. Our gutter has a smallish square piece that attaches to the squarish downspout built for our house. The end of the new downspout was just gonna have to fit inside the hard rubber but somewhat flexible 3” to 2” fitting we bought. The 2” part had no problems fitting over our 2” PVC pipe and was clamped on with the built in screw-type clamp. One end working just fine. Well, with a bit of adjusting. I brought out my hair dryer, heated the end of the downspout and we stuffed the rectangular end inside the round fitting. HA, it worked! Clamped it down before it could change it's mind about cooperating, and one more part finished!
Al punched a small hole in the sidewall of the upper section of the downspout and put a large hook through it... hanging it from the gutter much the way we hang our plants. This is a temporary fix, doesn't look very pretty but it works!
We hope we're finished with this first rain harvesting system. We've watched a bunch of videos on YouTube with guys telling us all sorts of things … some very technical and other just plain outlandish! Not one video had a detailed guide along with a suggested shopping list. We stopped a couple of videos and printed still images to take to The Home Depot with us to find parts. Mostly we improvised and created our own system as we went along. We should harvest about 345 gallons of rainwater … hope our hard work pays off!
Please let us know what you think of our rain harvesting system.

PNG_Grandma-
 Posts : 297
Join date : 2010-06-20
Age : 76
Location : Modesto CA, Central Valley, USDA Zone 9b, Sunset 14, AHS Heat Zone 8, whew!
... more about our rain harvesting system
![]() PNG_Grandma 2/26/2014, 5:14 pm
PNG_Grandma 2/26/2014, 5:14 pm
I was asked about the stability of our barrels... what keeps the bottom barrels from rolling apart when the top barrels fill. Great question! These barrels will weigh about 400 pounds when filled with water... they won't fill to capacity due to the location of the fill holes and vent holes, but still, they WILL be pretty darned heavy!
In the detailed instructions posted on the other topic pages we showed the 2x4 strips we placed at the base of each outside barrel, just for this purpose. Before the barrels fill with too much water we will either put two thick rods of rebar (taller than the top barrels) into the ground at each end of the system and link the tops of the rebar together with chain ... or we'll place tie-down straps around the entire system to hold them in place.
None of the videos on YouTube speak of any barrels rolling apart, but if these were to break free when full of water they would take out that post on the left that holds up the awning on our house that's attached to our roof. DISASTER!! Not to mention the potential harm to any humans standing nearby. Yes, we've thought of the safety issues too.
Here in the Central Valley in CA we occasionally have a small earthquake, nothing large... and because we're mostly on sand we have a low rolling quake, not the harsh jolts of the more coastal areas of CA. We think we've prepared for just about any problems...
With that said, I must tell you that after the rain began today, and enough came down to fill the gutter a bit and drip into the downspout ... we found a problem. We forgot to glue the last few fittings!! The downspout was clamped to the black flexible fitting that you see in the picture and it was clamped to the 45° fitting that was attached to the 2" pipe which went into a "T" fitting then continued on down to the 90° fitting to begin filling the bottom barrels. We forgot to glue the 45° and the Tee fittings!! They were leaking... but hey, that was exciting to see because it meant the system was working!!! During a lull in the light rain Al quickly glued the fittings and wiped off the outside drips. Over an hour later and there are no new drips... and it's still raining. YAY!! Seems like it's working. Again, whew.
PNG_Grandma- Posts : 297
Join date : 2010-06-20
Age : 76
Location : Modesto CA, Central Valley, USDA Zone 9b, Sunset 14, AHS Heat Zone 8, whew!
Re: Best rain barrel instructions
![]() sanderson 11/12/2014, 2:16 pm
sanderson 11/12/2014, 2:16 pm
PNG_Grandma and others, Any updates on your rain water collection systems? For desert and dry dwellers, these can be food for thought.


sanderson
Forum Administrator- Posts : 21547
Join date : 2013-04-21
Age : 75
Location : Fresno CA Zone 8-9 -

Re: Best rain barrel instructions
![]() PNG_Grandma 11/12/2014, 3:03 pm
PNG_Grandma 11/12/2014, 3:03 pm
Thanks for asking! We built a second set of rain barrels for the west side of our house but weren't sure how much would actually fill. We can't see the water in these blue barrels but only guess by the sound when we tap them. The image is not tilted, the barrels are! Our driveway slopes from our backyard to the street and we didn't think we'd have a problem ... so far, no problem. During the rain we had on Oct 31 and Nov 1st, not a long rain, but enough to fill the barrels and shoot the water back out the air vent! By the time I grabbed the camera the shooting up water had lessened, but you can still see it pouring out of the 3/4" upright PVC air vent pipe.
During the summer Al used water from our white barrels to do some of our plants in the yard and the backyard container gardens. With the rain on Nov 1st the white barrels filled again. It is mind boggling to see how fast these barrels fill, and with only 1/4 of our roof, possibly just from the awnings on both sides of our mobile home. Our home is 24 x53 but the awnings add another 12' to each side... so our rain collecting roof area is 48' x 53' ... and the barrels fill from only 1/4 of that area on each side of the house. In the image you can see the water pouring off our neighbors gutter. My personal opinion is that EVERYONE in CA should be collecting at least some of the rainwater ... it's free!

During the summer Al used water from our white barrels to do some of our plants in the yard and the backyard container gardens. With the rain on Nov 1st the white barrels filled again. It is mind boggling to see how fast these barrels fill, and with only 1/4 of our roof, possibly just from the awnings on both sides of our mobile home. Our home is 24 x53 but the awnings add another 12' to each side... so our rain collecting roof area is 48' x 53' ... and the barrels fill from only 1/4 of that area on each side of the house. In the image you can see the water pouring off our neighbors gutter. My personal opinion is that EVERYONE in CA should be collecting at least some of the rainwater ... it's free!
PNG_Grandma- Posts : 297
Join date : 2010-06-20
Age : 76
Location : Modesto CA, Central Valley, USDA Zone 9b, Sunset 14, AHS Heat Zone 8, whew!
Rain barrel
![]() MrBooker 4/7/2016, 5:04 am
MrBooker 4/7/2016, 5:04 am
This looks to be pretty simple but it's only a single barrel. I'm going to try this one today.claudiamedic wrote:It seems overwhelming....without any "Mr. Fixit" (or Ms. Fixit) around it is the blind-leading-the-blind. Keep the suggestions coming!
https://www.youtube.com/watch?v=MYTNciCplmw&nohtml5=False

MrBooker-
 Posts : 736
Join date : 2016-03-19
Age : 78
Location : 62260
Re: Best rain barrel instructions
![]() johnp 4/7/2016, 10:39 am
johnp 4/7/2016, 10:39 am
I liked the video, looks simple and I already have two barrels in a greenhouse that I no longer use. One for the back and one in the front.

johnp- Posts : 644
Join date : 2013-01-05
Age : 78
Location : high desert, Penrose CO
Re: Best rain barrel instructions
![]() PNG_Grandma 4/7/2016, 1:35 pm
PNG_Grandma 4/7/2016, 1:35 pm
Our two sets of barrels (7 + 7) are still full and with each brief storm we replenish any water we've used in our yard or the Apollo Garden. During the next few days we might get a small amount of rain here in the Modesto area (we're in the northern part of the central valley of CA) and because the barrels are all full the rain will just run off the roof onto the ground. Always seems so sad that we can't harvest more of that precious water! We're still in "Extreme Drought Conditions" through a good part of CA. The plus side of our 4 yr drought and now having rain - the wild flowers along the freeways and on the hills and out in the desert areas are beyond beautiful! The hills are a gorgeous green with large areas of golden poppies, yellow mustard, the blue and lavenders of the many wildflowers - huge swipes of color seemingly painted with an invisible and ginormous paintbrush!

PNG_Grandma- Posts : 297
Join date : 2010-06-20
Age : 76
Location : Modesto CA, Central Valley, USDA Zone 9b, Sunset 14, AHS Heat Zone 8, whew!
Re: Best rain barrel instructions
![]() ralitaco 5/4/2016, 9:12 pm
ralitaco 5/4/2016, 9:12 pm
Saw this on Family Handyman:
How to Build a Rain Barrel
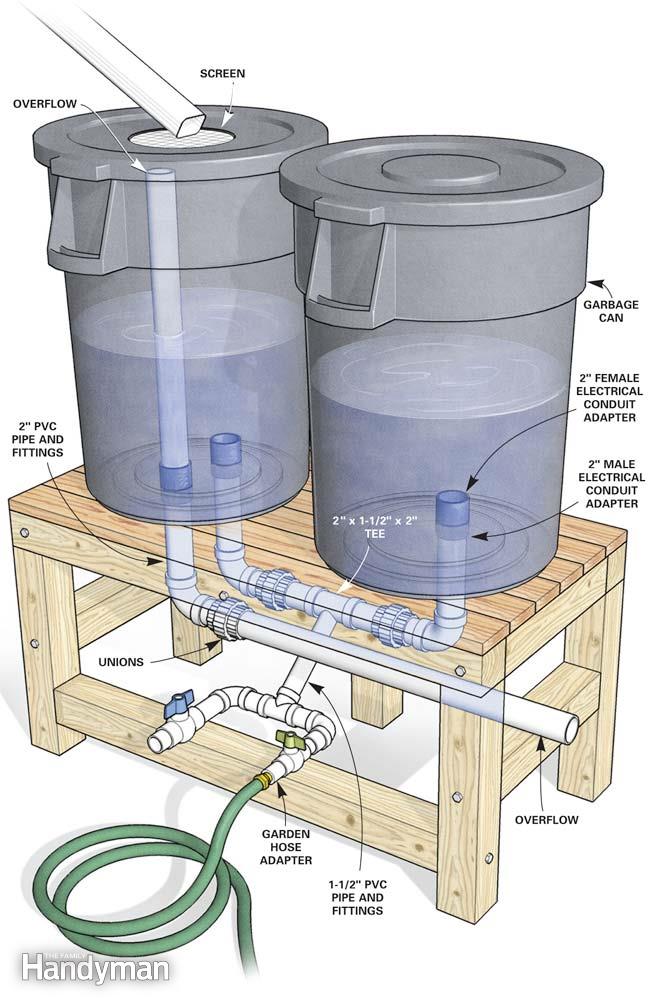
How to Build a Rain Barrel

ralitaco- Posts : 1312
Join date : 2010-04-04
Location : Hampstead, NC
Re: Best rain barrel instructions
![]() sanderson 12/20/2023, 2:43 am
sanderson 12/20/2023, 2:43 am
Bump. 
Winter is usually the rainy season, and I'm wondering who actually made a collection system since this thread first started in 2012. New members, do any of you have a system you would like to share?
Winter is usually the rainy season, and I'm wondering who actually made a collection system since this thread first started in 2012. New members, do any of you have a system you would like to share?
sanderson
Forum Administrator- Posts : 21547
Join date : 2013-04-21
Age : 75
Location : Fresno CA Zone 8-9 -
Re: Best rain barrel instructions
![]() markqz 12/24/2023, 8:01 pm
markqz 12/24/2023, 8:01 pm
I just put out barrels when it rains. Since the rainy season lasts only four months, that makes it easy to hide them away from the front of the house or use for other tasks (like collecting material for compost).
But it does mean I have to do more work to move the water to where it is needed. I use an old hose, start a siphon on it, and move the water to where it is needed which is fortunately mostly downhill from the house.
But it does mean I have to do more work to move the water to where it is needed. I use an old hose, start a siphon on it, and move the water to where it is needed which is fortunately mostly downhill from the house.

markqz
Forum Moderator- Posts : 914
Join date : 2019-09-02
Location : Lower left hand corner
sanderson likes this post
Re: Best rain barrel instructions
![]() sanderson 12/28/2023, 4:34 pm
sanderson 12/28/2023, 4:34 pm
Are they 55-gallon containers? It looks like we may get some rain.
https://www.ventusky.com/
https://www.ventusky.com/
sanderson
Forum Administrator- Posts : 21547
Join date : 2013-04-21
Age : 75
Location : Fresno CA Zone 8-9 -
Re: Best rain barrel instructions
![]() markqz 12/28/2023, 5:39 pm
markqz 12/28/2023, 5:39 pm
sanderson wrote:Are they 55-gallon containers? It looks like we may get some rain.
https://www.ventusky.com/
Standard 35 gallons.
markqz
Forum Moderator- Posts : 914
Join date : 2019-09-02
Location : Lower left hand corner
sanderson likes this post
Page 2 of 2 • 1, 2
» When is it safe to start filling my rain barrel?
» Rain barrel question
» How do you have your rain barrel set up?
» Rain Barrel Question
» is this a good rain barrel?
» Rain barrel question
» How do you have your rain barrel set up?
» Rain Barrel Question
» is this a good rain barrel?
Page 2 of 2
Permissions in this forum:
You cannot reply to topics in this forum|
|
|