


by sanderson Yesterday at 3:13 pm
» Soil Blocks: Tutorial In Photos
by OhioGardener 4/25/2024, 5:20 pm
» Manure tea overwintered outside - is it safe to use?
by Mhpoole 4/24/2024, 7:08 pm
» Advice on my blend
by donnainzone5 4/24/2024, 12:13 pm
» Senseless Banter...
by OhioGardener 4/24/2024, 8:16 am
» Rhubarb Rhubarb
by sanderson 4/23/2024, 8:52 pm
» What Have You Picked From Your Garden Today
by OhioGardener 4/23/2024, 1:53 pm
» What do I do with tomato plants?
by SMEDLEY BUTLER 4/23/2024, 1:36 am
» N & C Midwest: March and April 2024
by Scorpio Rising 4/22/2024, 4:57 pm
» Kiwi's SFG Adventure
by sanderson 4/22/2024, 2:07 pm
» Sacrificial Tomatoes
by SMEDLEY BUTLER 4/22/2024, 10:36 am
» From the Admin - 4th EDITION of All New Square Foot Gardening is in Progress
by sanderson 4/21/2024, 5:02 pm
» Seedling Identification
by AuntieBeth 4/21/2024, 8:00 am
» Happy Birthday!!
by AtlantaMarie 4/21/2024, 6:56 am
» Three Sisters Thursday
by sanderson 4/20/2024, 5:25 pm
» Recommended store bought compost - Photos of composts
by sanderson 4/20/2024, 3:08 pm
» Compost not hot
by Guinevere 4/19/2024, 11:19 am
» Maybe a silly question but...
by sanderson 4/18/2024, 11:22 pm
» Hi from zone 10B--southern orange county, ca
by sanderson 4/18/2024, 12:25 am
» Asparagus
by OhioGardener 4/17/2024, 6:17 pm
» problems with SFG forum site
by OhioGardener 4/16/2024, 8:04 am
» Strawberries per square foot.
by sanderson 4/16/2024, 4:22 am
» What are you eating from your garden today?
by sanderson 4/16/2024, 4:15 am
» April is Kids Gardening Month!
by sanderson 4/15/2024, 2:37 pm
» Creating A Potager Garden
by sanderson 4/15/2024, 2:33 pm
» Butter Beans????
by OhioGardener 4/13/2024, 5:50 pm
» Companion planting
by sanderson 4/13/2024, 4:24 pm
» First timer in Central Virginia (7b) - newly built beds 2024
by sanderson 4/13/2024, 4:16 pm
» California's Drought
by sanderson 4/10/2024, 1:43 pm
» Anyone Using Agribon Row Cover To Extend The Growing Season?
by sanderson 4/8/2024, 10:28 pm
My first Hugelkultur Raised Bed

My first Hugelkultur Raised Bed
![]() SQWIB 3/17/2017, 9:35 am
SQWIB 3/17/2017, 9:35 am
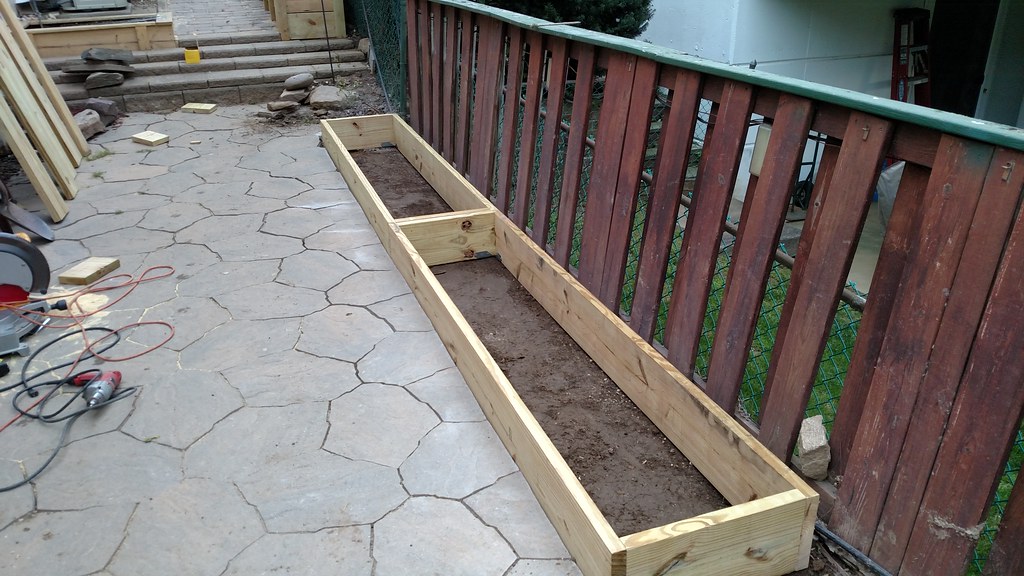
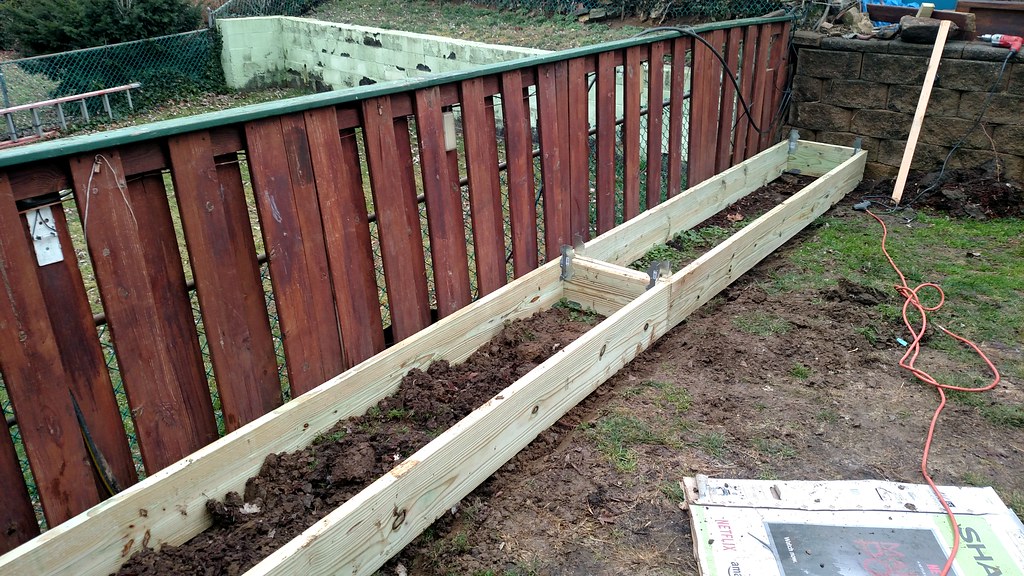
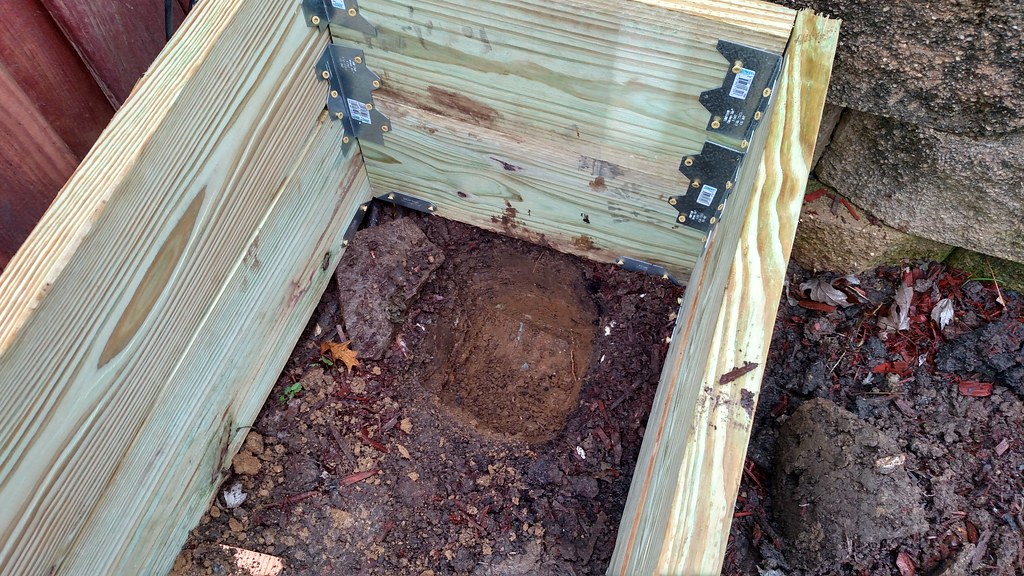
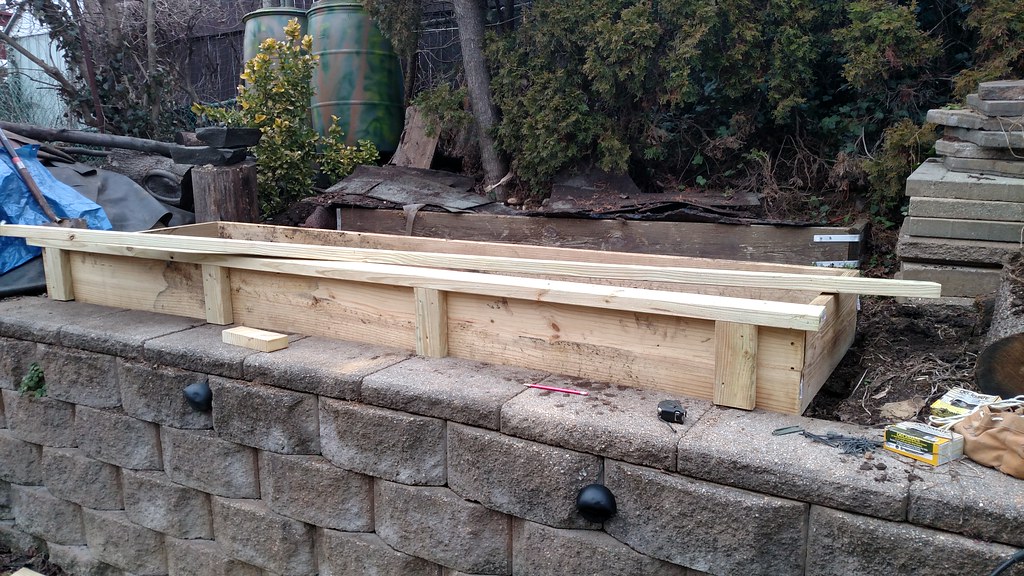
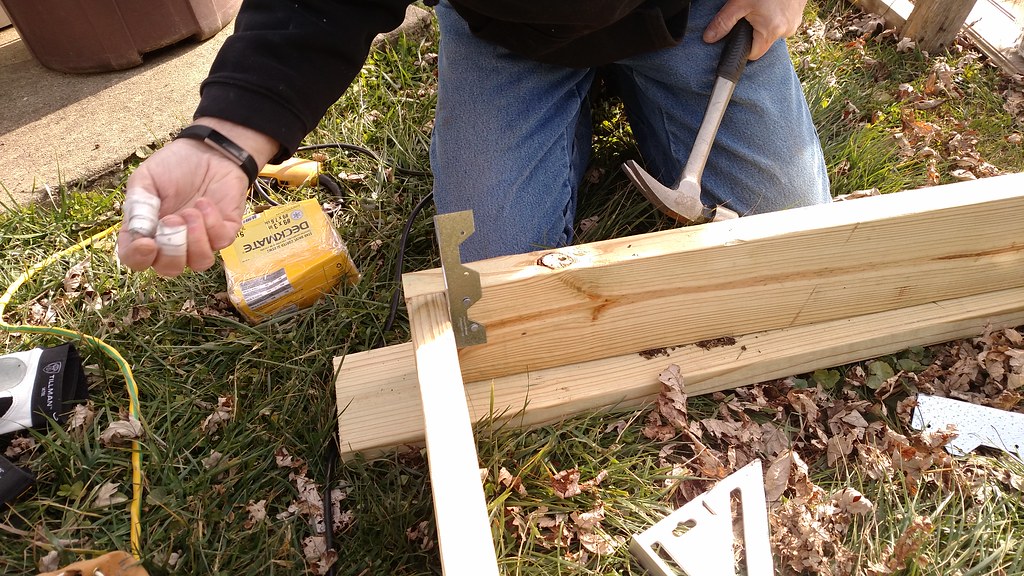
Raised bed #4
- (6) 2x10x10
- (3) 2x4x10
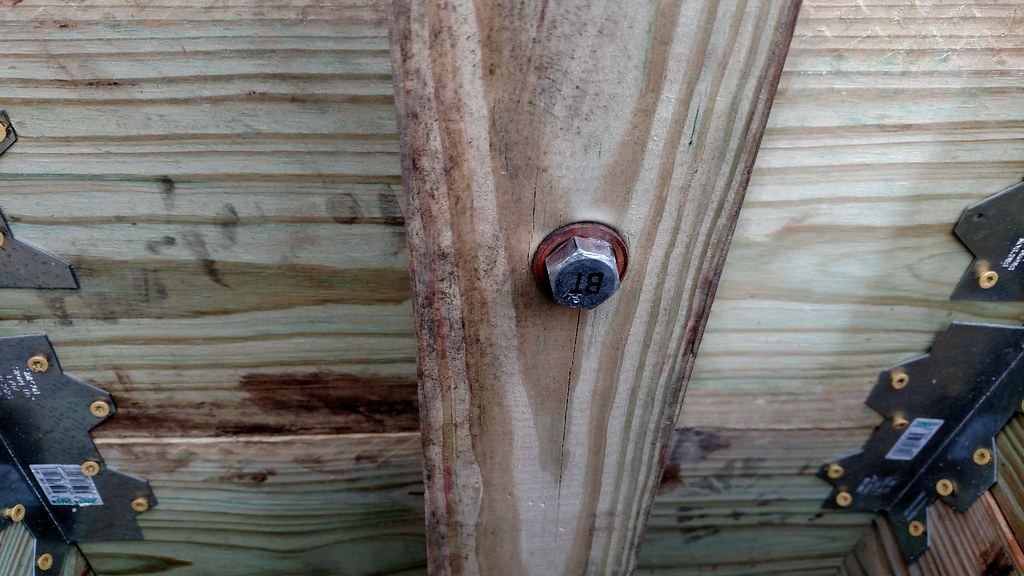
- (1) #8 x 1-5/8 in. Star Flat-Head Wood Deck Screws (1 lb.-Pack) [1-1/2" is fine, but this is what I had]
- (1) #10 x 3 in. Star Flat-Head Wood Deck Screws (5 lb.-Pack)
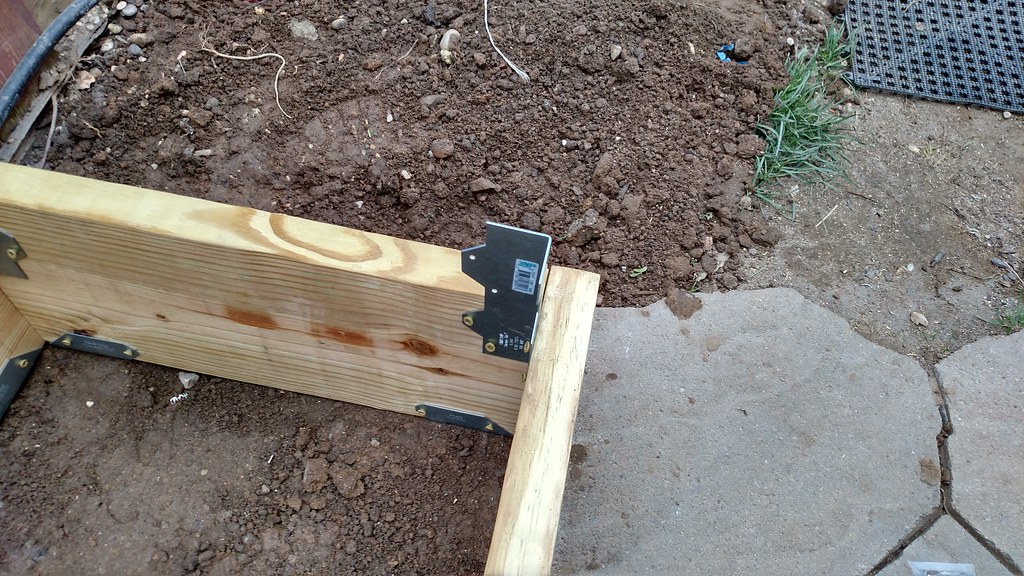
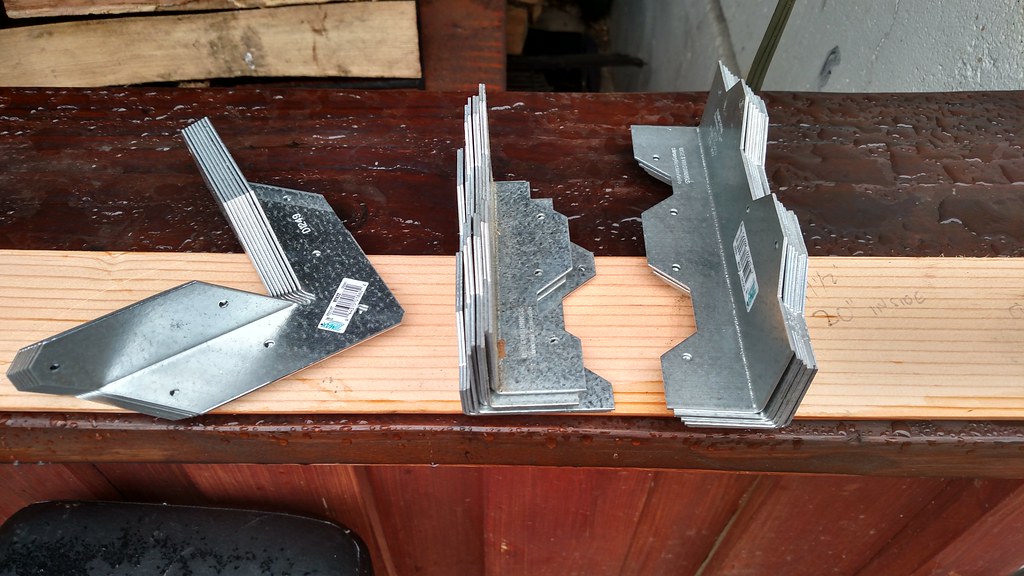
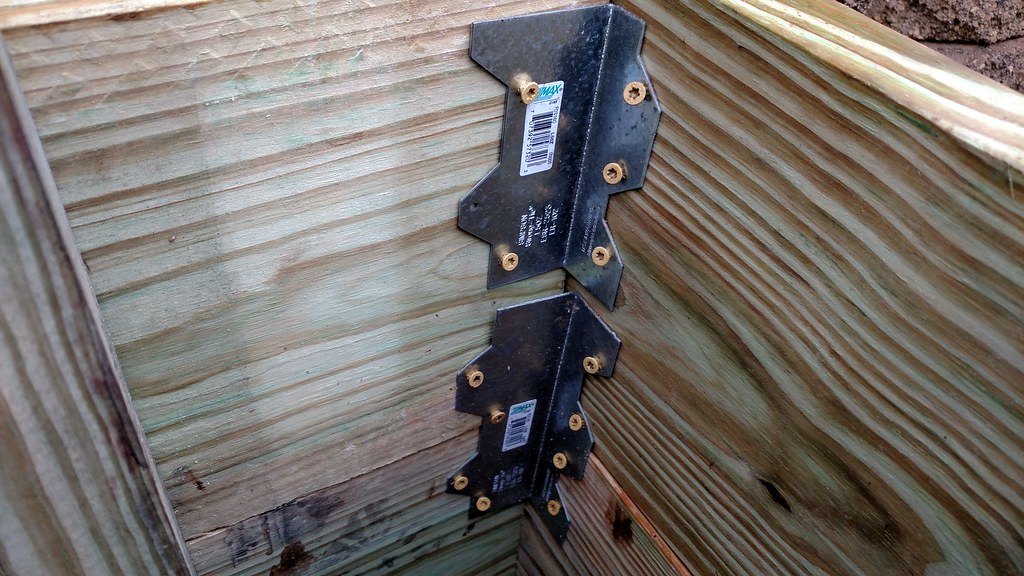
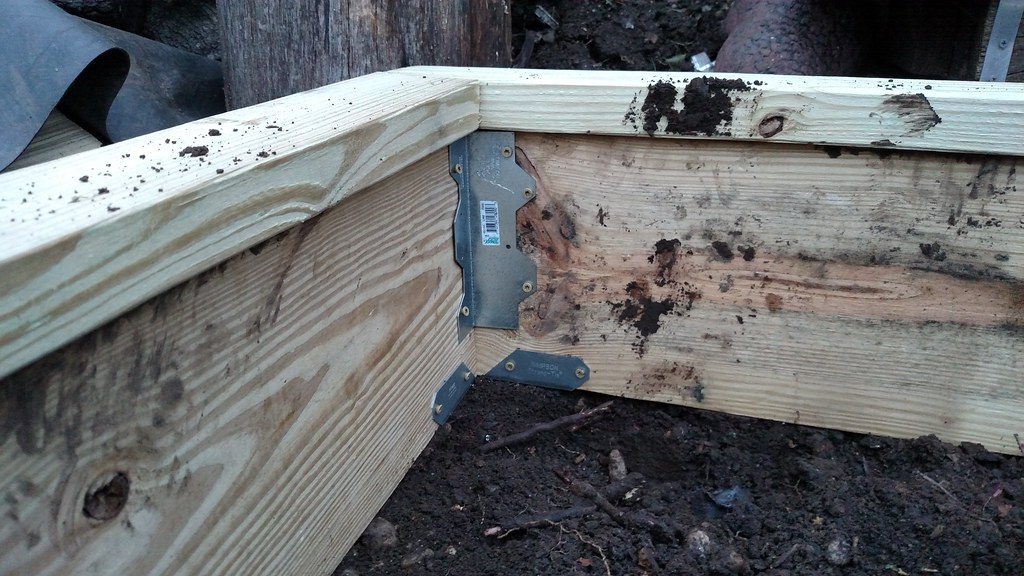
- (4) ZMAX Galvanized 16-Gauge 2X Rigid Tie Connector
- (2) ZMAX 7 in. 16-Gauge Galvanized Reinforcing L-Angle
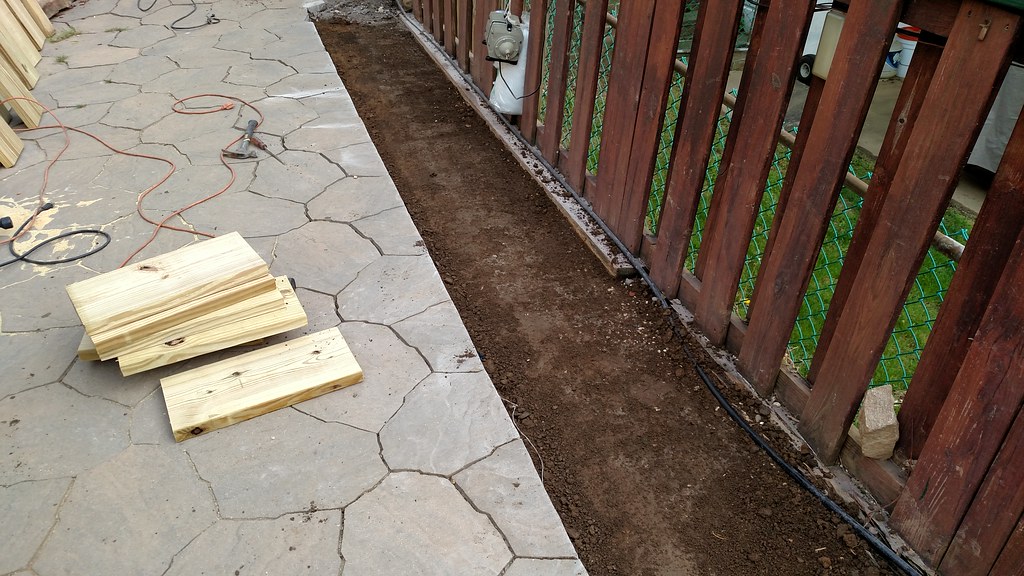
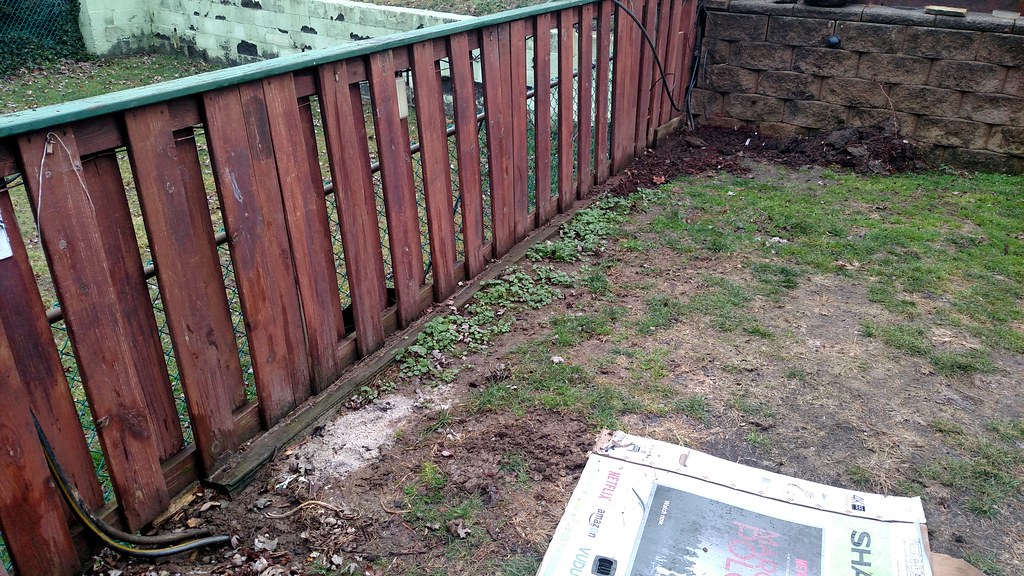
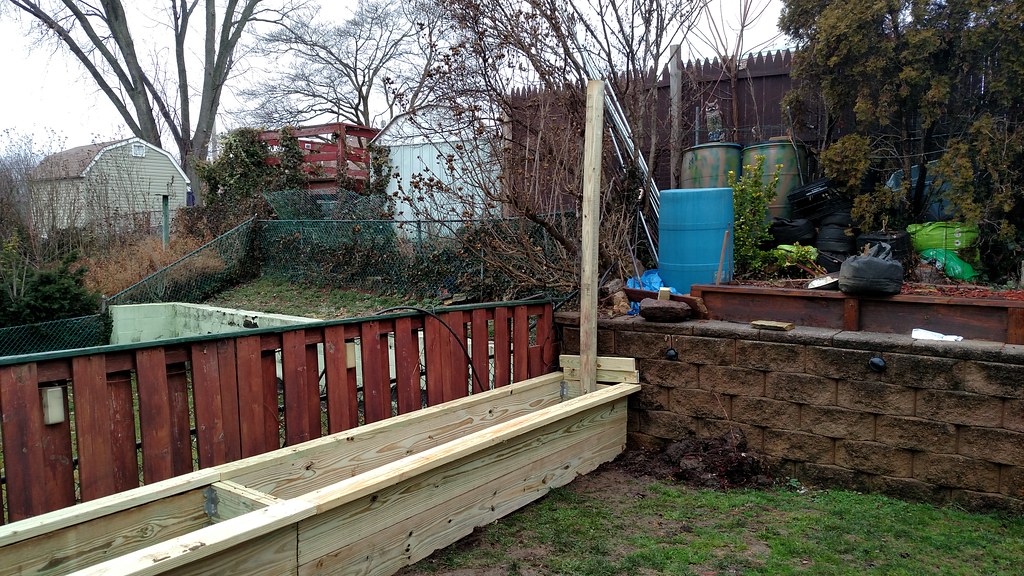
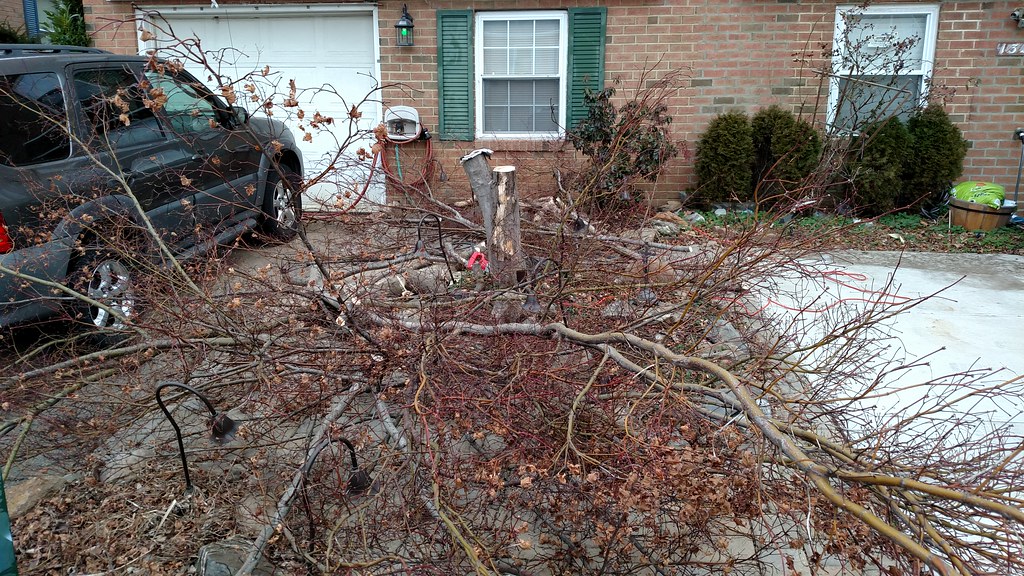
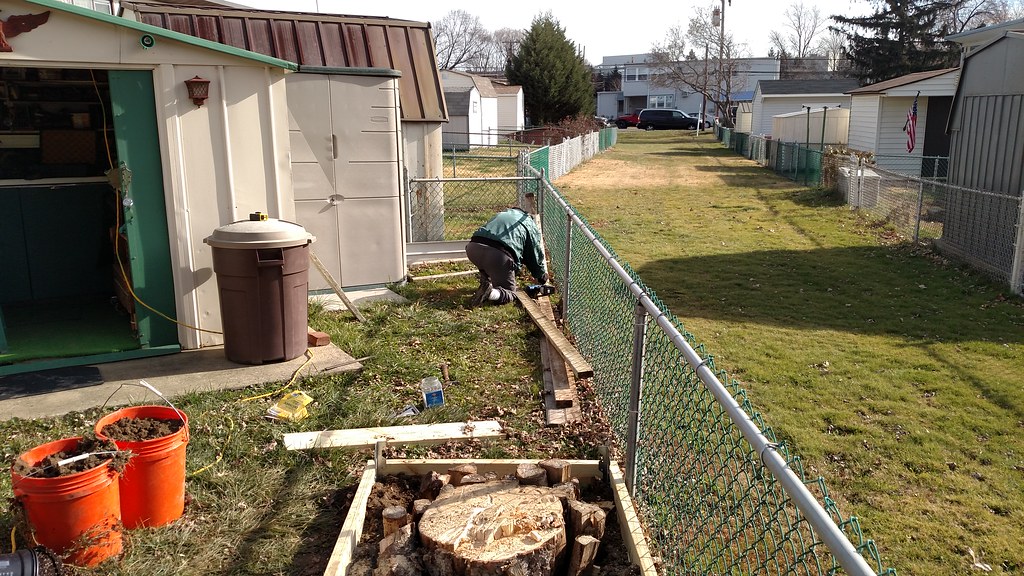
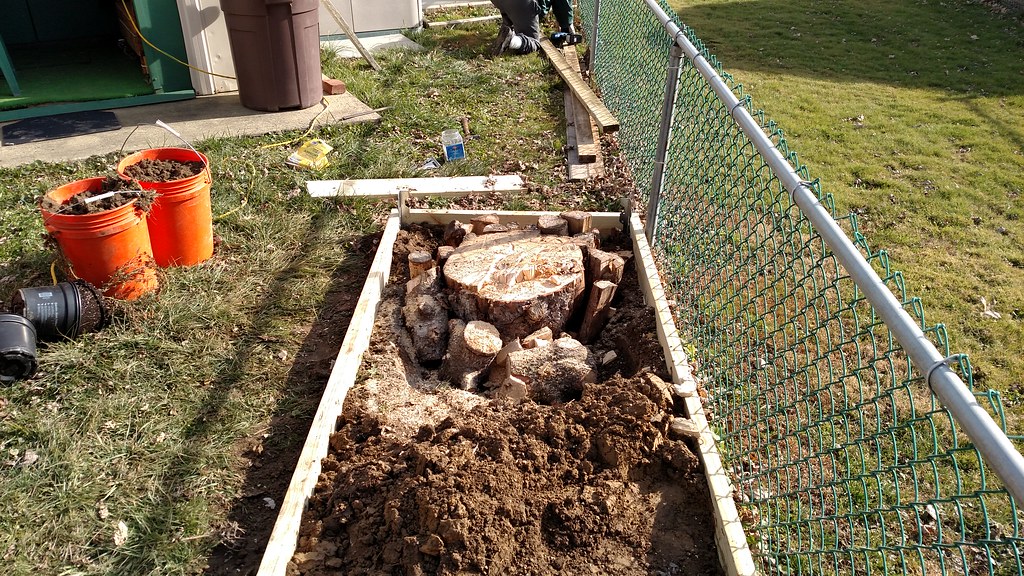
OK... Time to start this nightmare. I have always disliked this part of the yard, it has never looked good and the Bradford Pear tree tore it up pretty good. Working around the stump and roots is gonna be a nightmare especially factoring in the close proximity to the fence. Last year I tossed in this pallet fence to keep the dogs out and try to grow some beans...FAIL!
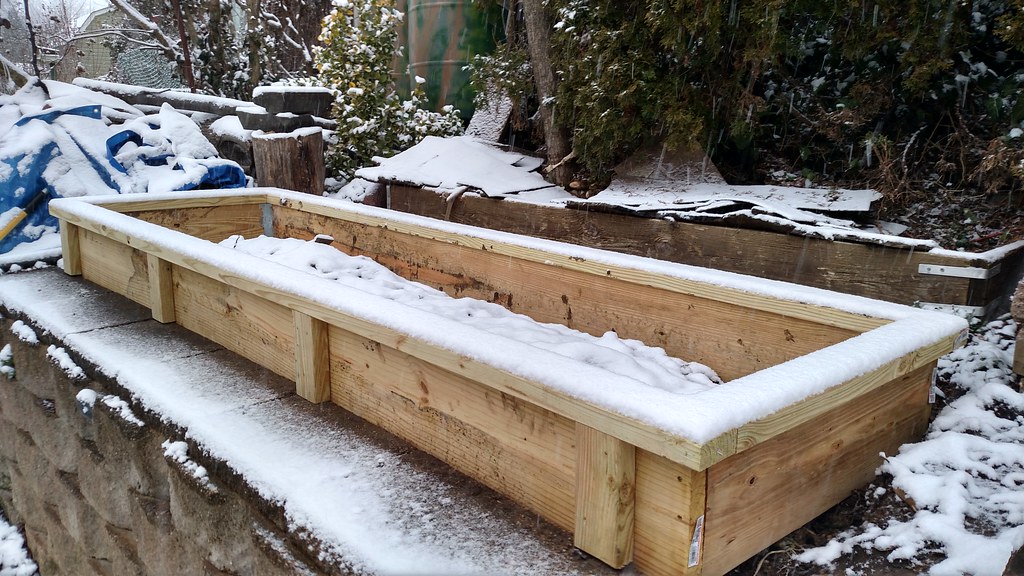
This bed will be a Hugelkultur bed, I have researched this form of gardening and was quite impressed, so I figured I would give it a shot. I have plenty of wood from the Bradford Pear tree to fill it with, (Crotch wood, roots, stuff I can't easily split for firewood). Ray next door wants his shrubs out, so my goal is to get this built, add my logs, cut Rays shrubs back a bit, trim the evergreens and toss everything in the bed. The build will be similar to Raised bed #2 and #3, but three (10") boards high.
The yard slopes a good bit here so the bed will be approximately 30" at the low end and 18" at the high end.
- First I removed the pallet fence and 4x4.
- Oh boy!
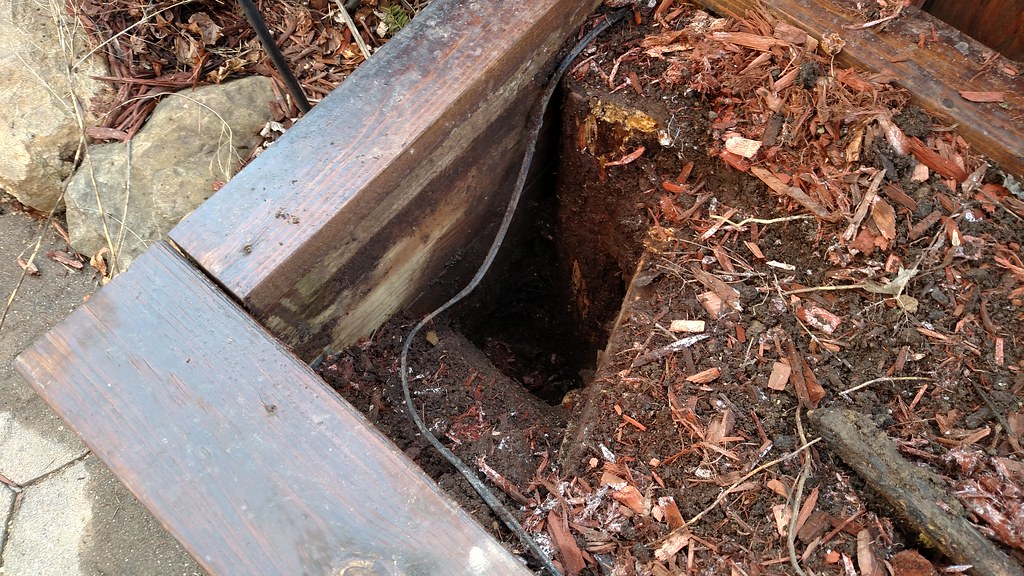
- Dug out a bit.
- Then marveled at the roots and tried to come up with a game plan. I decided to "irrigate" the soil away with the hose then chipped away to see what I was up against. OH BOY!
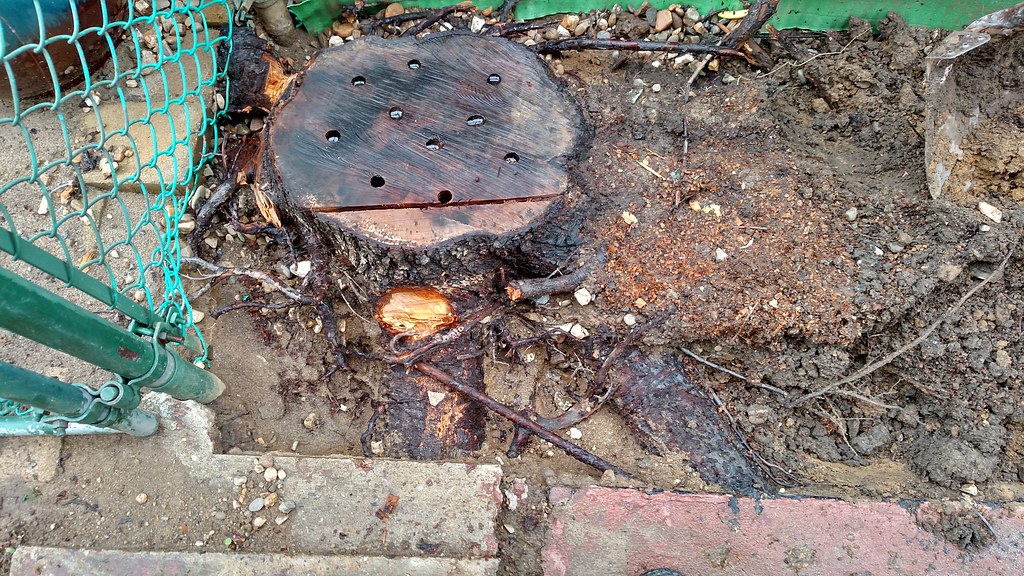
- Look at this thing
- These are the two roots that almost sent me to the emergency due to a cardio event.

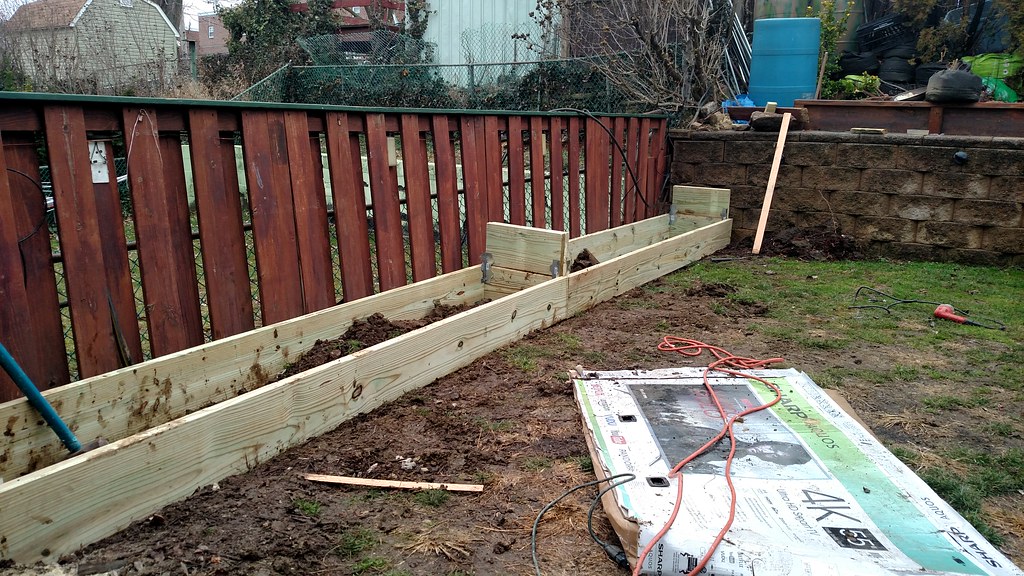
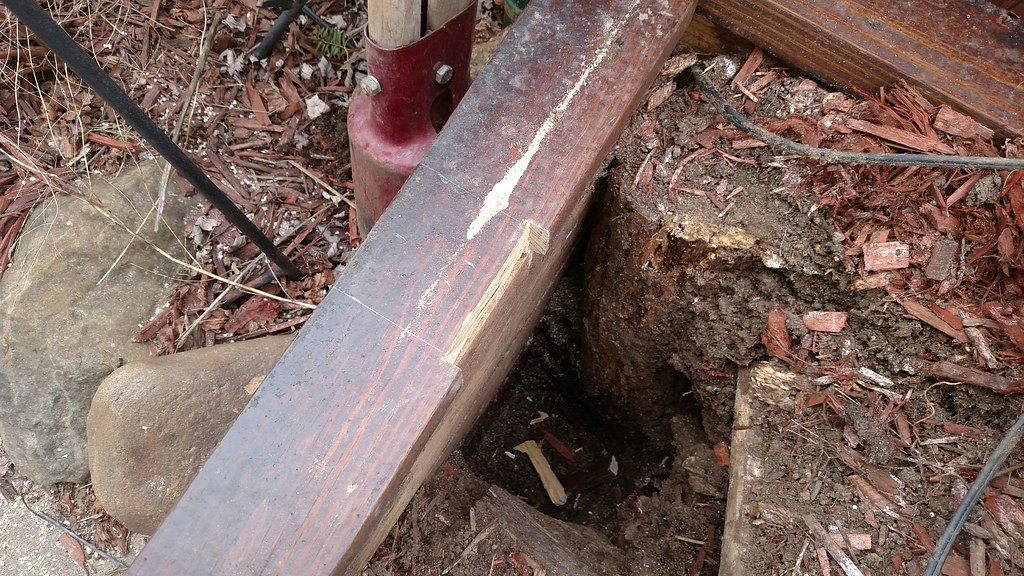
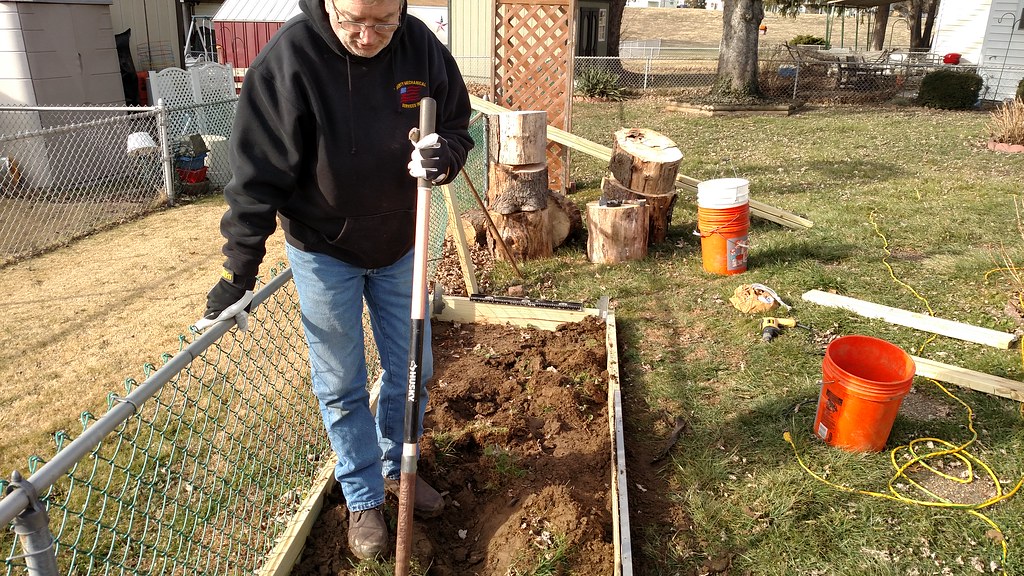
This project is proven to be a total nightmare. Working around the stump is impossible the roots are embedded with rocks so after frying my chainsaw blade on rock embedded roots, I switched to a Sawzall then an axe, it was impossible to get a swing on the axe. The roots were so abundant that I had to irrigate the soil away with a hose but after I got down so far I hit Green/Gray clay.
The clay was so hard that I had to chip it away with a hammer and screwdriver. I finally got through one root that was over 12" thick...REALLY, A DAM FOOT!!!. I am pretty persistent but finally gave up on my original plan to dig behind the stump for the 2x10's and went another route.
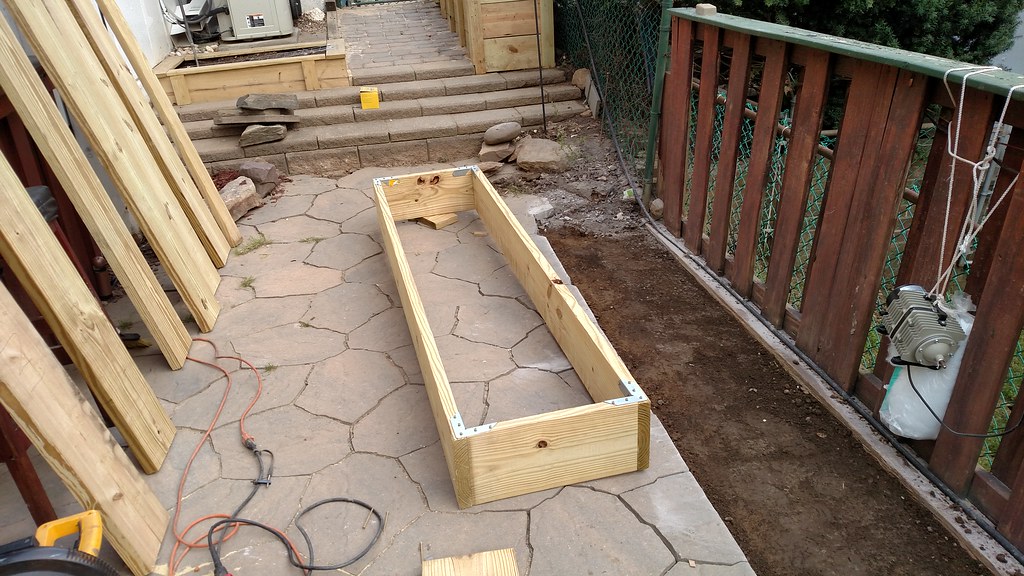
Anyhow, after building one frame I decided to put this section in place, level and secure, the next piece was a three sided section that slid in underneath, everything was leveled (somewhat) and secured. What a dam mess!
Of course my wife lets out the, "two stupid dogs" and they decide to run through the mud and jump on me to show me how much they love me!
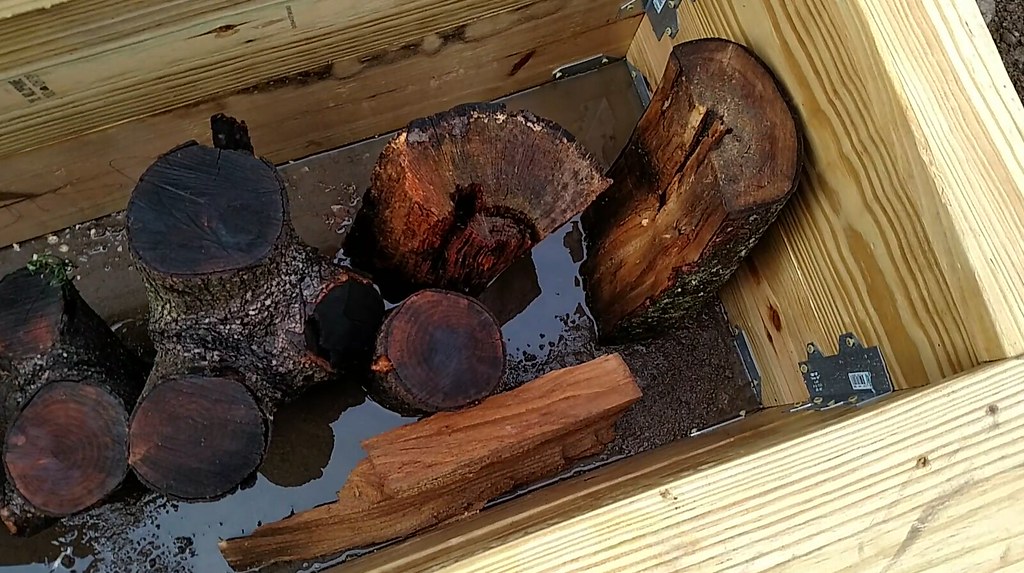
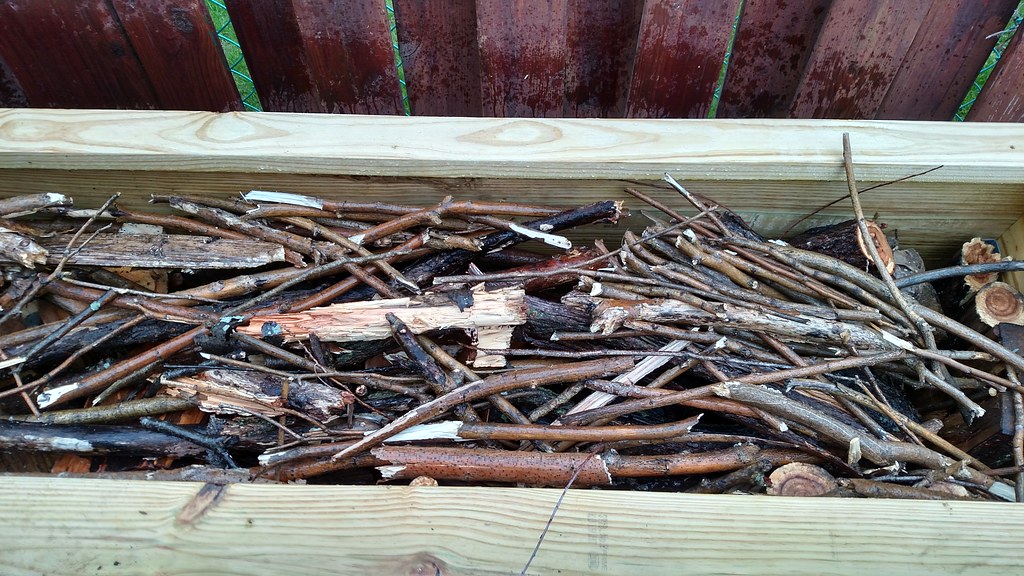
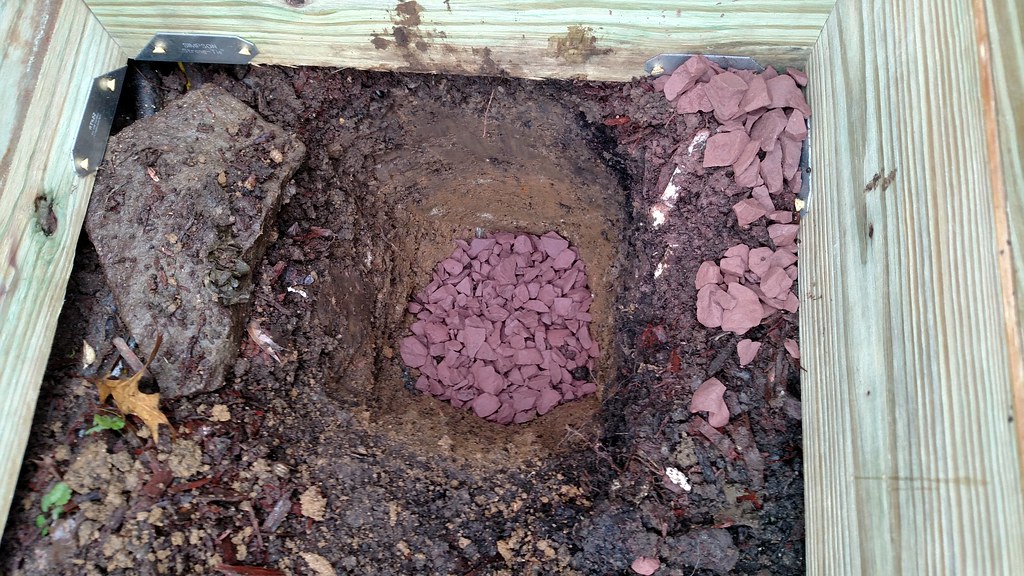
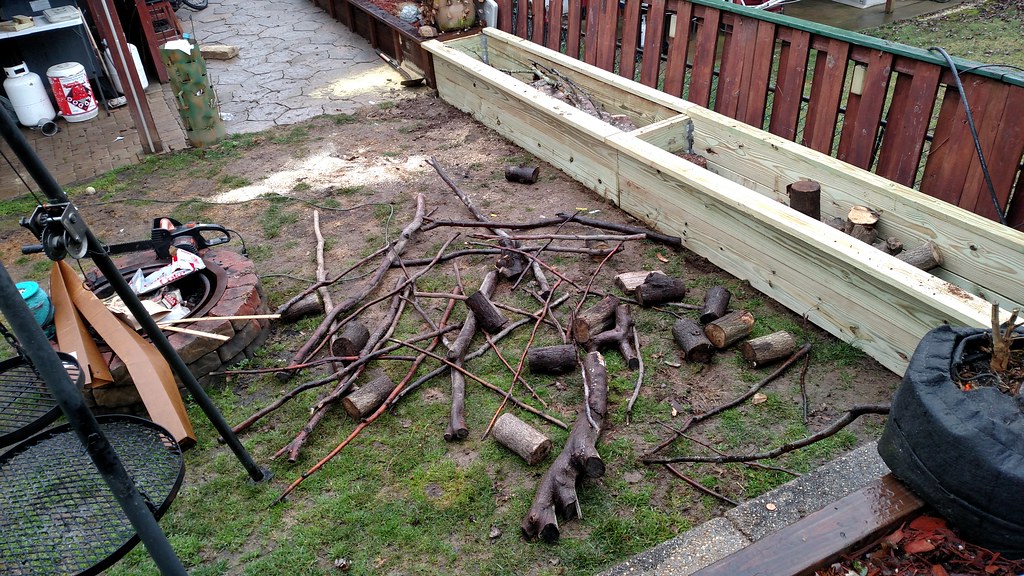
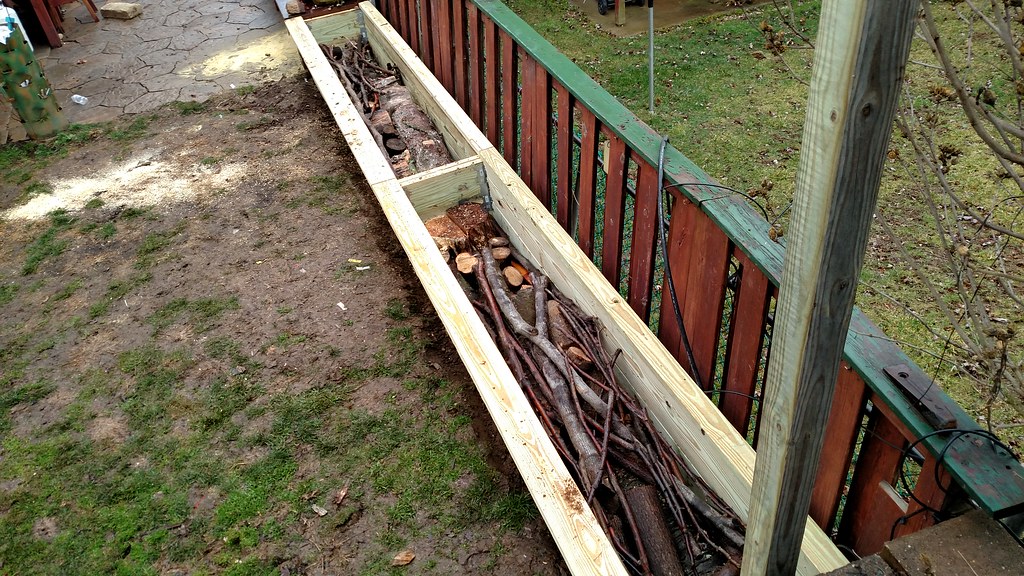
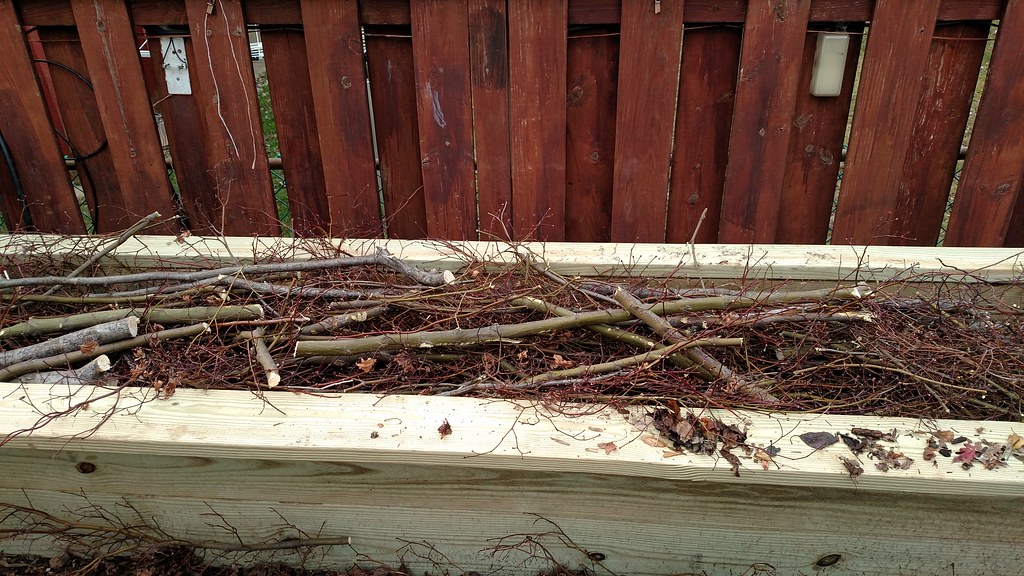
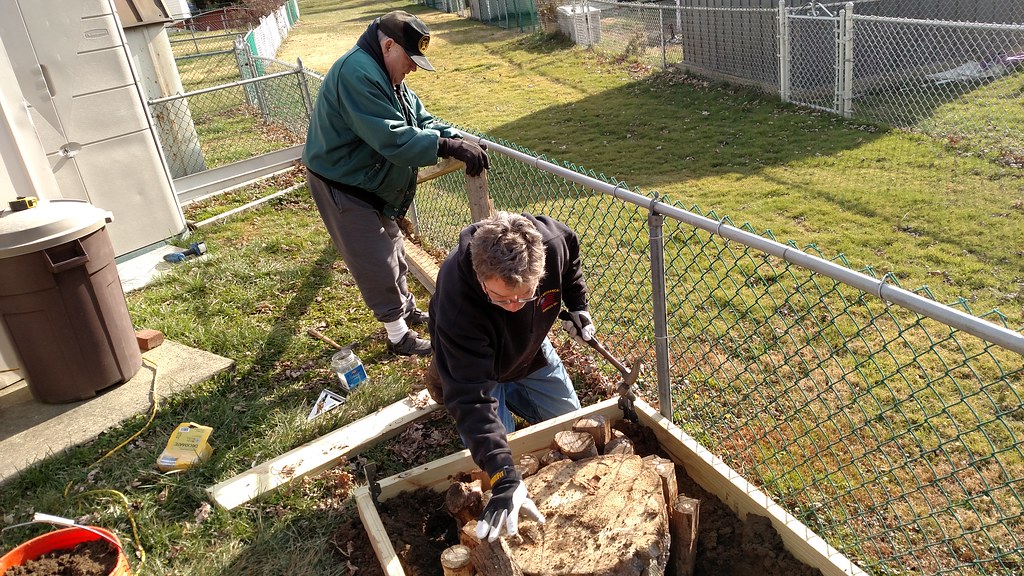
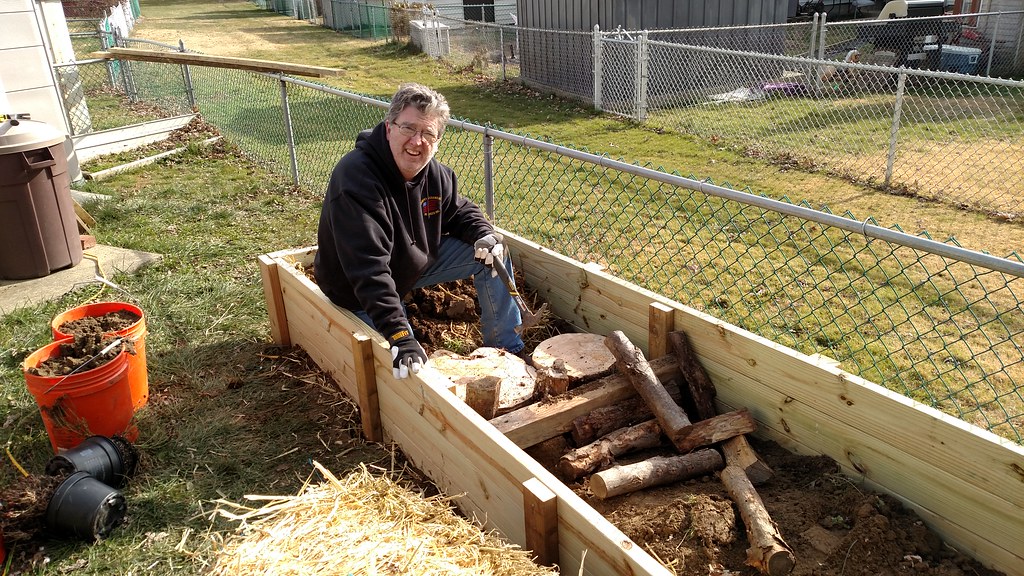
- After everything was secured, I added some of my crotch wood, roots from the Bradford Pear tree from the back yard and some old firewood. The section in the center where the buckets are will be tore up and pavers will be put in.
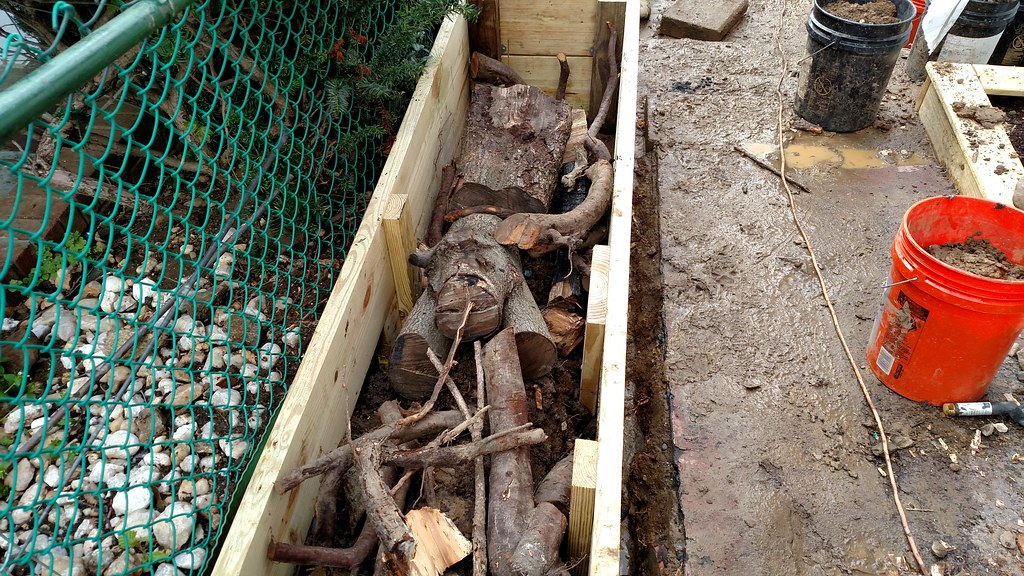
- My neighbor wanted to get rid of this shrub, so I told him I would take care of it, figured it would be great for the Hugel Bed.

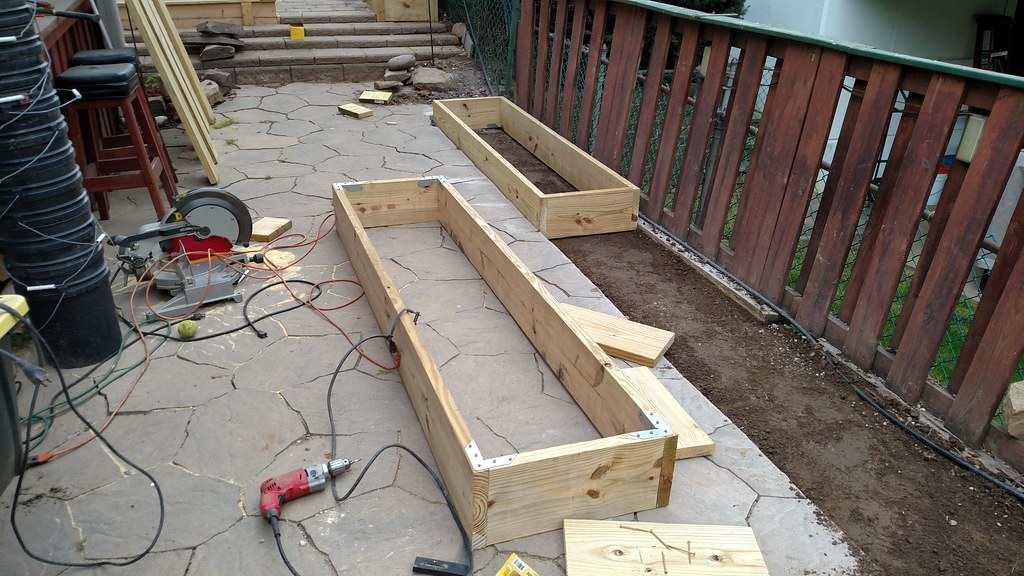
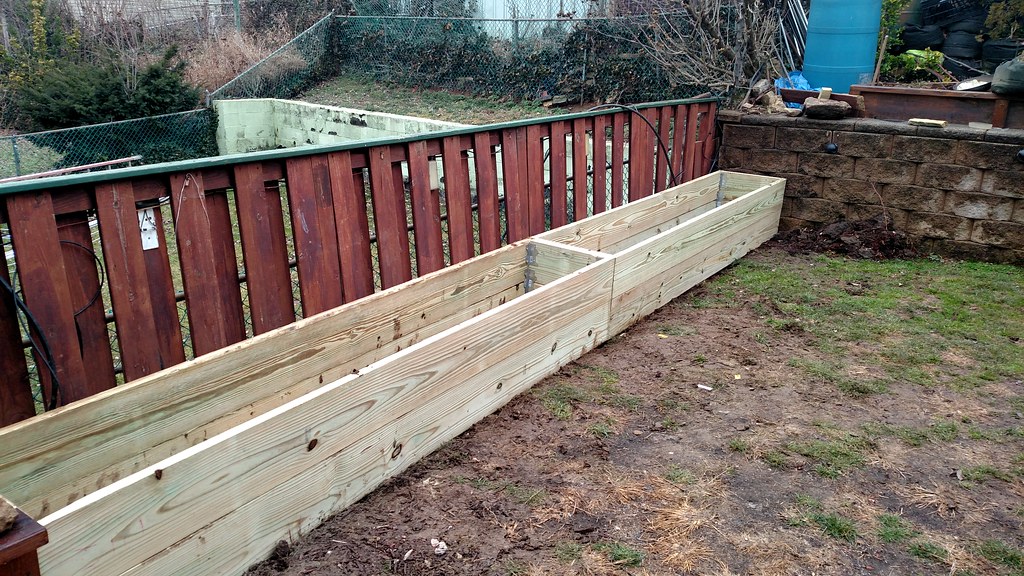
- After some of the trimmed bush was added to the Hugekultur Raised Bed, the third section was built and secured.
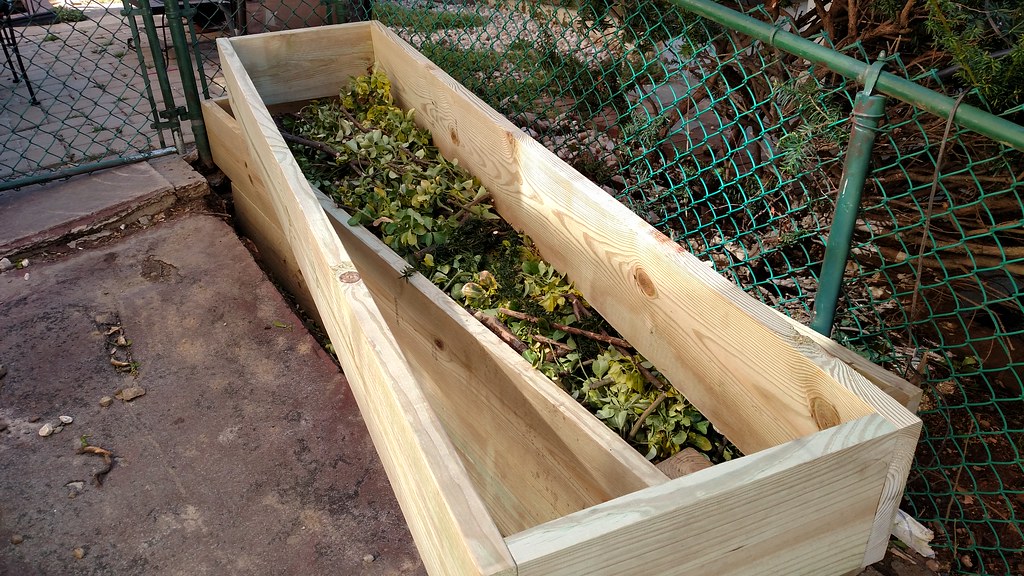
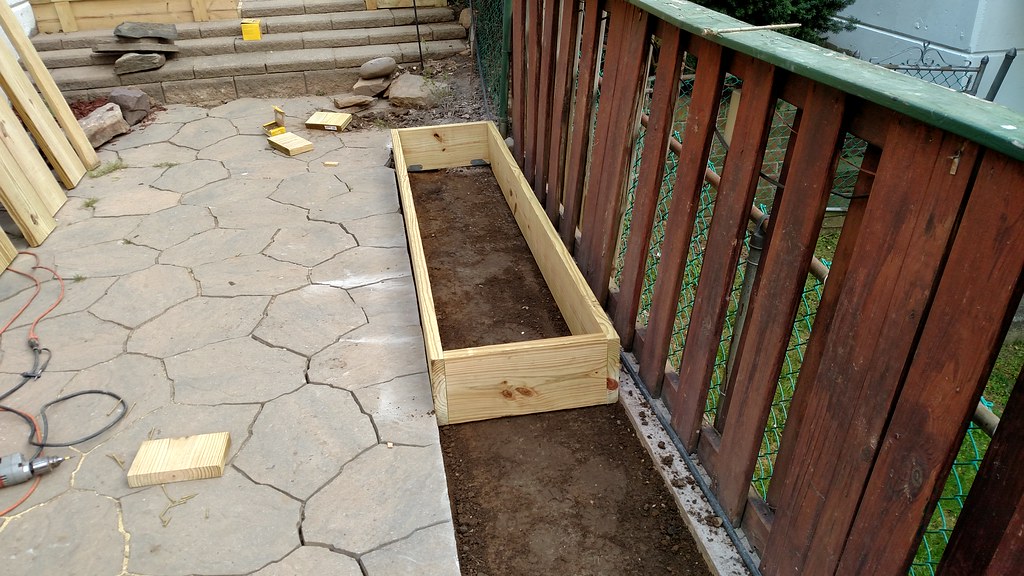
- The top is capped with 2"x4"'s with a 1.5" overhang to be flush with the uprights but I can't finish the uprights yet because the pavers need to be installed first, then I can cut the uprights to be flush with the pavers.
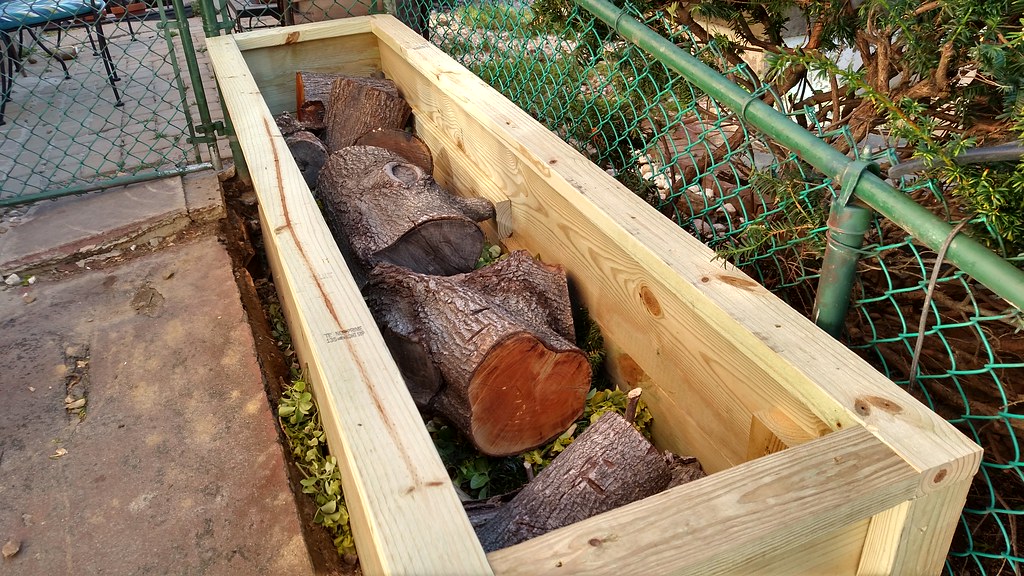
- Another layer of Crotch wood and logs are added. I told a friend that I am planting firewood so I can have a firewood crop in the fall.
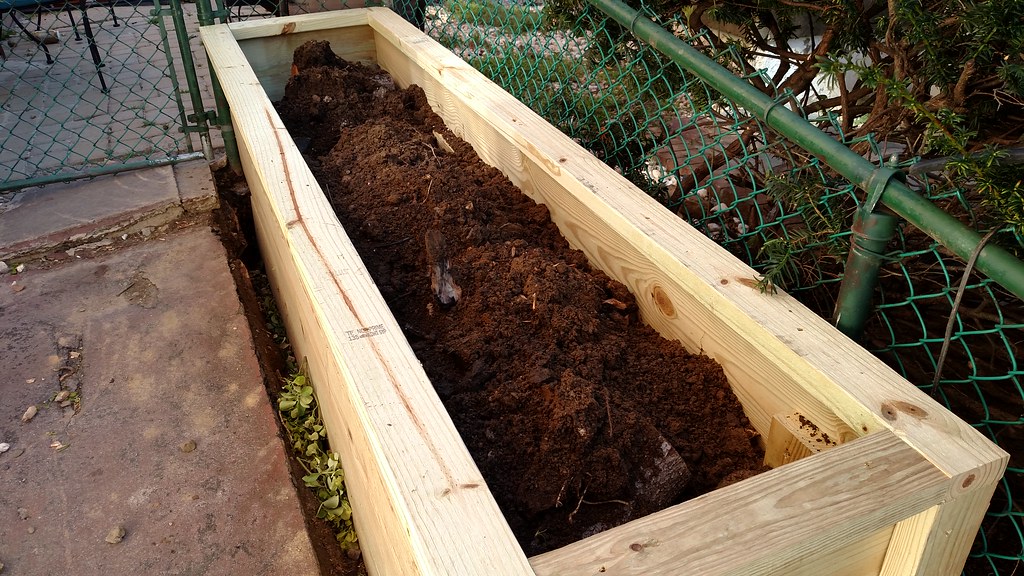
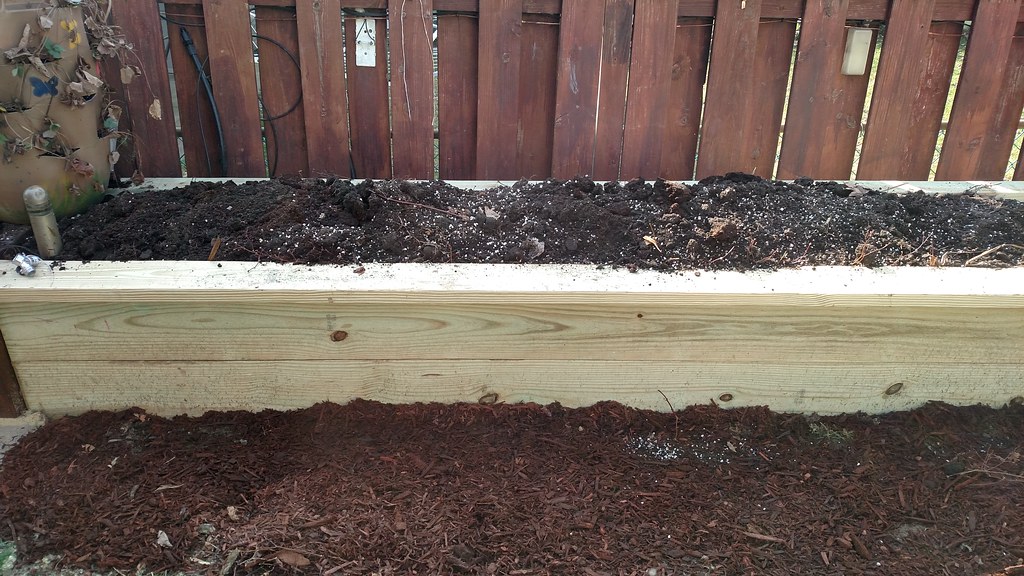
- The soil that was removed during construction was dumped into the bed. It's a fairly heavy clay soil but I have had no problems growing anything in this soil, quite the contrary. It will be top dressed composted manure and mulch.
- I busted up the concrete slab under the gate, it was over 5" thick and took a bit of work with a sledgehammer, after the slab was busted up and tossed in the truck for disposal, I removed the roofing tile and placed it in the truck for disposal.
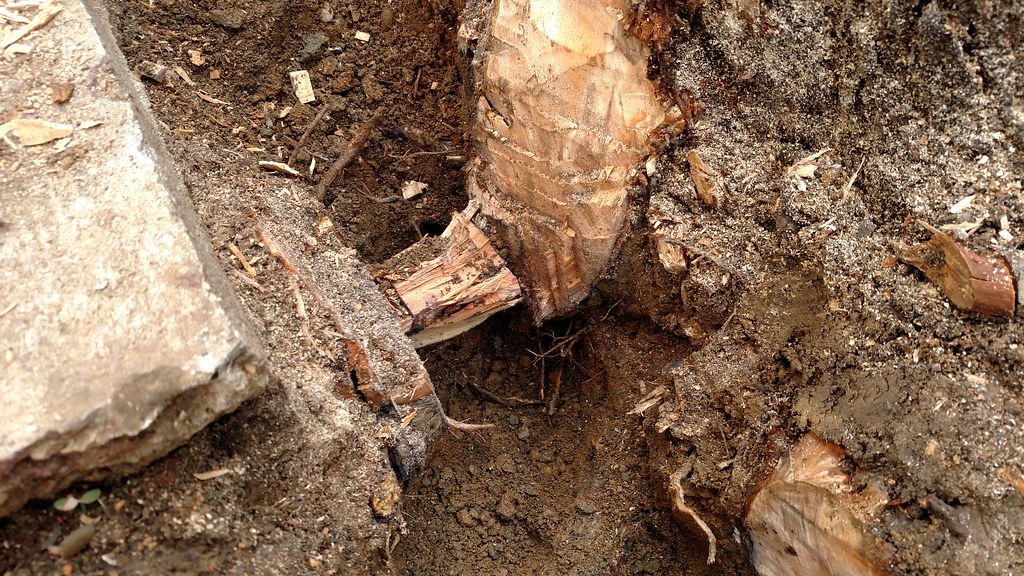
April 12th - I spent several hours trying to get this root out, I even tried irrigating the soil away to get under it and only made a mess. This thing is just SICK!

April 13th - I finally gave up and removed as much as possible with a 12" sawzall blade. I wanted to remove the whole root and back-fill because the pavers will sink when the root rots, I figured it would be less effort to lift the pavers, back-fill with paver stone and replace the pavers in 5 years or so.
Early on in this article I said, "The hardest part about building these beds has been removing the River Rock and the cleanup", BOY WAS I WRONG! The Bradford Pear stump and roots are kicking my ass.
After dealing with this stump and the roots, I decided to remove the two Bradford Pear Trees on the back hill before they get too big... I'm getting too old for this $hit!

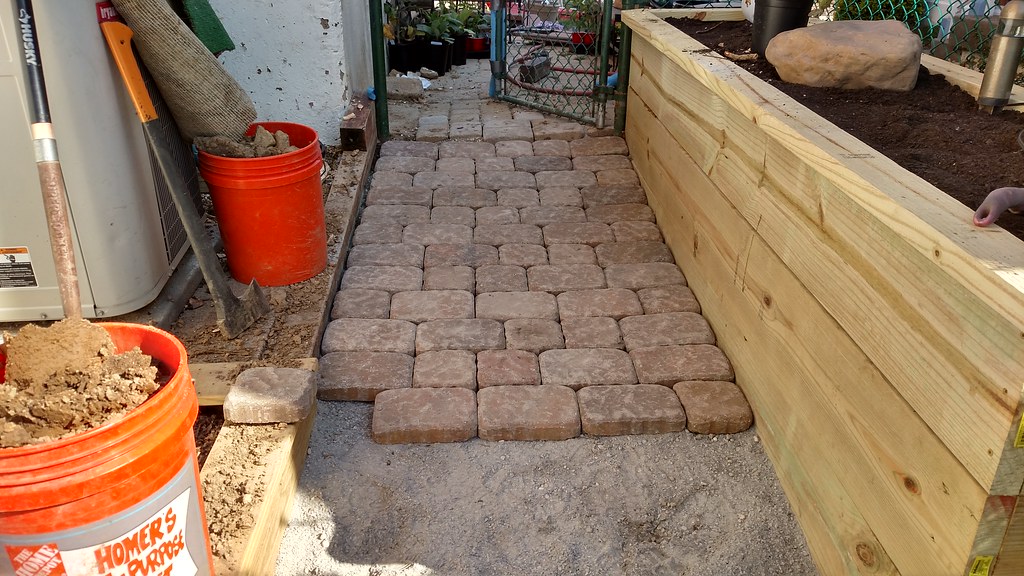
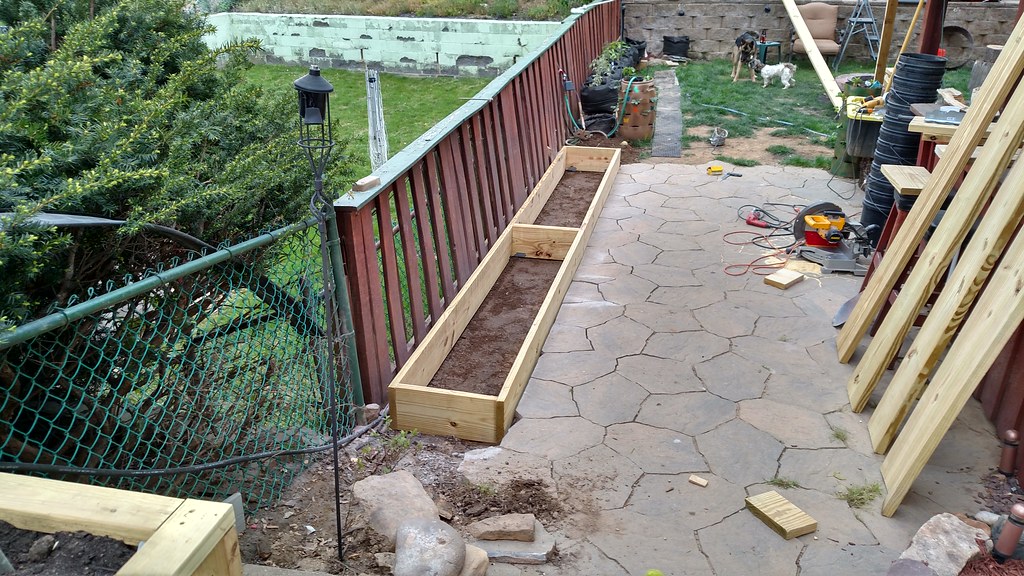
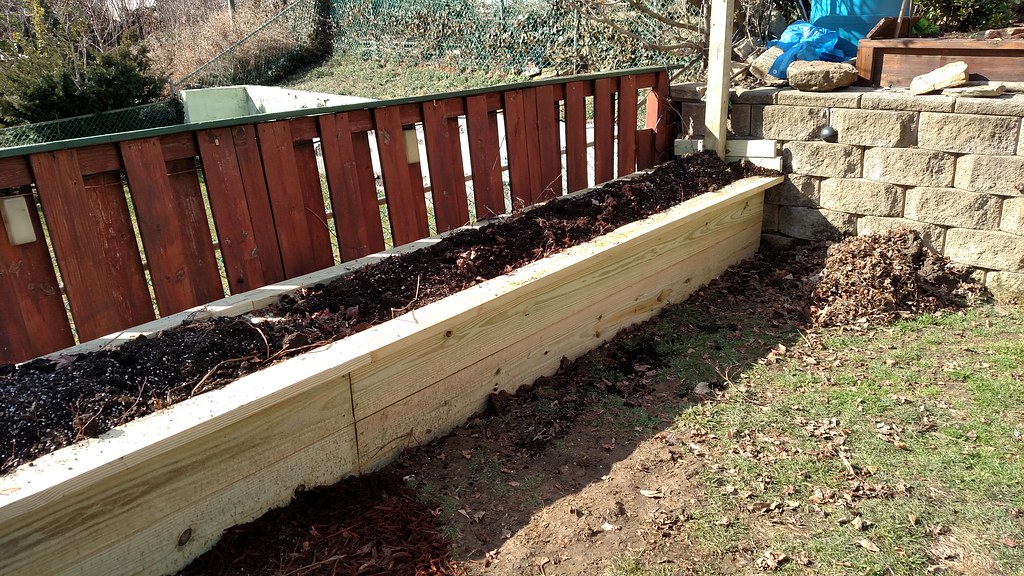
- Looking good so far, In a few years I'll most likely lift the pavers and peak the center up a bit so its rounded and not concave, but for now I'll leave it!
[size=16]
April 14th - Final touches, adding the side pieces and irrigation.
[/size]
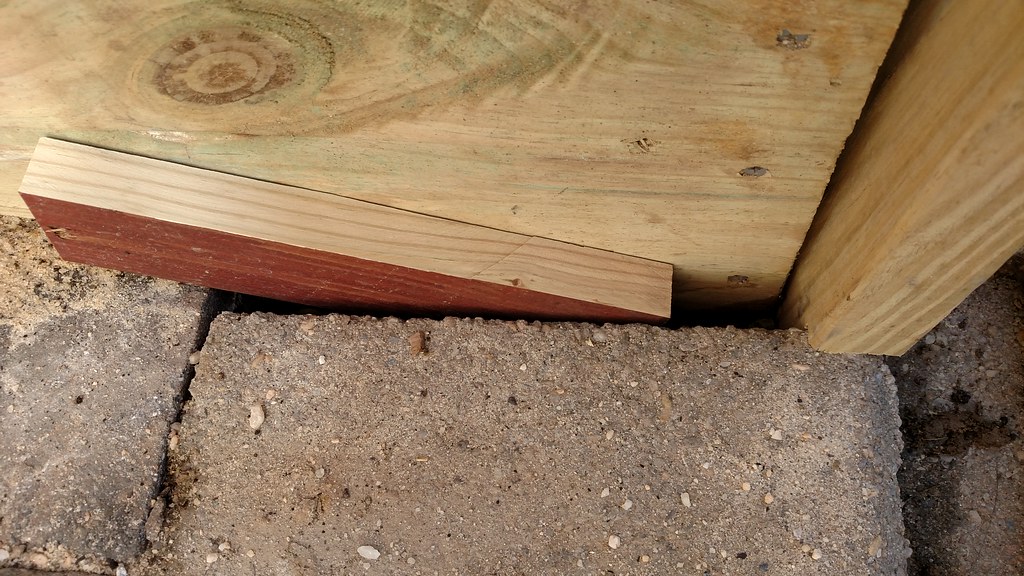
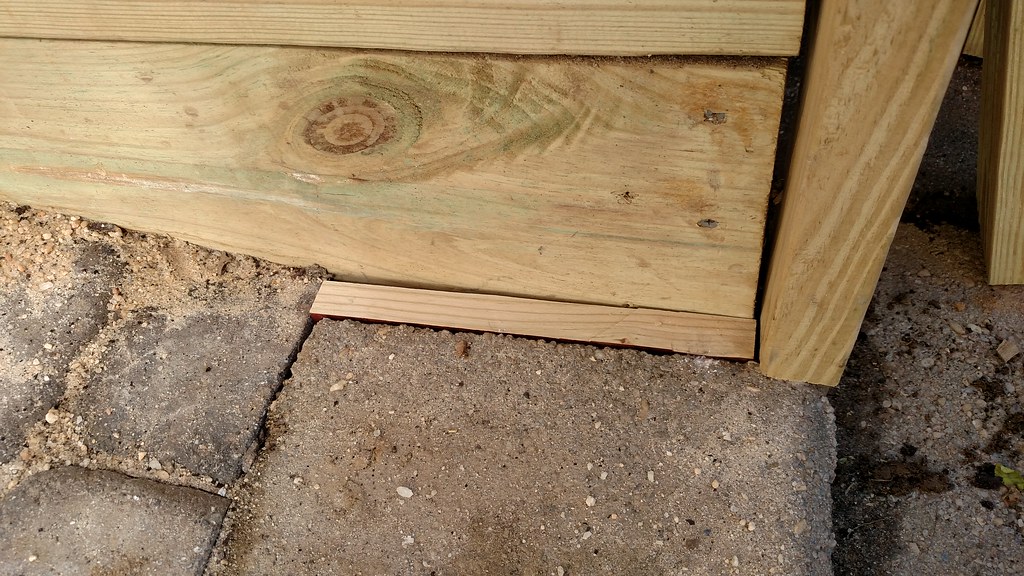
- There was a 1-1/2" gap on one side of the cap stones (steps), so I centered the cap stones (steps) and cut two pieces of 5/4 P.T. and placed the cut 5/4 in the gaps.

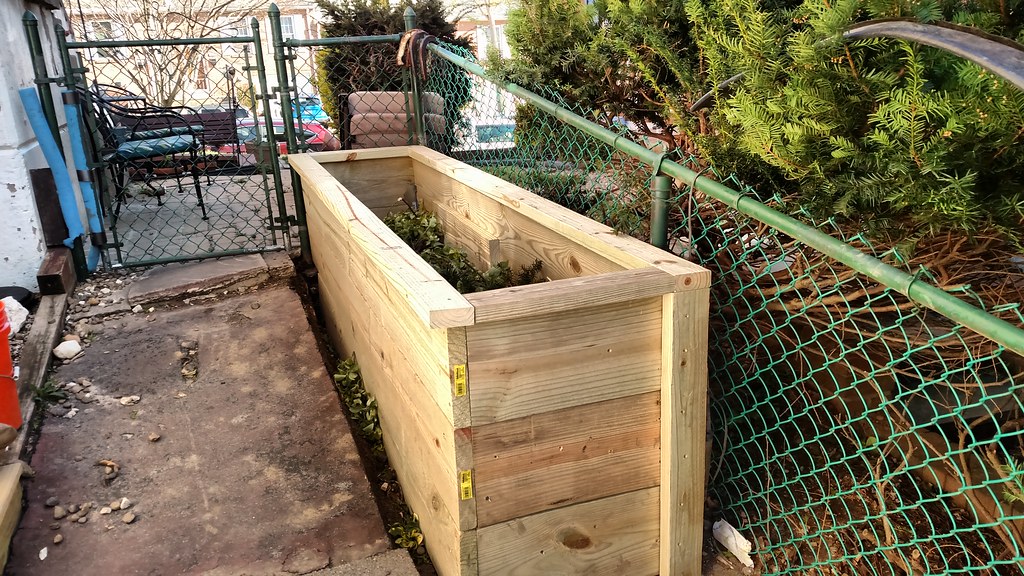
- Finished the pavers and uprights

- Ran some drip irrigation to the bed.
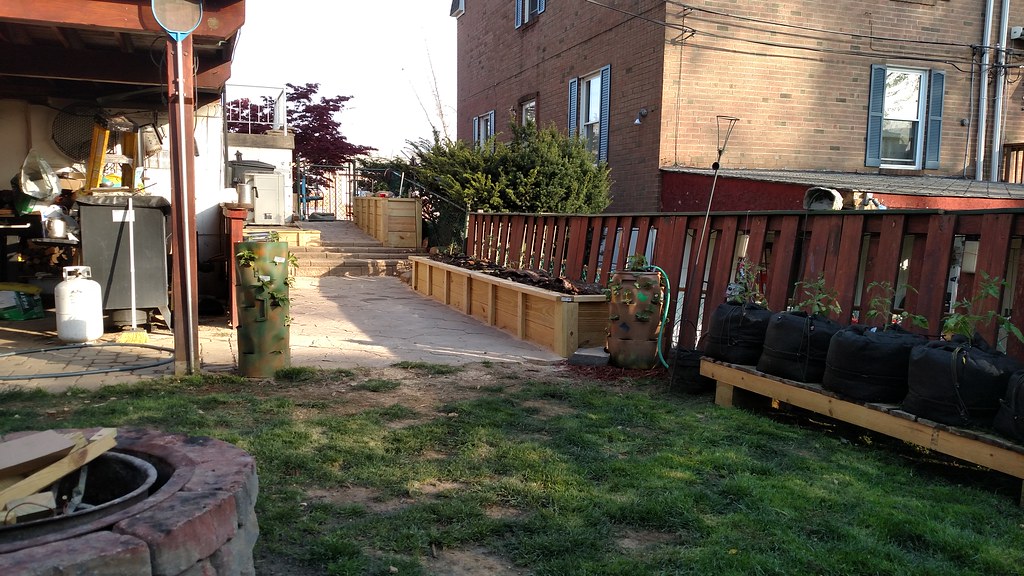
- This year the bed will be used as an overflow (extra veggie plants)
- Even looks good from the deck.
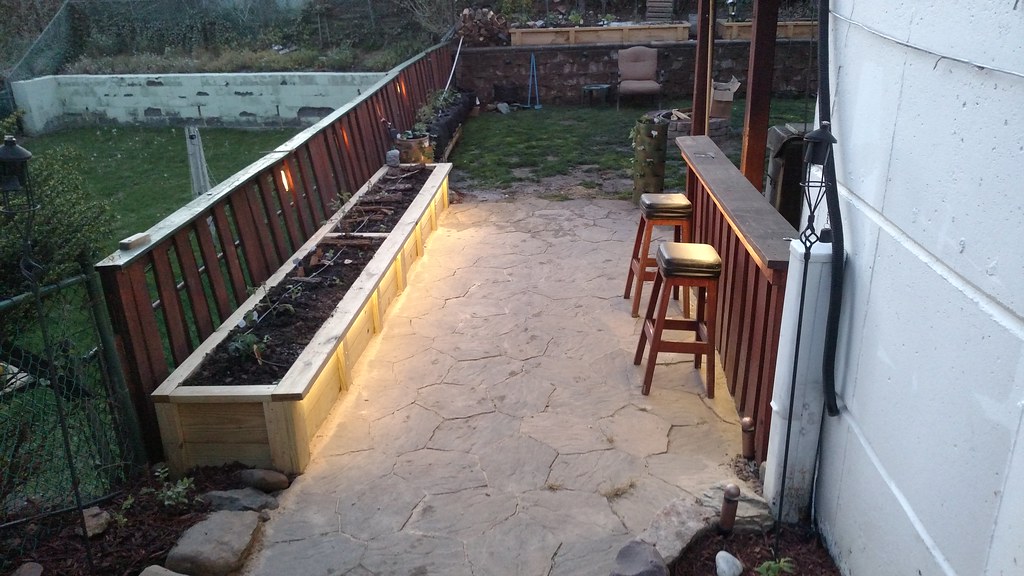
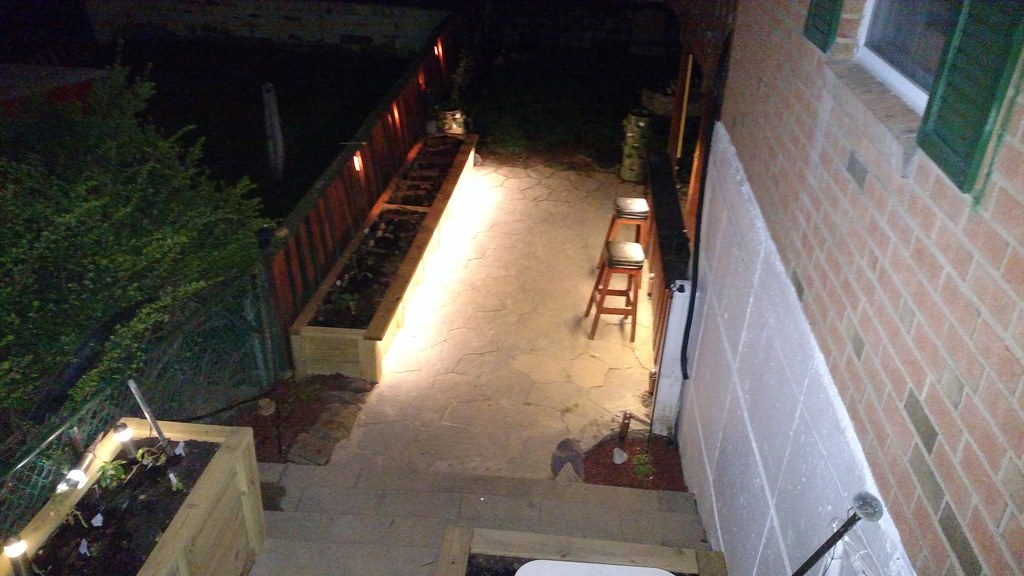
April 26th, 2016 - Last night I was going through all of my landscape lighting supplies to find some lighting for the new bed, I came across 4 railing lights that I decided to use, I ran some wire and connectors today.
April 27th, 2016 - Last night I installed 4 railing lights and two Bolo lights, I have a 21 watt incandescent bulb in one socket and 3 led's in the other fixtures to see how they looked at night. I did not like the LED's but really like the glow of the incandescent but its 21 watts, that would be 84 watts on the transformer that's too much.
If I used the current LED's, it would be 4 watts but I don't care for them. I ordered some 0.48W LED's to try, that would be less than 2 watts, I also ordered some 11 watt incandescent, I can live with an additional 44 watts on the transformer if need be.
The Bolos had 20 watt bulbs and were replaced with 3 watt luxeon LED's.
March 1st, 2016 I installed the new LED'S last night and I am extremely impressed, I am so impressed that I ordered twenty more bulbs and 6 more Railing lights for the other Hugelkultur bed. @ 0.48 watts, you cant beat it, these will replace my 7 watt deck lights and 21 watt front yard landscape lights.
- Here's a pic from 2012 that shows the tree, it was taken out in 2015 and was much bigger than this pic shows.
September 17th, 2016
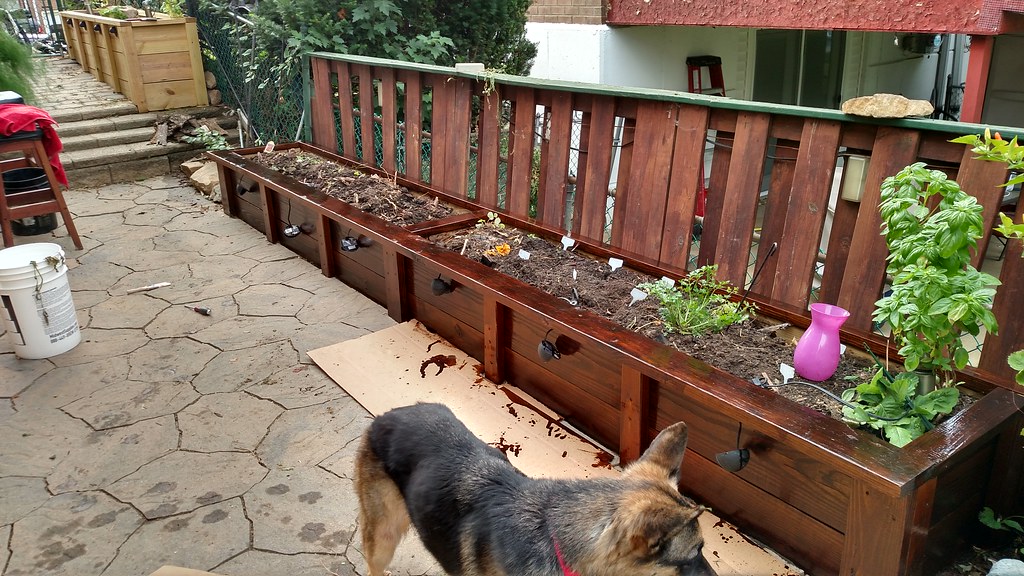
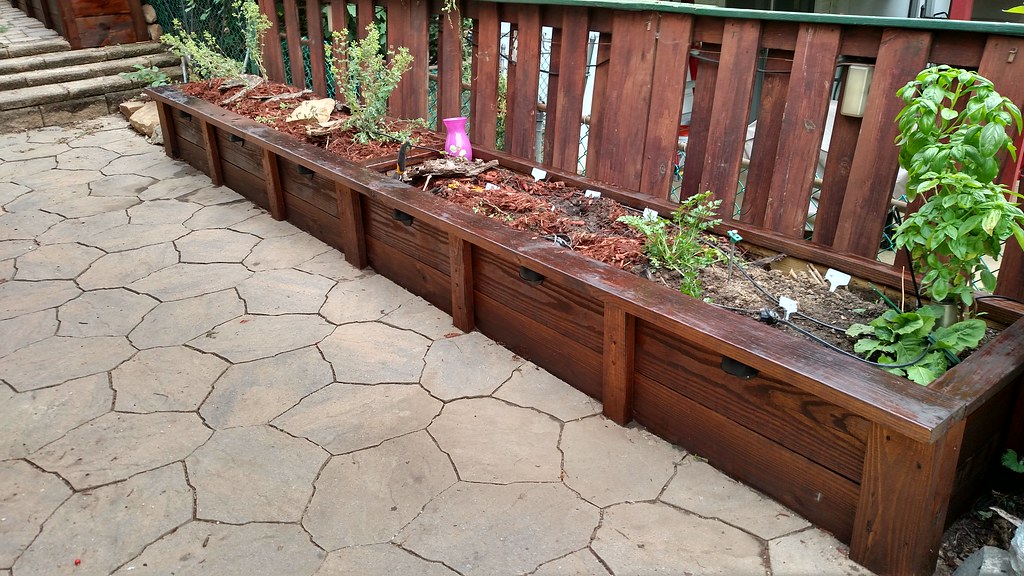
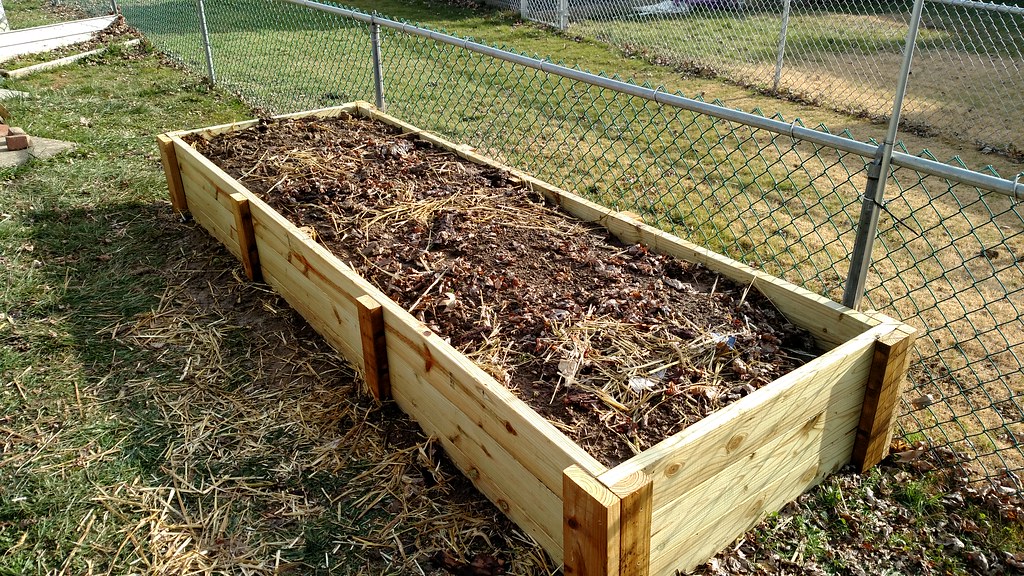
- In the fall, the beds are stained, cleaned out and top dressed with mulch.
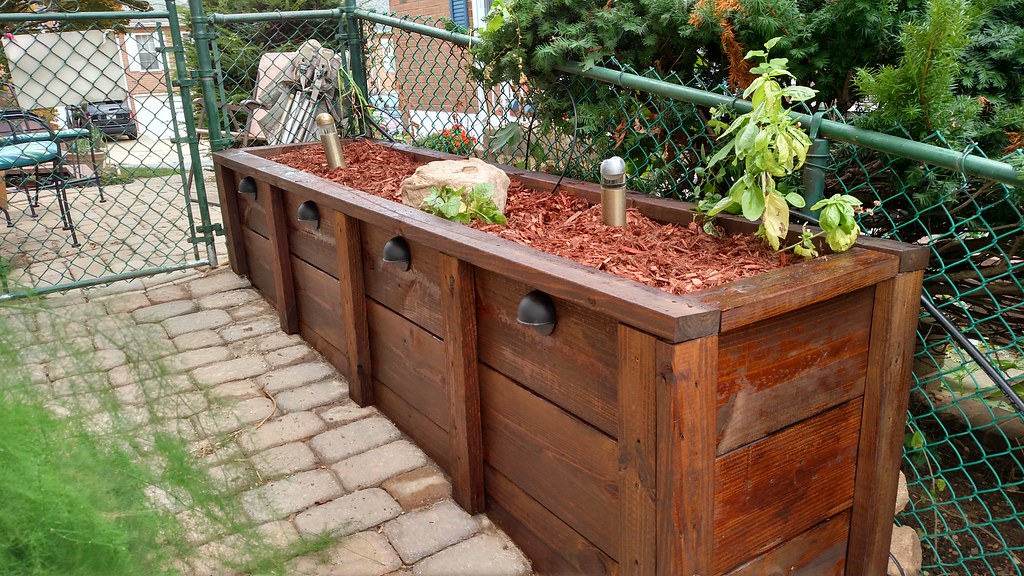
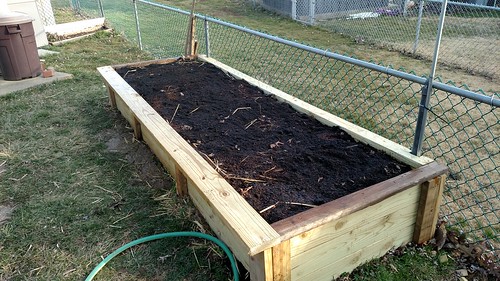
Much nicer
 |  |

SQWIB- Posts : 366
Join date : 2016-03-07
Location : Philly 7A
My 2nd Hugelkultur raised Bed
![]() SQWIB 3/17/2017, 9:39 am
SQWIB 3/17/2017, 9:39 am
Raised bed #5
April 19th, 2016 - I must be freaking nuts... I'm sitting in the yard playing with the dogs looking around thinking, "this is great, the bulk of the gardening is done, now I can relax", I'm sitting on the grass tossing the ball up by the Hugelkultur bed past the Hydroponic system, the dogs a Shepherd (Maggie) and Shitzu (Millie) are happily retrieving the ball each time.
A couple tosses and the ball lands behind the Hydro Buckets, as Maggie is trying to dig out the ball I'm thinking, hope she don't tear up the plants or the air lines... a couple more tosses, then I start eyeing up my Hydro setup and then the Hugelkultur bed, then the Hydro, then the Hugel and thought, Wow that Hugeklkultur bed looks really nice. I especially like the clean look of the pavers up to the side of the bed, and the irrigation setup is working out so well.
I just like the aesthetics more of the Hugel bed. Anyhow as I'm processing all of this, I started comparing the setup of the Hydro and the Planting of the Hugel bed, thinking how nice it was planting in the Hugelkultur bed compared to the Hydro System. I know what my subconscious mind was doing, it already knew what the outcome was gonna be, it just had to convince my conscious mind.
I called the wife out and said, "what do you think about another raised bed instead of the Hydro system", she looked at me like I had two heads and said, "What will you do with the Hydro setup", I said, "I'll give it away"! "Really", she replied. "But you just built the hydro setup and love it". I said, "but look how nice the Hugelkultur bed looks"... every time I say Hugelkultur I expect someone to say, "gesundheit".
So the conversation continues with stuff like, "I'll make the bed at bench height and make a top piece wide enough for a sort of bench, it is right across from the bar". "It will also tidy up the pavers a bit", "It will look neater than the buckets in the winter", she says, "yeah I do like the pavers you just did". I have such a mish-mosh of pavers, but that story is for another time. I then told her, "Plus I can get rid of the rest of the trees that I cut down", she liked that idea. I do have wood all over the yard.
"And the irrigation line is already there, I only need to install 2 barbs and that's it", she of course had no clue what I was referring to.
Her last statement was the kicker, "well it would be easier on you with your back and stuff, we are getting older, chuckles all around.
"OK, I'm doing it this weekend", her reply, "Your nuts"! We both smile and my mind starts racing!
Now the hydro setup is pretty easy but there are more things to consider and a much larger margin of error when using this setup, there's a lot more worries like Nutrient Level, getting the plant roots just right so they don't dry up or drown, water temperature, air pump or water pump cutting out, electricity going out, squirrel chewing through any of the air hoses or electric.
And then there's end of season cleanup, water pump is removed and stored indoors, air stones are removed, air hoses and air pump are removed and store indoors, hydroton and growstones are cleaned and stored, net-cup lids are cleaned and stored, buckets are flipped so they don't catch water and the up-righted buckets aren't aesthetically pleasing. Now all this sounds like a lot of work but it really isn't that bad, it's just me trying to convince myself to go with the Hugelkultur bed.
Now none of the aforementioned has happened, other than cleanup, but I do worry about these things on a regular basis, especially when we go on vacation for a week and the more I thought about the Hugelkultur bed, I was definitely going to build it. What can I say... I love dirt!
I thought I can do this, I still have 2 weeks till mothers day (my normal planting time).
OK So here we go!
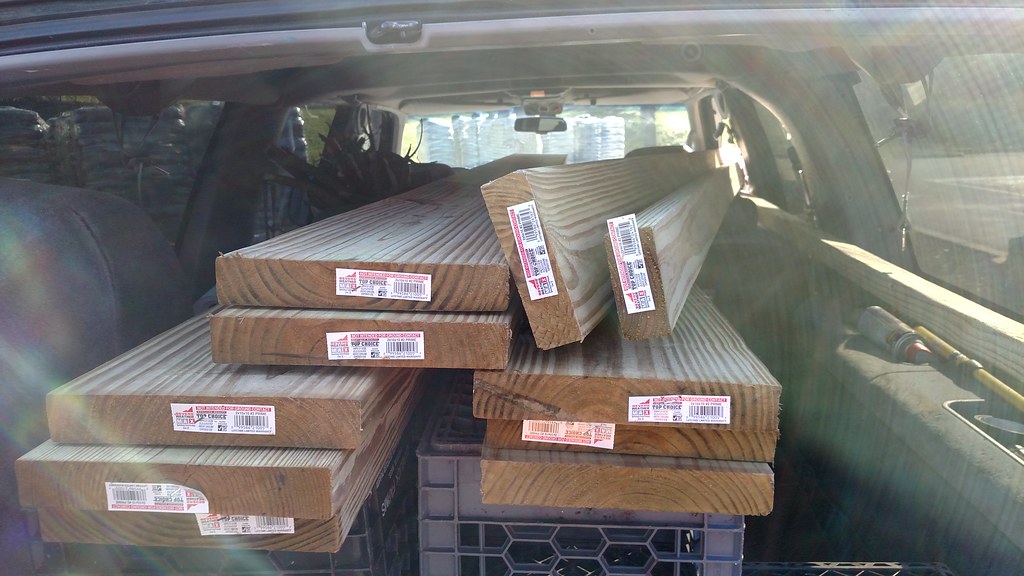
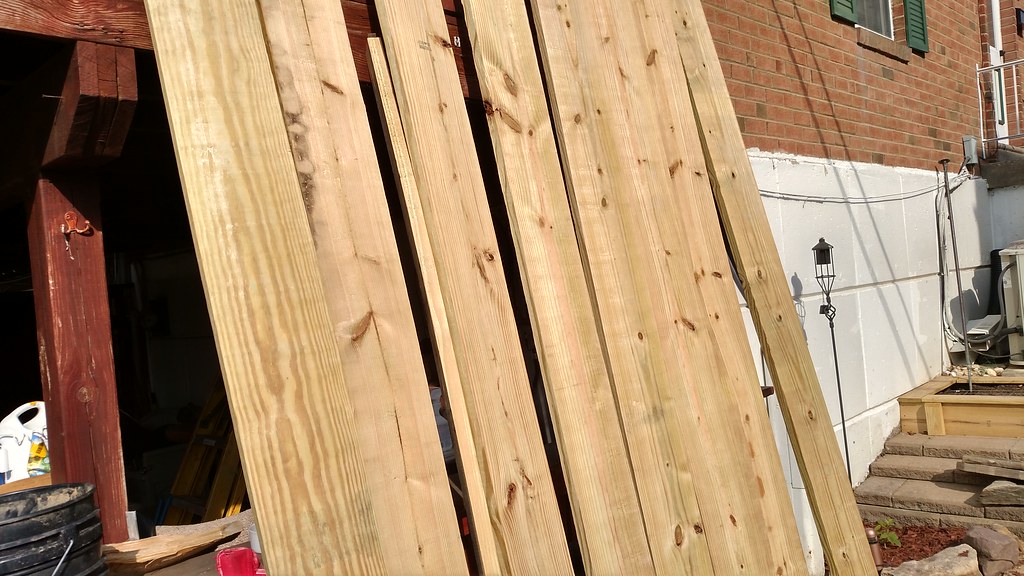
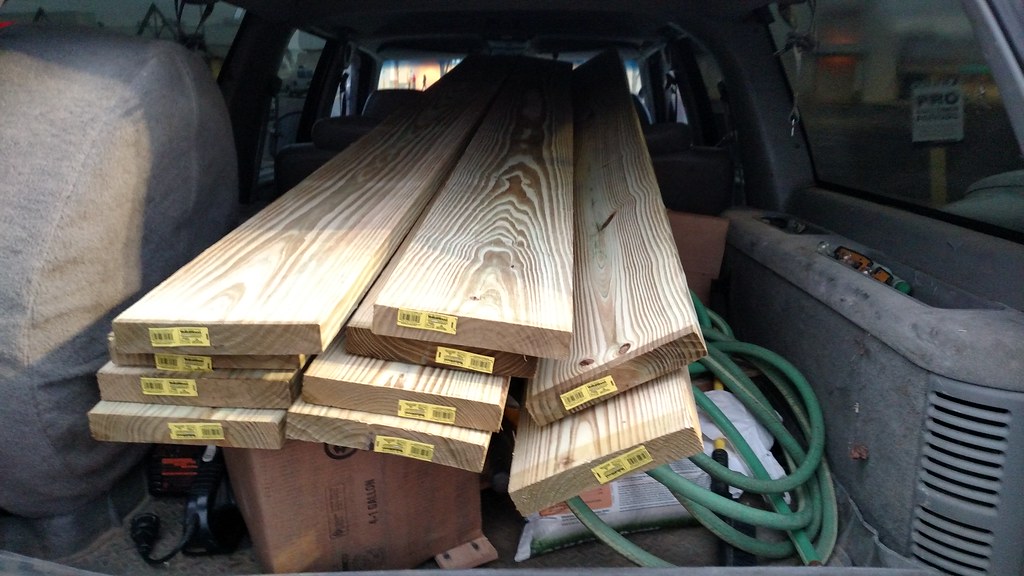
- After work, I picked up all the wood at Lowes, I was only going to get the 2"x10"x10's but got crazy and got some 16 footers too. Dam the wood was heavy, it was very wet, if you ever hauled dry vs. wet pressure treated wood, you'll know what I'm talking about.
- I have Rear side open doors on my Suburban and was going to wait and take my wife's suburban, to get the 16 footers, her Suburban has a rear hatch that would have been much easier (safer) to leave the back window open and leave the wood hang out of the back. New hobby, Suburban Jousting!
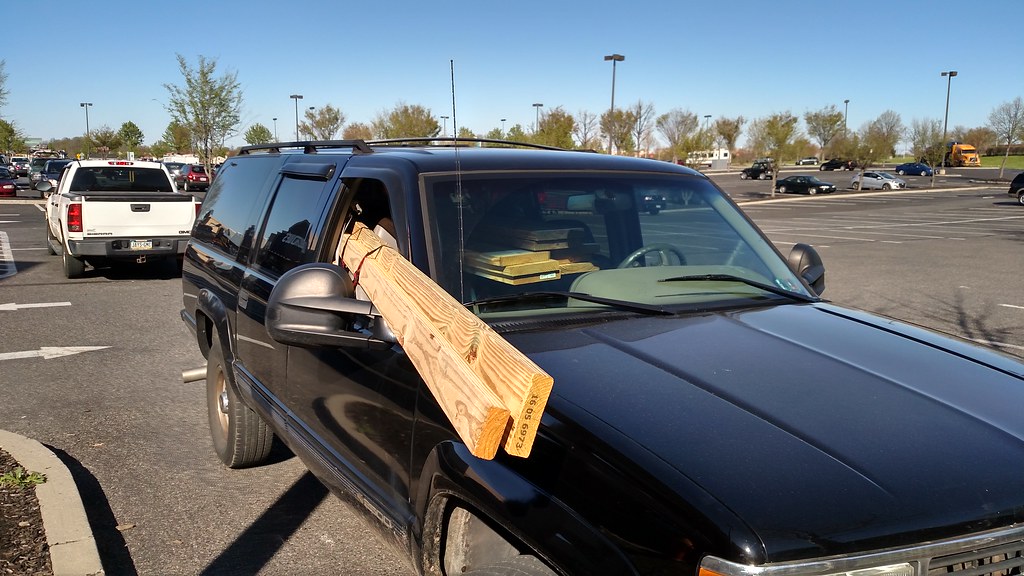
- I got home safely and unloaded the wood and stood the wood upright to inspect and decide which pieces will be the front (visible) part of the bed.
- Then I broke down the Deep Water Culture setup and transplanted the plants to a tote with potting soil. Hopefully, I can save these guys.

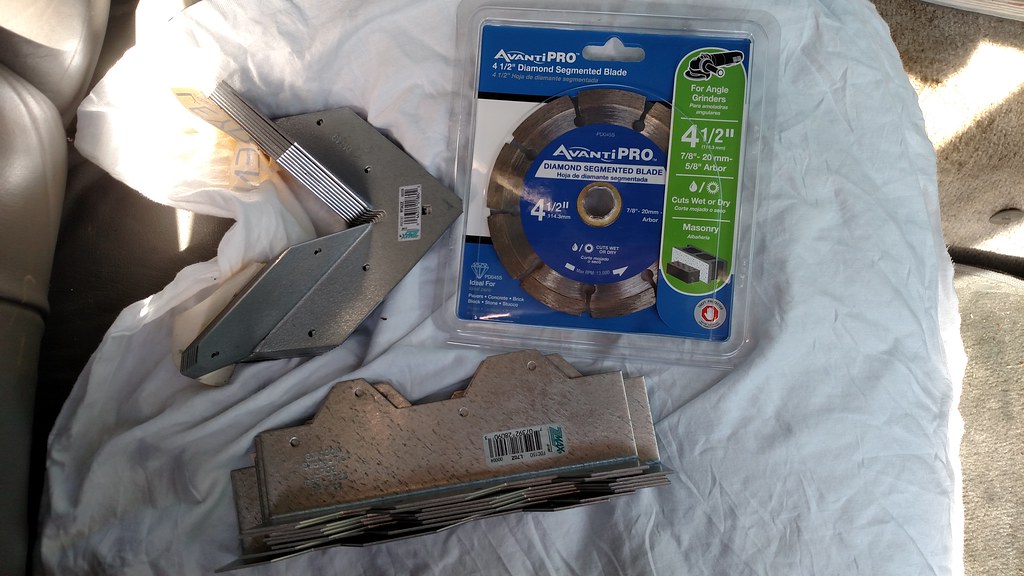
April 19th, 2016 - This morning on the way to work I stopped at Home Depot and picked up some hardware for the beds and a new Segmented Diamond Blade for my angle grinder.
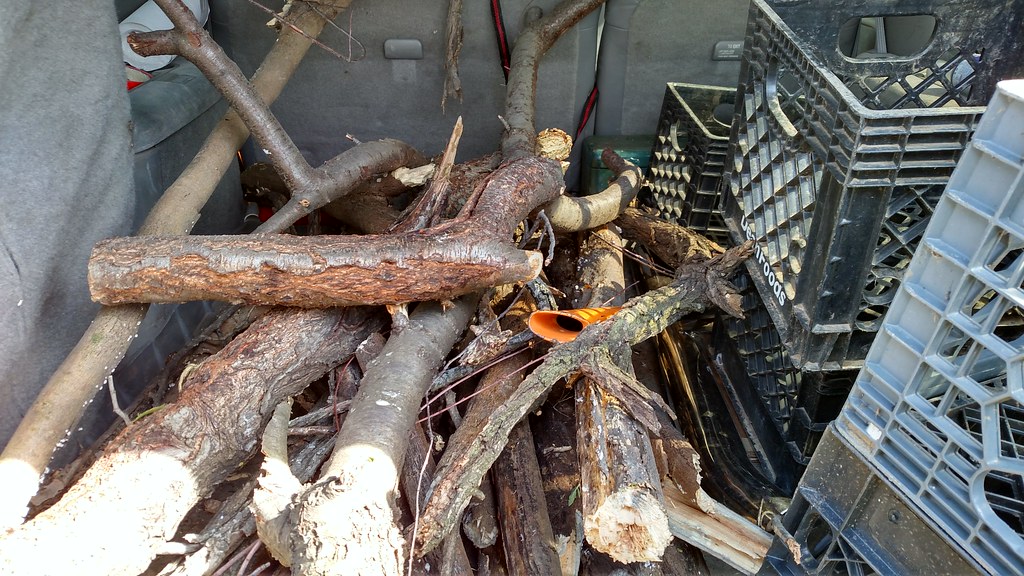
- At work, during break I went out into our parking lot and chopped up some dead wood for the Hugelkultur bed, hey... killed two birds with one stone!

April 21st, 2016 - I gotta say, "I really have good feeling about this project". I feel like a kid in the candy store! C'mon 4:30!!!
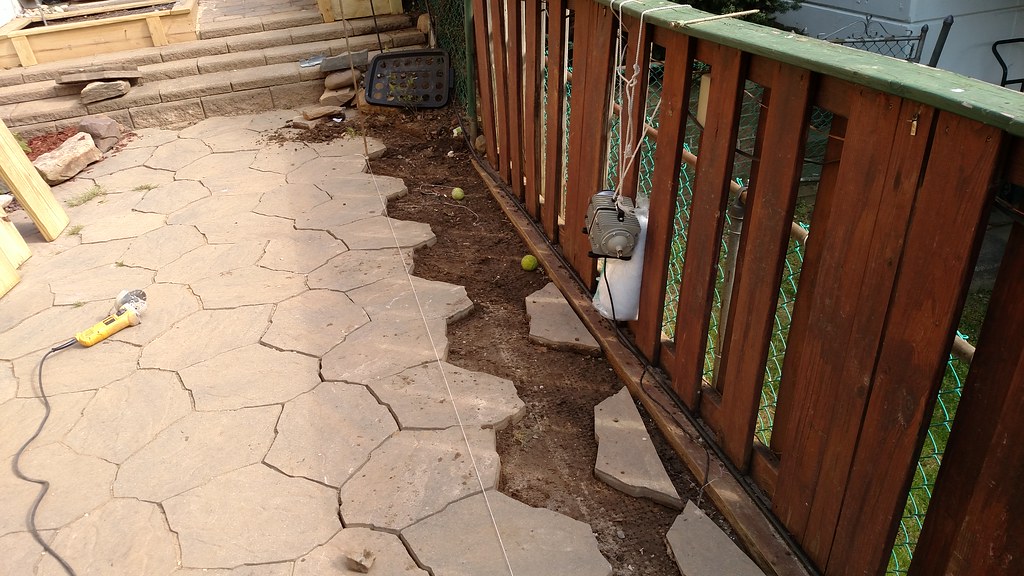
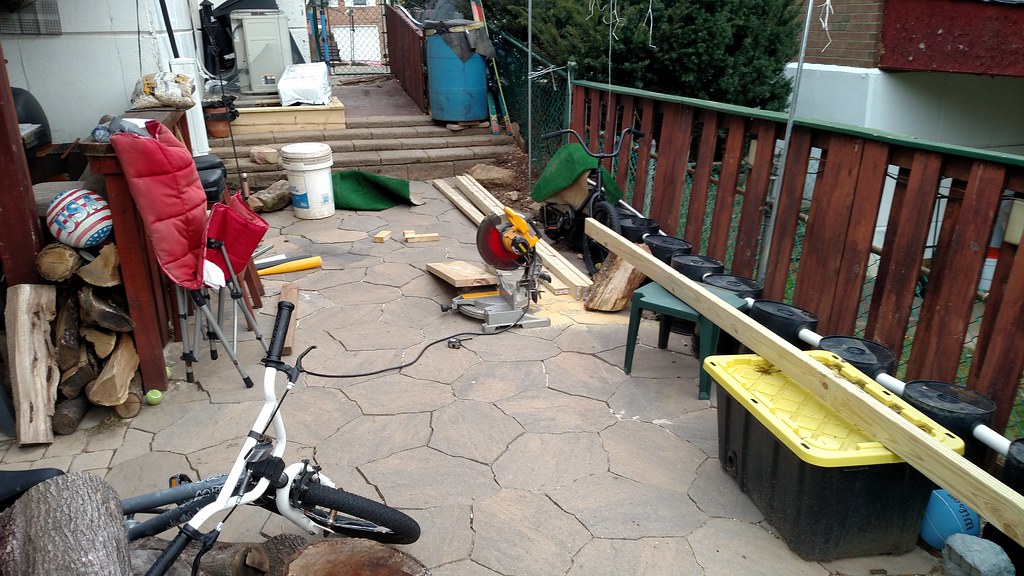
4:00... yeah, I left work early, anyway... I head straight home and into the back yard, no dinner. I start by running a line for the pavers to be cut, second time doing this, I just did this Saturday for the Hydroponics before I decided to replace it with a Hugelkultur bed.
- Then the area is somewhat leveled but made very flat. Next step was to get out the chop saw and make all the cuts. Each box length is 7' 11" the reason I used this measurement was so that a 16' 2x6 would cap the top without any seam, the 16 foot 2"x6" was 1" over length (16' -1") I deducted 3" from the overall length of the 16 footer and divided by 2,to allow for a 1-1/2" over hang on each side so the 2x4 uprights would be flush on the sides.
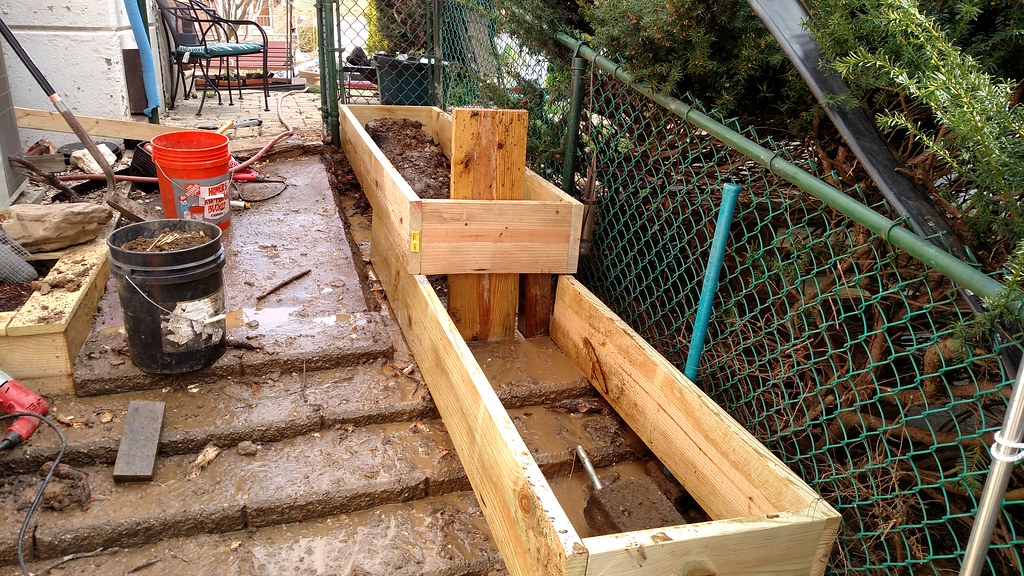
- The bottom half of the first bed is put together, angle pieces were used, then 3" deck screws secure the other end. This will be one large bed but in 4 sections.
- The bottom half of bed section#1 is flipped so the corner braces are on the bottom.$HIT, that's tight, I did add over a half inch to the depth when cutting the pavers.
- Building the bottom half of raised bed section#2
- Same with the bottom half of box #2, flipped and put in place. Then the beds are leveled and the center pieces are secured together. The fit on box #2 is even tighter.
- OK, Looks good so far.
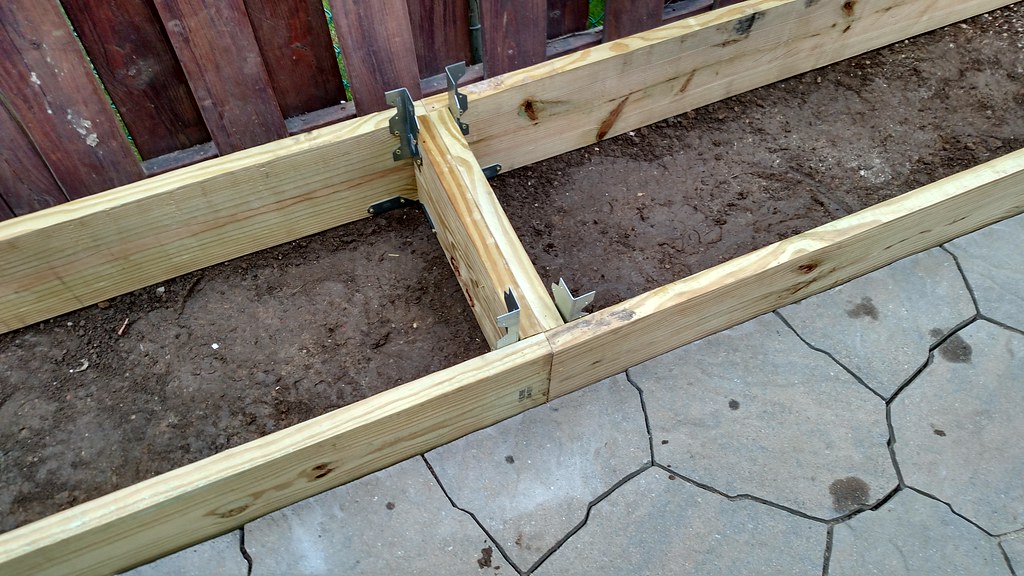
- Next up, installing the Galvanized reinforcing L angle. I strongly suggest using these especially if you are going to join more than one board together or are in a tight spot. The angles are offset so they will be screwed into both sections of the bed.
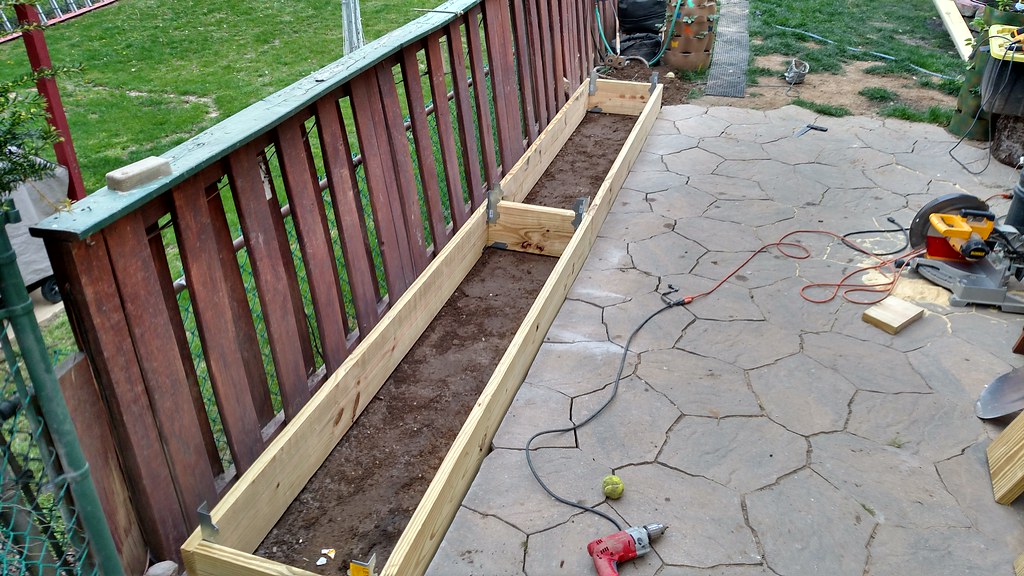
- Then the side pieces are installed.
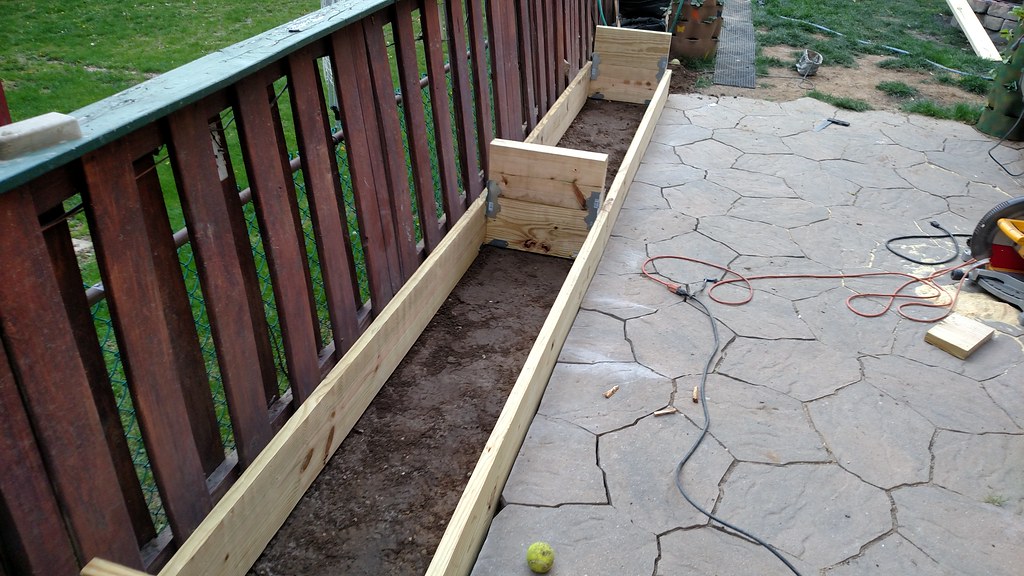
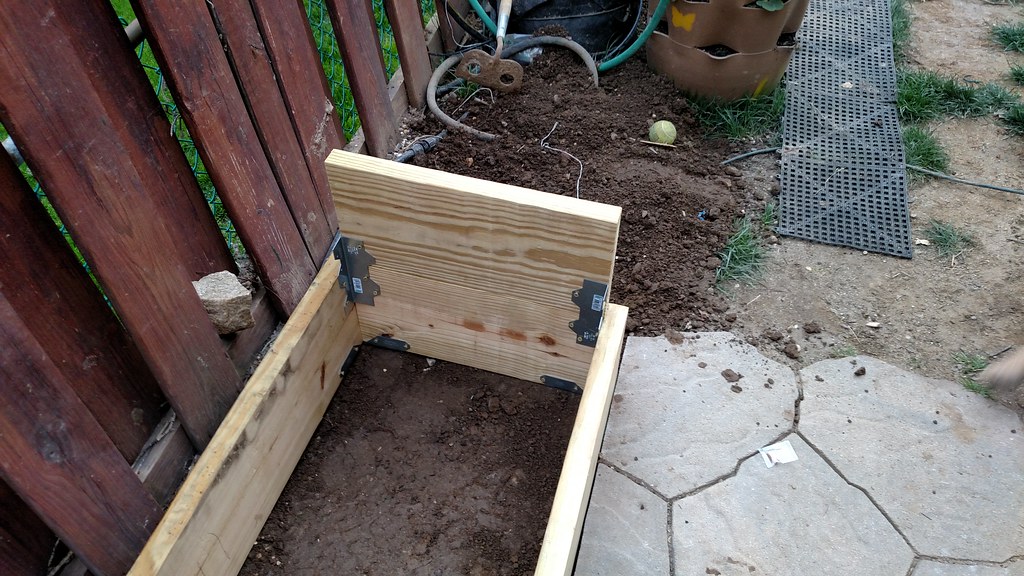
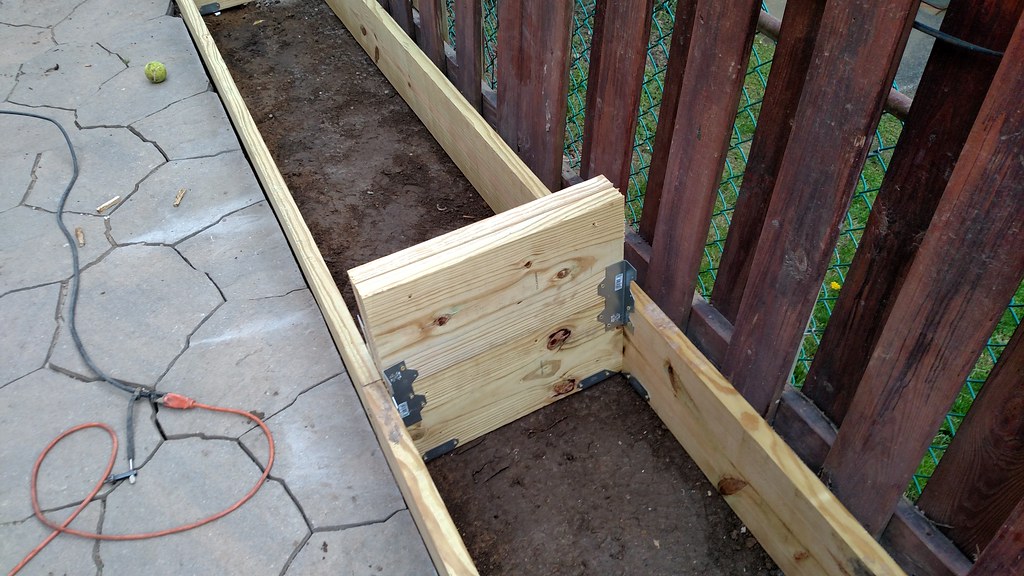
- Followed by the fronts and backs.
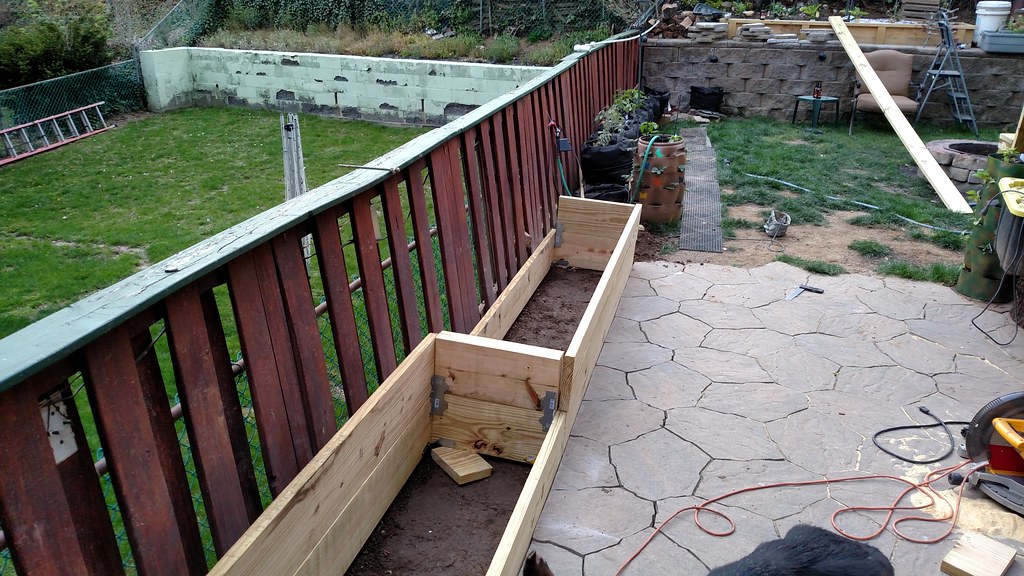
- After everything is secured, the two end pieces in the center are secured to one another with 3" deck screws.
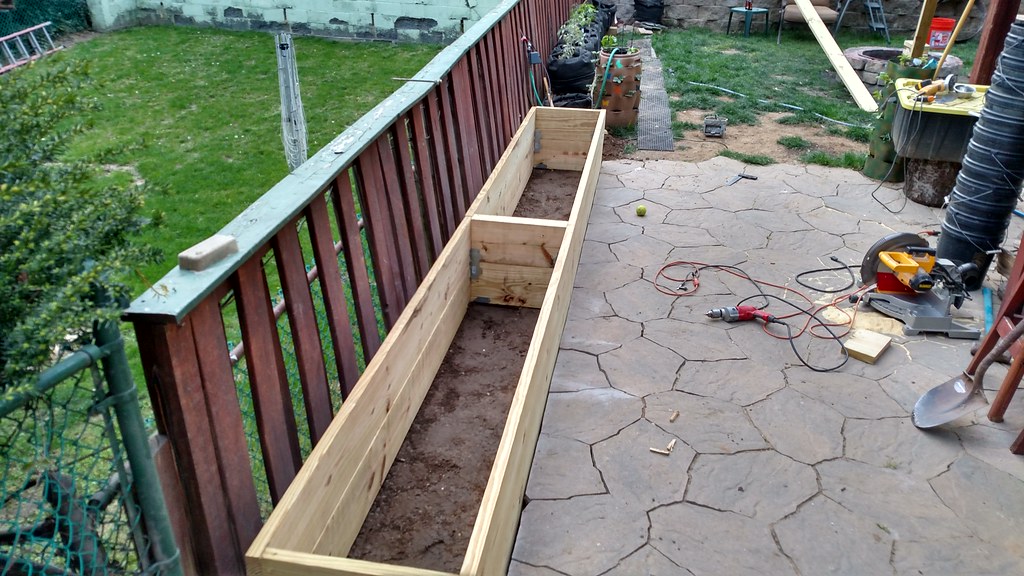
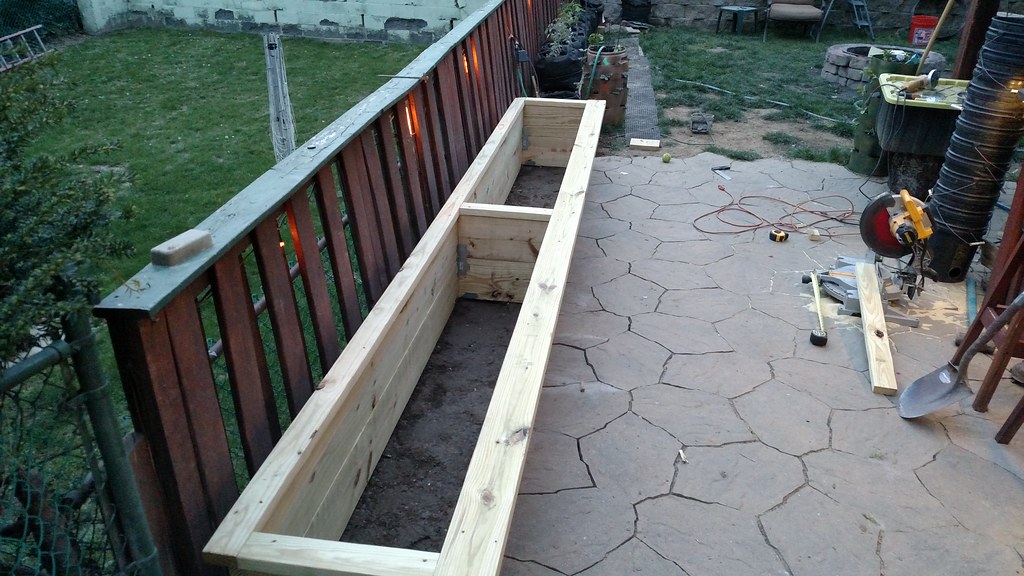
- The top is capped with 2"x4"s on the sides and back, the front is a 2" x 6" for a little bench.
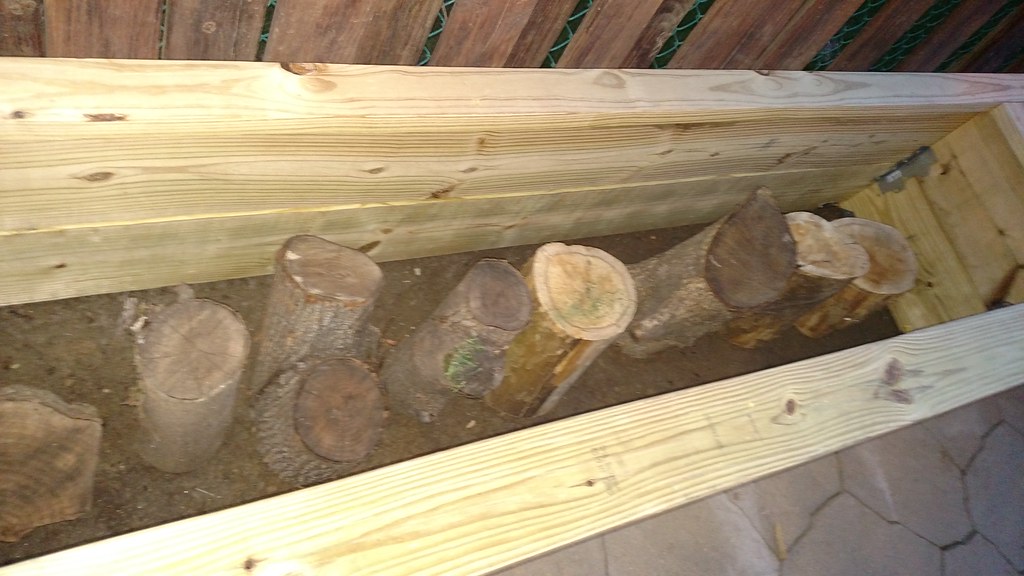
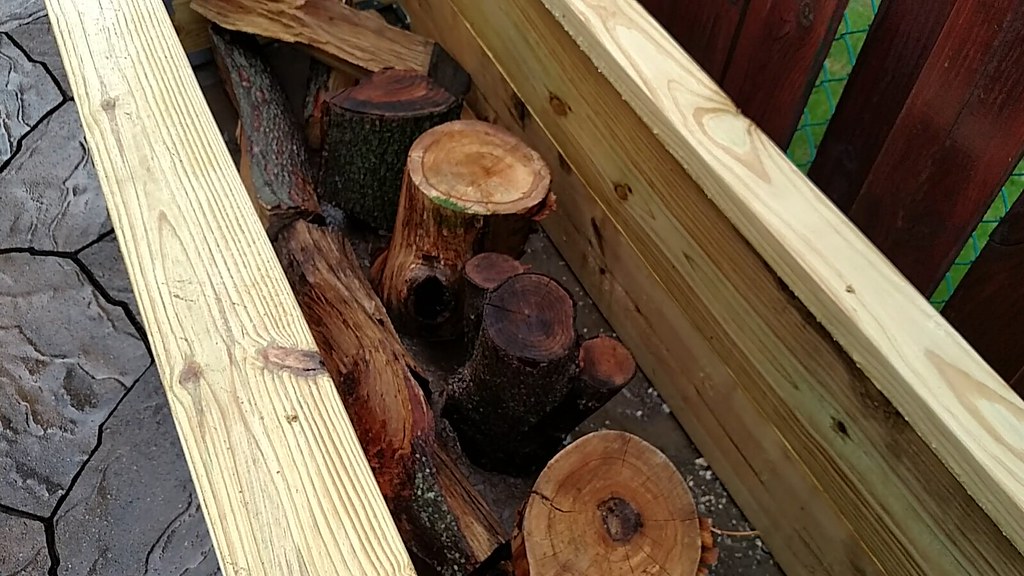
- I started filling with wood but its getting dark and I haven't eaten yet.

- Maybe I should go eat something, these are going to my head!

April 22nd, 2016 - Before work, I saturated all the wood in the bed.
- After work I picked up a few more supplies, added some supports in the back, I wanted to get the back supports in before adding the wood because I can't secure the supports from the back, they need to be secured from the inside. Then I soaked the wood again.
- Started the tedious task of filling with the wood I got from work.
- Saturated the wood.
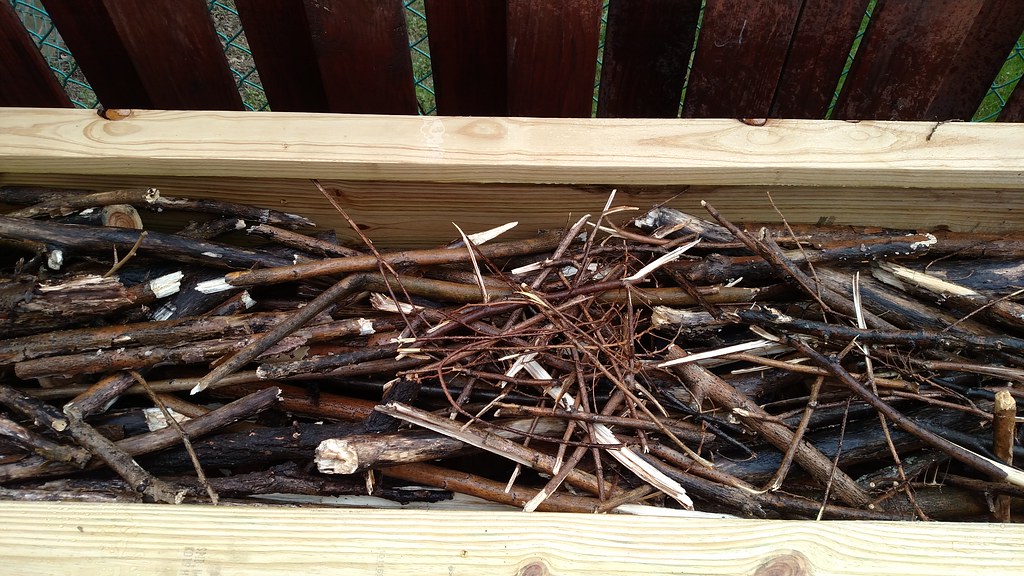
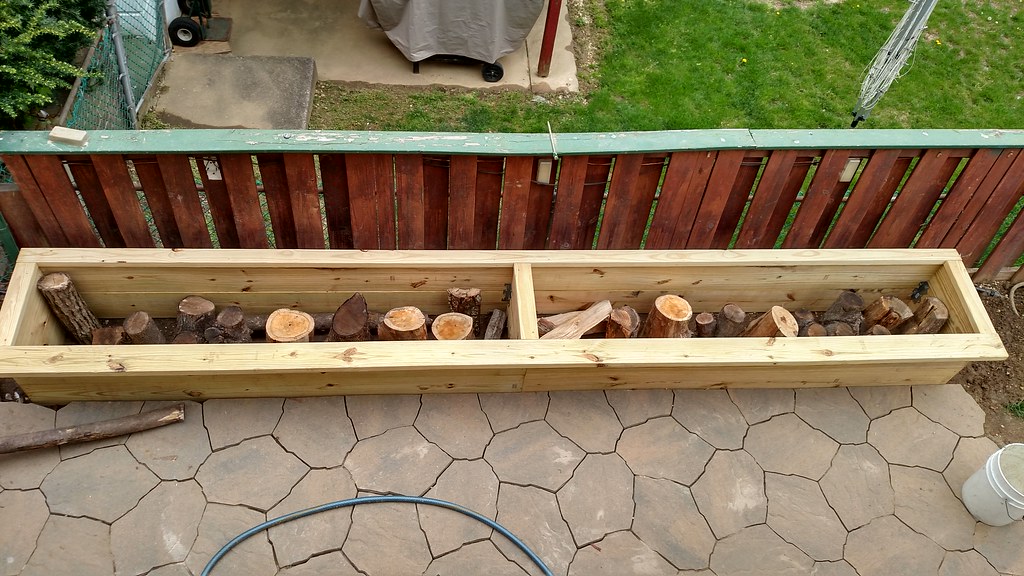
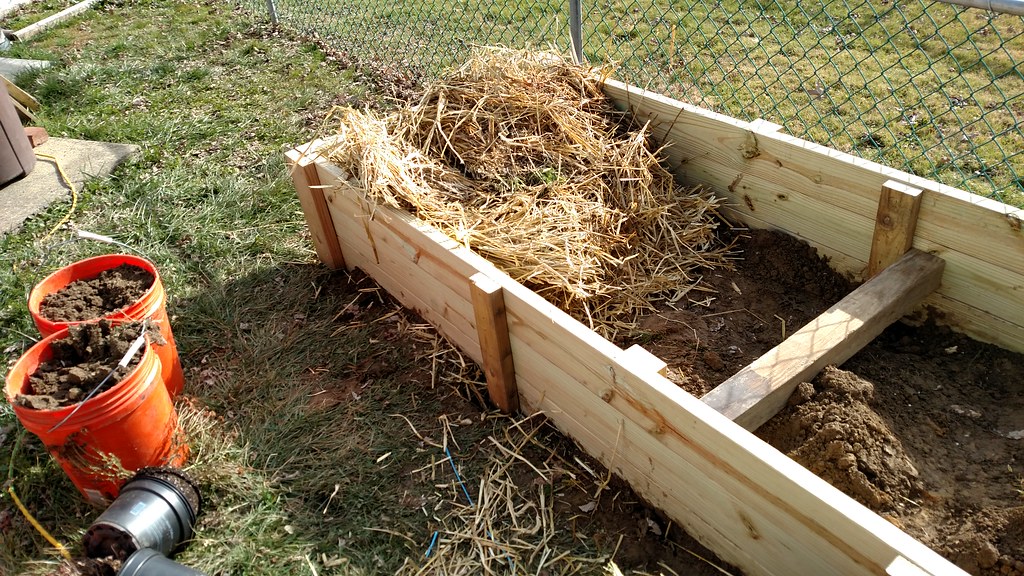
- Added about 10 (5 gallon) buckets of soil from the back hill.
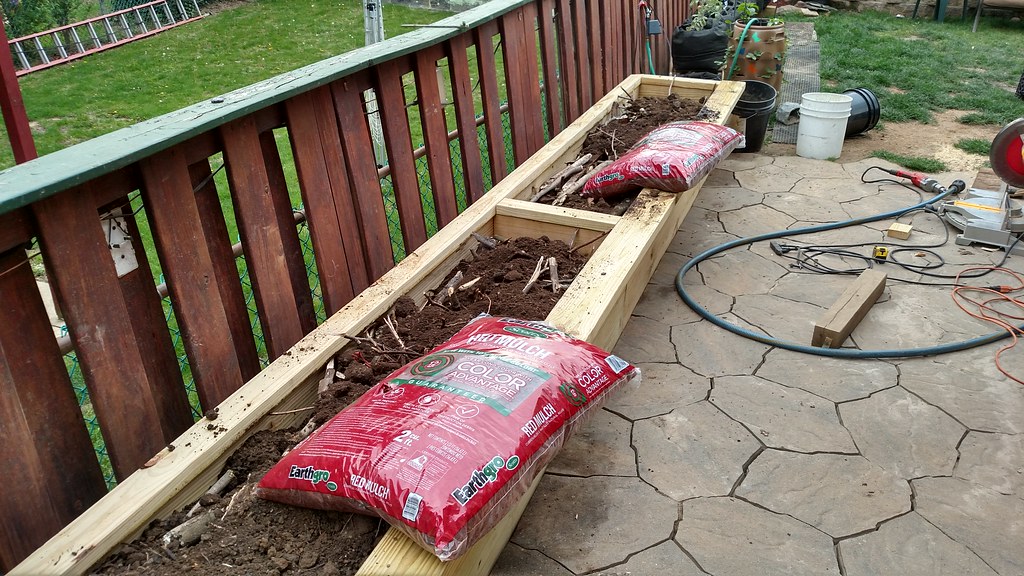
- 2 bags of shredded mulch are added, figured this would help keep everything intact to help planting this year, I'm sure this is going to settle quite a bit and I'll keep top dressing with mulch.
- The shredded hardwood mulch and soil are saturated.
- Composted Manure is added
- The composted manure is saturated.
- Three bags of top soil are added and saturated.
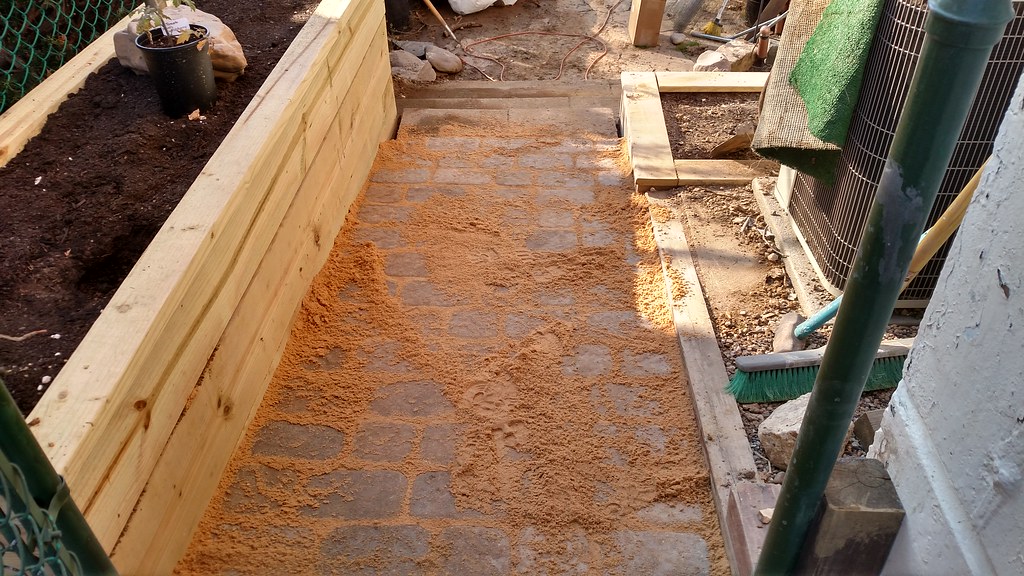
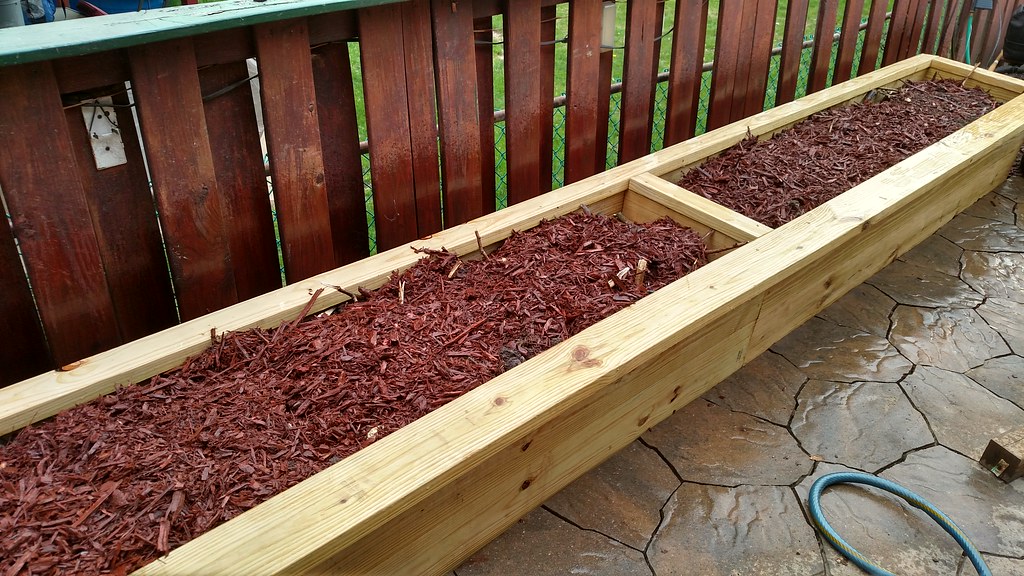
April 23rd - Installed the uprights, these aren't only for aesthetics but also for structure, and it pulls the boards flush. Then the drip line is installed, then tossed some paver sand down and worked the sand between the bed and pavers.
- Cut the rest of my firewood and saved some of the bark for mulch and used to help secure the drip line.
- Once the bed is seated well, I'm going to pull the fence in and secure it to the bed in an effort to get rid of that lean.
- LED ROPE Lights are installed and will run on a timer, the LED's are just taped in place for now and will be added permanently after the beds are stained.
May 1st, 2016 I installed the new LED'S last night on the other Hugelkultur bed and I am extremely impressed, I am so impressed that I ordered twenty more bulbs and 6 more Railing lights for this Hugelkultur bed. @ 0.48 watts, you can't beat it, these will replace my 7 watt deck lights and 21 watt front yard landscape lights.
May 15th, 2016 I installed 6 more Railing lights for this Hugelkultur bed. The LED ROPE Lights are removed
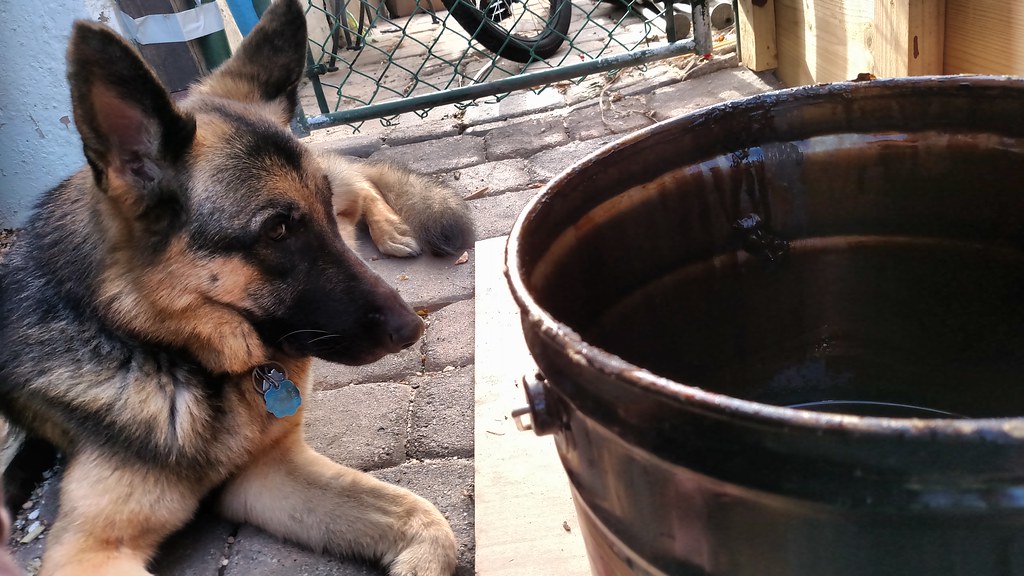
- My supervisor on the job.
SQWIB- Posts : 366
Join date : 2016-03-07
Location : Philly 7A
My 3rd Hugelkultur Bed
![]() SQWIB 3/17/2017, 9:47 am
SQWIB 3/17/2017, 9:47 am
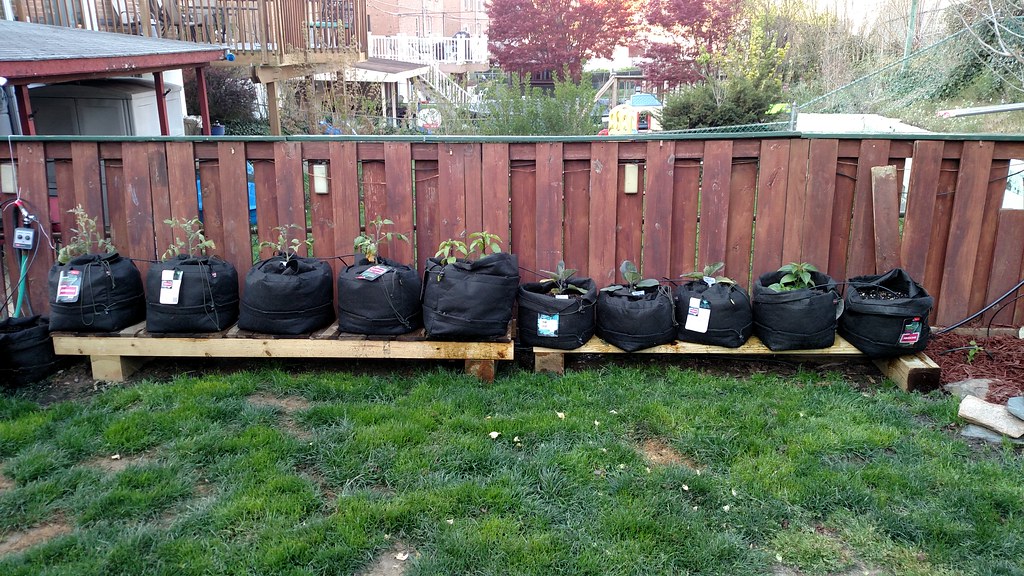
A few weeks ago I was eyeing up the yard and admiring the Hugelkultur beds. I thought about last seasons crops that were in the “Air Pruning Pots” that were along the side of the fence and was contemplating how to set up the Air Pots next season.
After much thought, weighing the "pros" and "cons", I decided to build another Hugelkultur bed along the side of the fence, this will be my 6th bed but 8th box, 9 if you count Moms Hugel Bed.
The plants did good in the Air Pruning Pots, but not as good as the plants in the raised bed. One of the "pros" to the “Air Pots” was they were mobile and at the end of the season I could move them up onto the hill and open the yard up a bit. But this was also a "Con", because the bags could be pretty heavy when wet and storing on the hill looks a little unsightly. So after one year of the Air Pruning Pots, I decided that I didn't want to be bothered putting the “Air Pots” away each season and wanted something more permanent. I will continue to use a few on the side patio.
This bed will be 24” wide by 20' long, I will loose some of the yard but another "pro" is that I can use the beds to straighten and support the fence, however, the cost of building the bed is another "con".
My biggest "con" is that the box turtles hibernate in this corner, so I will have to dig out the corner in front of the corner of the bed and add leaf mulch and wood mulch so they can still hibernate there.
Here is what I did to straighten out the fence using the Hugel Bed.
- (10) 2x10x10 $148.00
- (3) 2x4x12 $22.80
- (2) 2x6x10 $17.53
- (2) 4"x4"x10' $25.38
- (1) #8 x 1-5/8 in. Star Flat-Head Wood Deck Screws (1 lb.-Pack) [1-1/2" is fine, but this is what I had]
- (1) #10 x 3 in. Star Flat-Head Wood Deck Screws (5 lb.-Pack) $31.78
- (
 ZMAX Galvanized 16-Gauge 2X Rigid Tie Connector $16.80
 - ( ZMAX 7 in. 16-Gauge Galvanized Reinforcing L-Angle $19.25
- ( ZMAX 5 in. 16-Gauge Galvanized Reinforcing L-Angle $15.86
- (6) 1/2"x5" lags $3.91 (had 3 lags and washers already)
- (1) Everbilt 3/8 in. Galvanized Flat Washer (25-Piece per Bag $4.95
- (3) Everbilt 3/8 in. - 16 tpi x 6 in. Galvanized Carriage Bolt $6.97
- (3) Everbilt 3/8 in. Galvanized Hex Nut $0.70
- (2) 1/2"x12" Eyebolt $6.80
- (1) 1/8"x50' Cable $17.91
- (2) 3/32"x1/8" wire clamp set $4.20
- (2) Vista Red stone $9.69
6 bags manure
4 bags mulch
January 18, 2017
Earlier this week I checked the weather forecast and Saturday calls for sunny and 58°, after seeing the forecast I decided to knock out the bed this weekend. The day after I purchased the wood, I checked the weather again and the forecast is still 58° but cloudy, no matter, it will be dry, It's been wet the last few weeks and looks like more rain the beginning of next week.
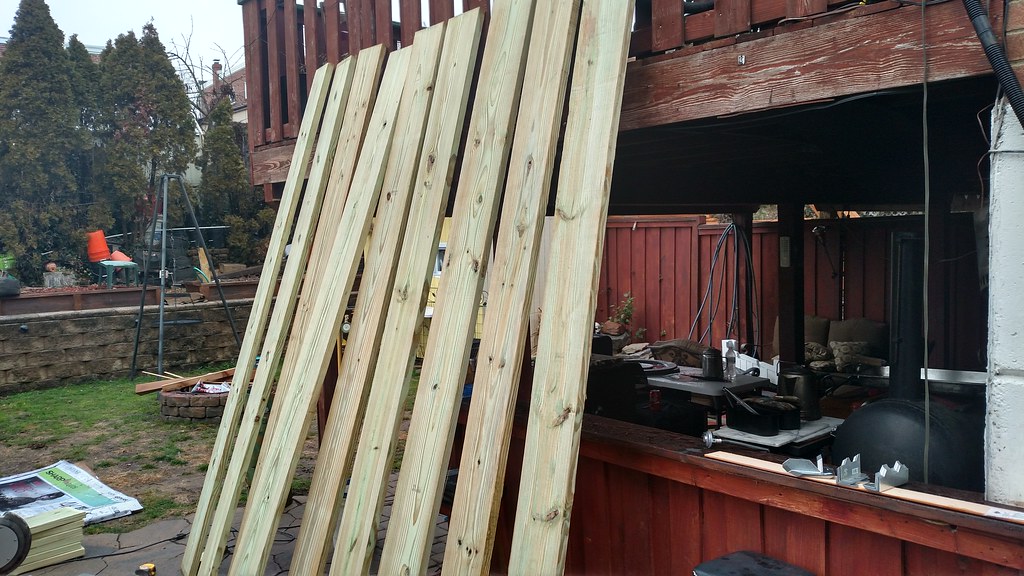
- I Picked up most of the wood at Home depot, still need to pick up the cap and side pieces.
- These are freaking heavy when wet. I stacked them in the back yard and picked out the cleanest 4 pieces that will be for the front of the bed.
January 20, 2017
- I dropped my son off at school and stopped in my usual spot to pick up some Hugel Wood.

January 21, 2017
- The weather was mild but very wet so I figured on getting muddy today. After I double checked the best pieces for the facade, I carefully dug out the one corner checking for turtles, yep found one. I dug a new hole a few feet away, filled with loose soil and mulch then dug out a slot and placed the turtle back in and covered with some light dirt and mulch. I dug out the raspberry bush and placed to the side. I had to move the underground hoses so they wouldn't get pinched.
- This spot is 20' wide exactly so I will be fitting this as tight as possible. The irrigation line needs to be reworked. The hoses to the left of the picture were adjusted also to avoid pinching off.
- I had Air Pruning Pots here for 2016.
- This is the hardware I will be using. It may seem like overkill but it makes building the beds so much easier especially considering I can't get on the back side to drive the screws.
- Build.

- Tight Fit.
- After the bottom half is done I try leveling and straightening the beds the best I can.

- After all the boxes were completed I readjusted the beds one more time then called it a day, I was muddy, sore and tired. I slipped into some sweat pants popped four Advil, made a cup of coffee and watched an episode of Dexter and I was feeling much better. Now for some venting, what really pisses me off is that I am busting my stones trying to get every piece cut and to fit almost perfectly but when I start putting the boxes together, the width varies 1/4" from one end to the next on the 2x10's, 9-1/4" on one side and 9" on the other side, this should be illegal. Whats next, a nominal 2"x 10" actual will be a 1"x 8"?
January 22, 2017
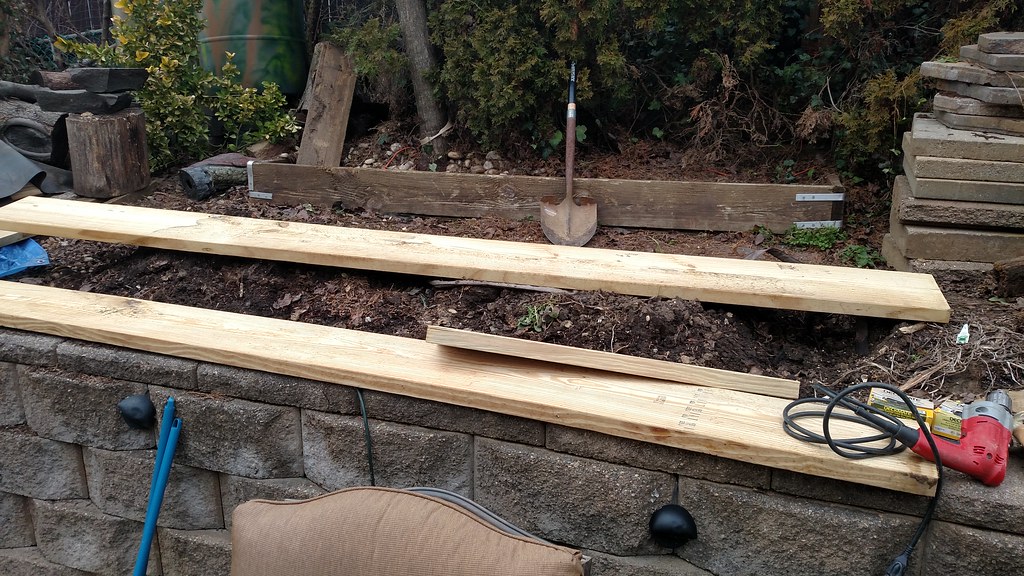
- The next day the weather was poor, it was misting all day and the yard was mostly mud but I wanted to get this done so I could get the wood, leaves, compost and other materials in the bed, we are supposed to be getting a lot of rain and figured it would benefit the bed.
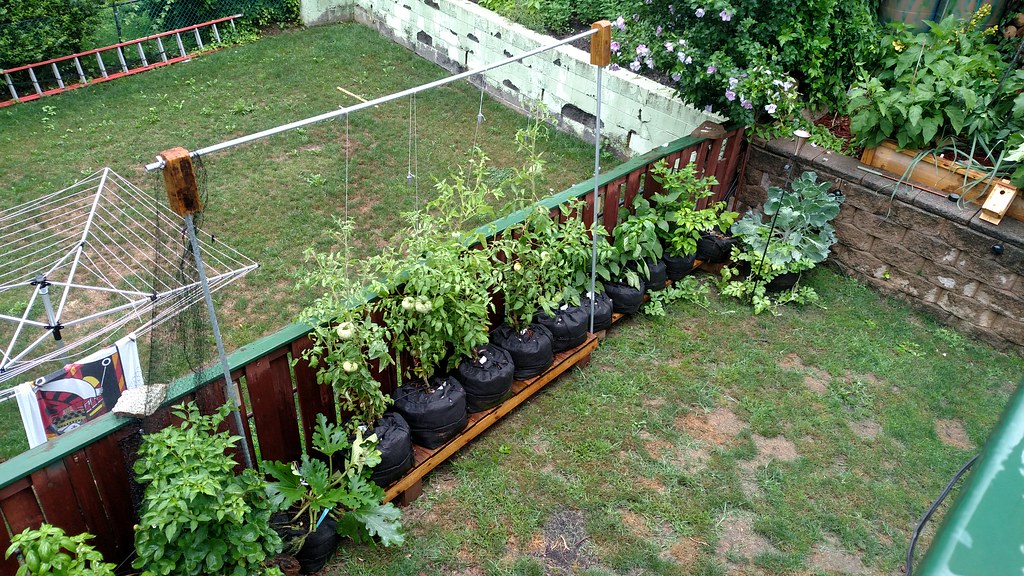
- I agonized over a support system, one thing I am sure of is that it is going to be a vertical support system. I really didn't want to be putting in a bunch of conduit and rebar. This was last years support system and with the added length of the bed this year, I thought a bunch of EMT pipe would look a little shabby.
- So here is what I came up with.
- But first a stop at the Home depot to get some more wood. I decided on a permanent support system for the plants so I will be adding two 4"x4"x10' supports, they will be dug in and the finished height from the top of the bed to the top of the posts will be 7'.
- Three 5" lags are installed and the corners of the box are beefed up, I used lags on this side because it butts up against the retaining wall, the other support will be secured with Galvanized carriage bolts.
- Tops of the bed are capped
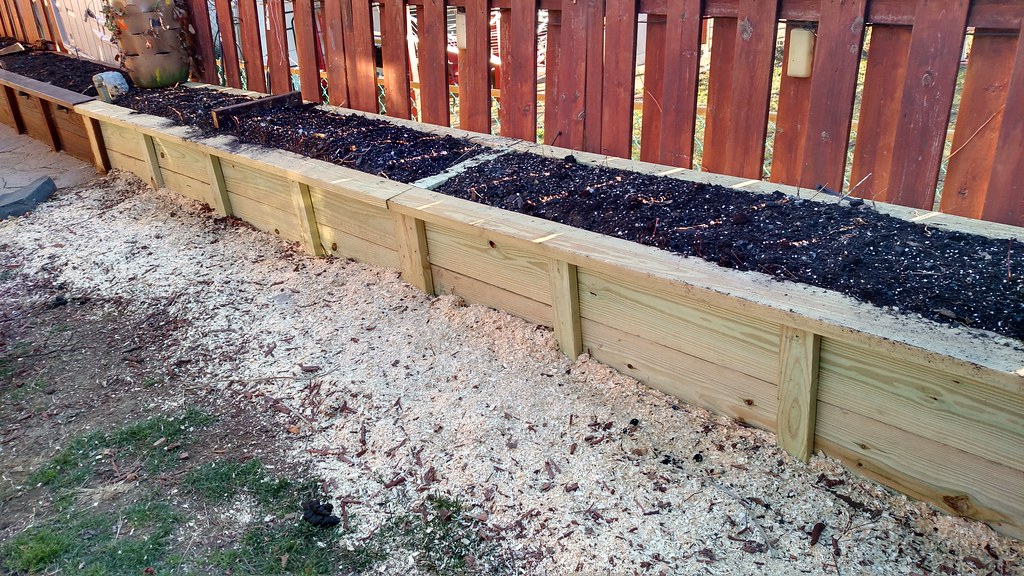
- Filling with wood.
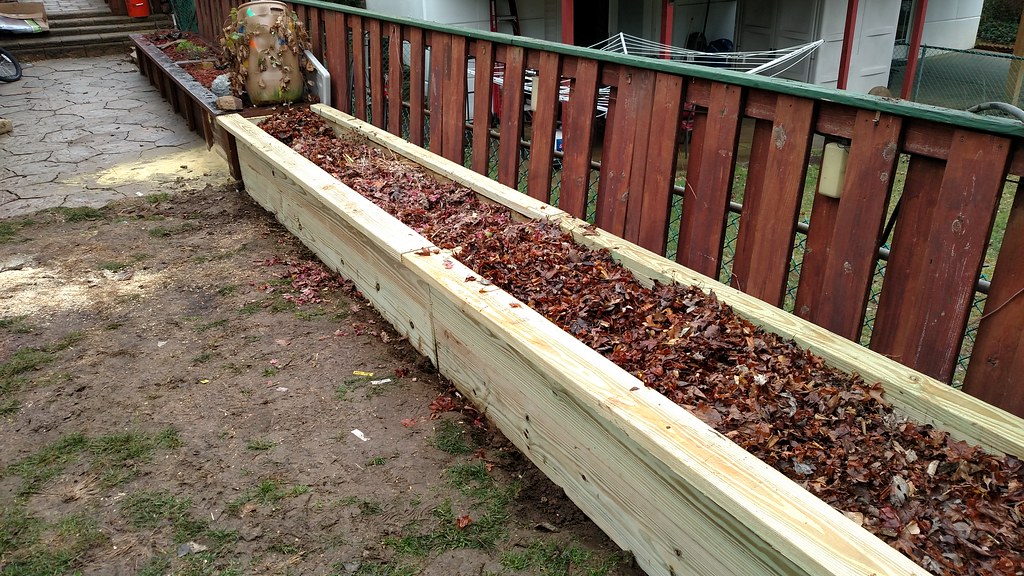
- Had the kids rake the leaves from the front yard and toss in the beds.
I still have to replant the Raspberry bush, add the upright supports and tweak the watering system. I will be removing the end top piece on the finished bed and install a wider piece for a neater transition between the new bed and the finished bed, also I need to remove the 6" upright in the front of the finished bed and move over the seam of the new bed and finished bed.
I still need to dig out a little of the soil in the front of the bed, this soil will be tossed on top of the leaves.
Over the next several months I will be adding compost from my compost pile and 6 bags of manure, some potting soil, perlite and 10-10-10.
I also need to dig out the finished bed to the far left and install another 4"x4"x10' upright for the permanent support system. This is gonna be a chore because of the wood in the bed, my only other option is to put the upright on the outside which I do not want to do unless I have no other choice.
January 28th, 2016
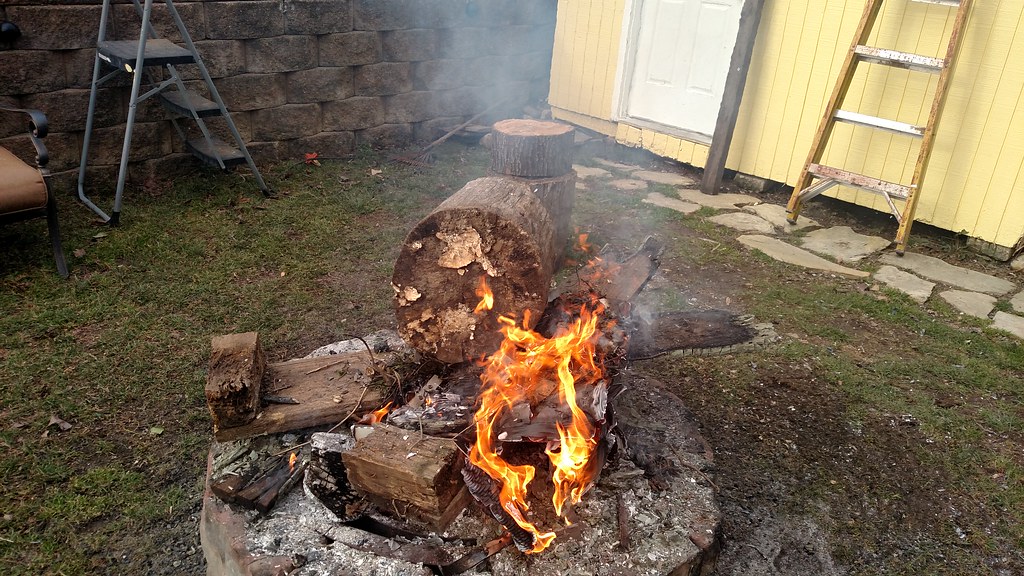
- It was a sad day today, I cut down my Red Maple, I planted this 25 years ago and it just died all of a sudden. I hadn't the heart to burn up the wood so I figured it would make me feel better if it sustained new life over the next 10 years or so. Some will be split and used in the pit and some will be chunked for the smoker.
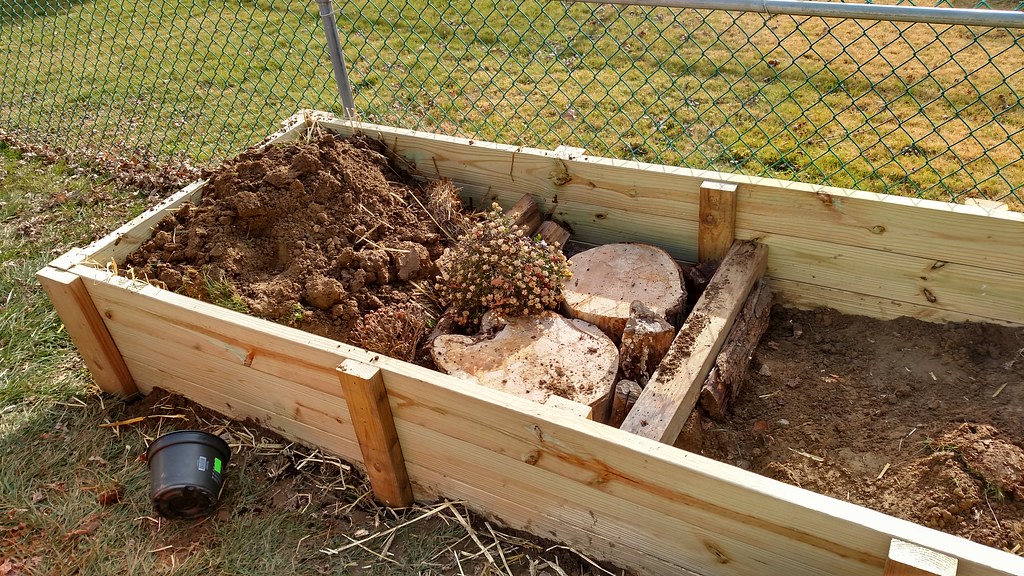
- I removed all the leaves from the bed and placed the red maple in the beds. Sad little coffin!
- Topped with some compost from the compost bin, some clay soil from the yard, followed by the leaves then I emptied my air pruning pots into the beds, the Air Pots had , peat, manure, topsoil and perlite in them.
- I'll probably toss a few bags of mulch in front of the beds for a path, my yard can get pretty swampy. I'm all ready to plant, just need to tweak the irrigation line, add the top cap pieces, vertical pieces and finish the vertical support. I will stain the bed and may add lights in the fall.
- I ran out of money but not Mojo so I dug out the other end of the bed, there was some wood in the way that I cut with a sawzall and one piece I had to split with a splitting wedge, then I hit a piece of granite with the post hole digger and got out the hammer drill... forget that... I gave up after 30 minutes and just decided the extra 10" wasn't worth it!
- Well the whole day didn't go as planned, we blew a brake-line on the suburban and I had to drive home with no brakes, wife was having a conniption the whole way home, I used the brakes one time on a twenty minute drive...IN THE CITY, wasn't fun.

February 5th, 2017.
I finished installing the vertical support line.
- Notched the side top plate
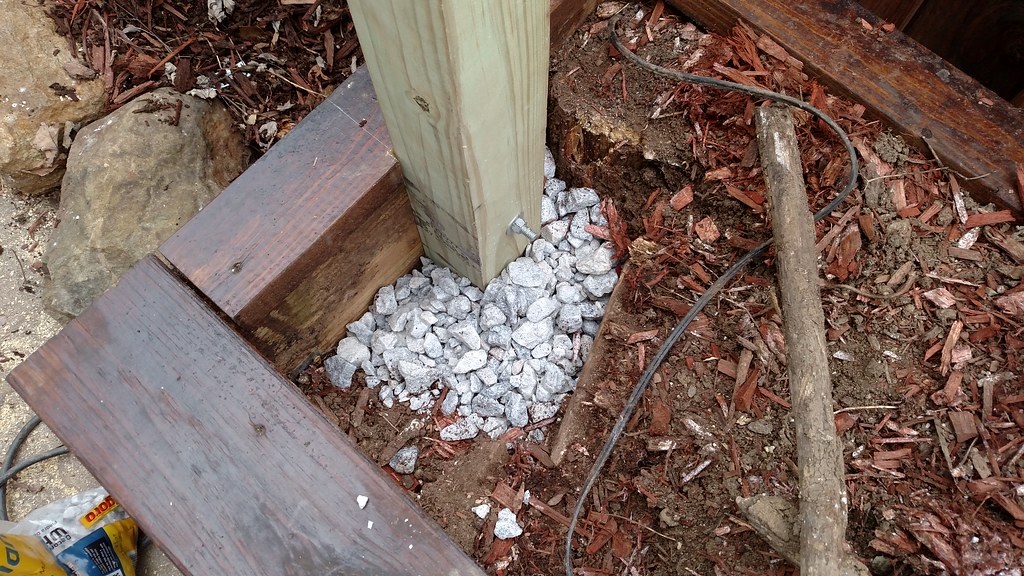
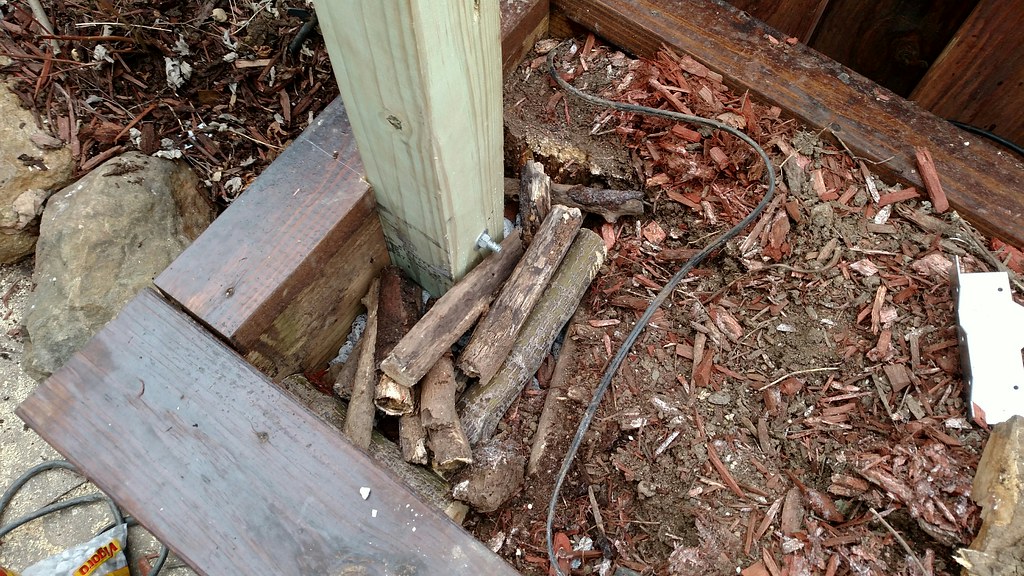
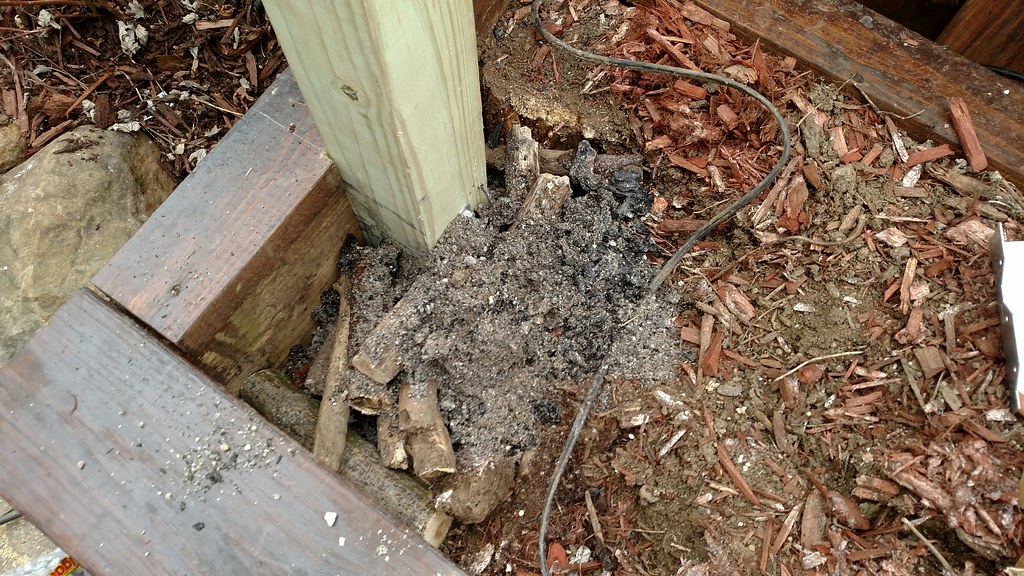
- I had to cut 9" off of this upright because I hit a hunk of granite that I couldn't get through and the depth was shy by about 9". Next up I installed the Carriage Bolts.
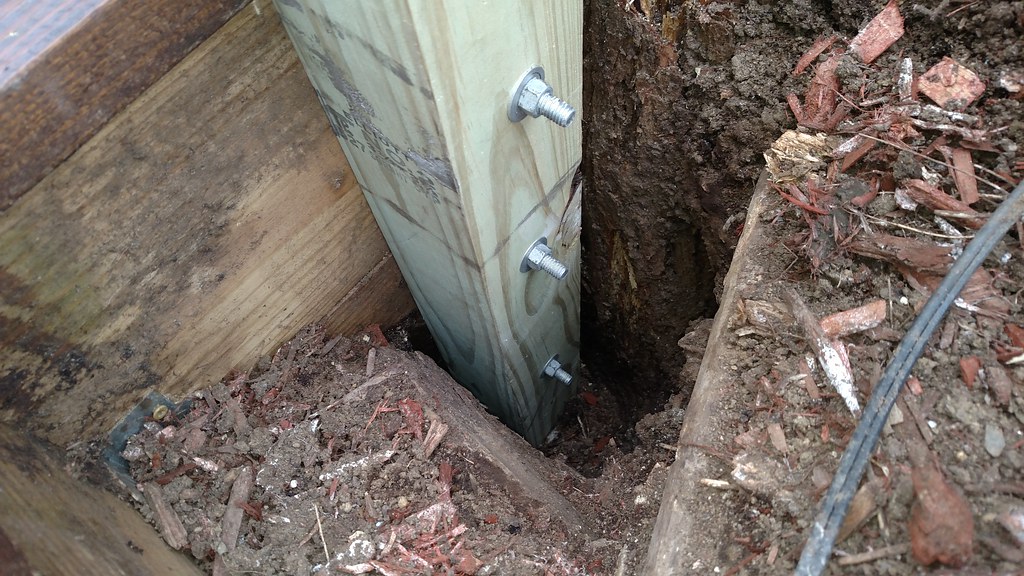
- Back filled with stone, wood , ash and soil.
- OK, time for the support cable, this will be 36' long.

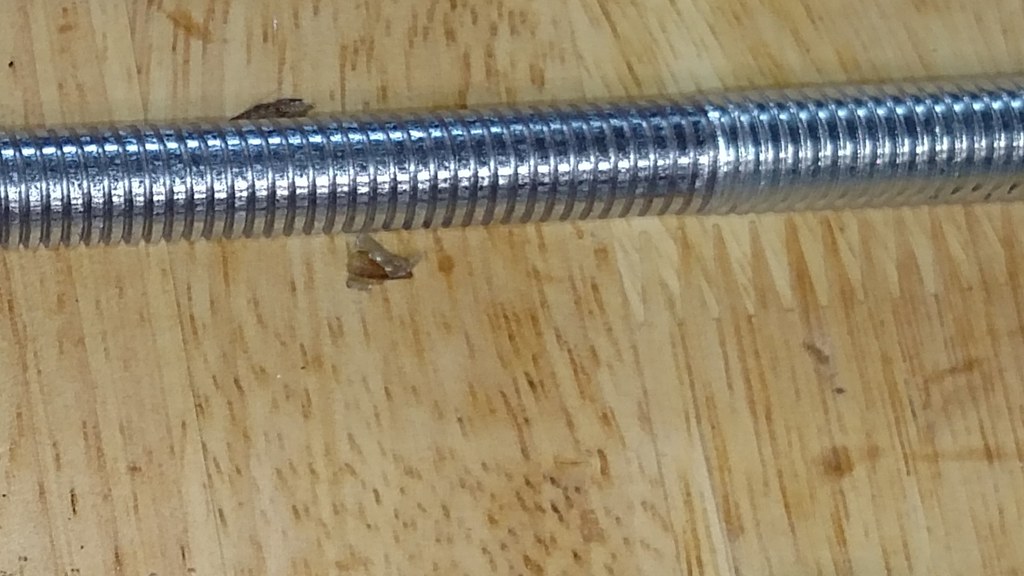
- There were only about 3" of threading on these eye bolts but I wanted as much adjustment as possible so I had to thread these further. What disappointed me was that the shaft diameter is slightly a smaller diameter of the threaded end so I don't have a full thread (Threads are flat)
- Thread comparison.
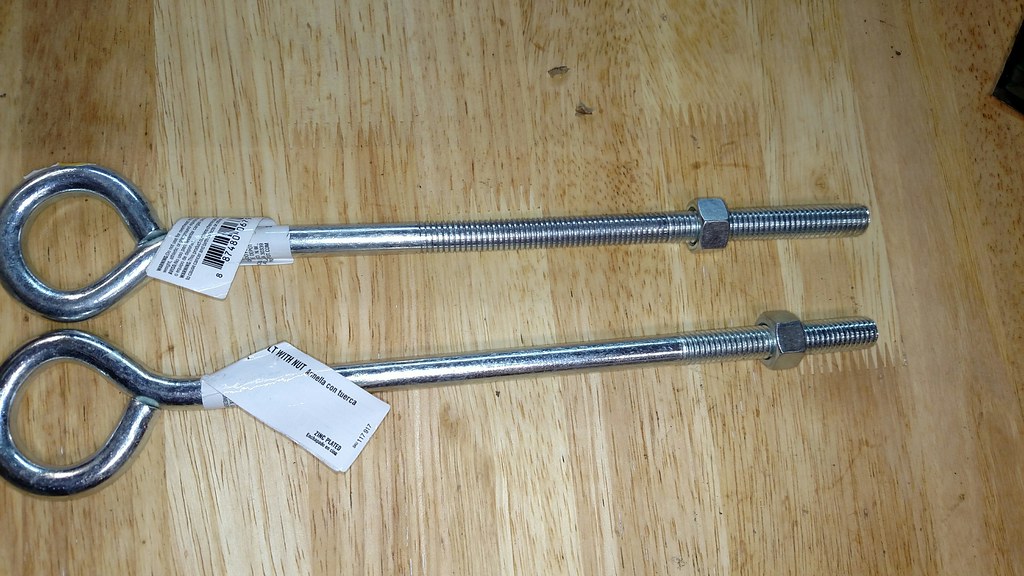
- Closeup of the threads.
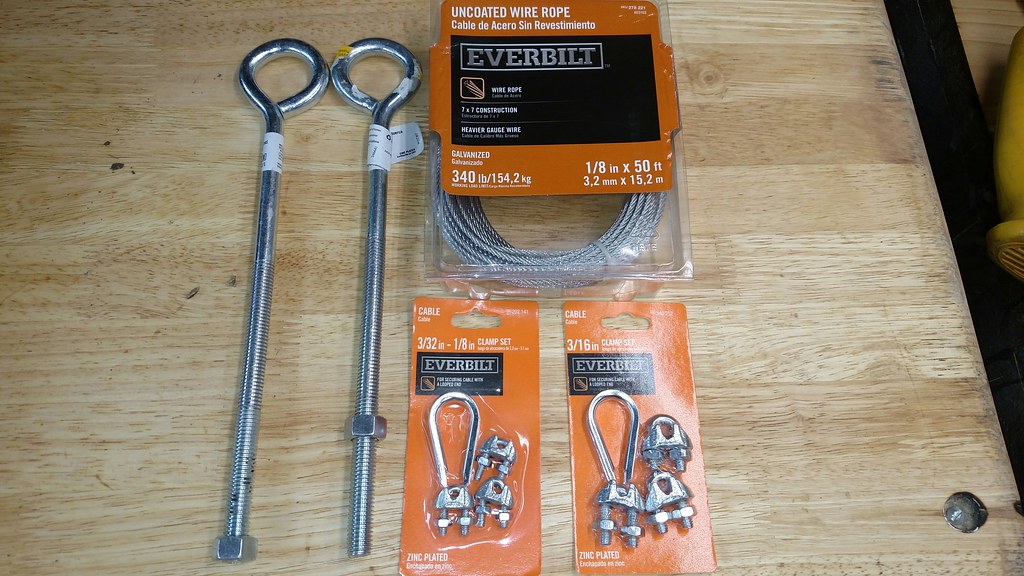
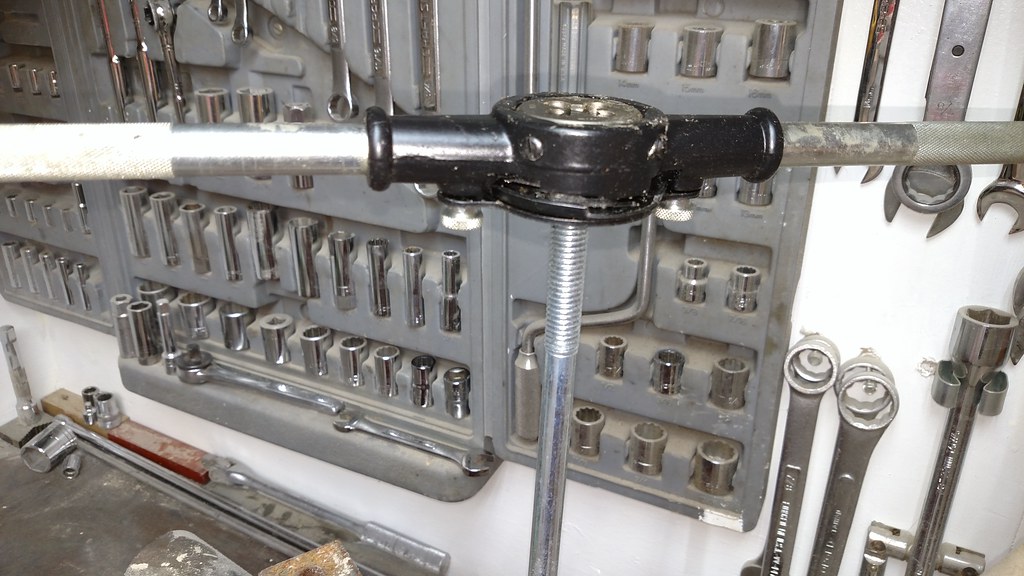
- Holes are drilled in the uprights, slightly larger than the eye bolts so they can move freely. Cable is looped and secured at one end around the eyebolt using the cable connectors. The cable is run to the other end and adjusted to the proper length and looped and secured with the cable connectors. Yes, Home Depot screwed up and gave me two different size cable connectors, but it was 25°F outside and I just wanted to get this done. I may change out the 3/16" with the 3/32" some day if I'm bored.

- I'm happy with the support for the upcoming year, but more importantly, my wife is very happy with the streamlined support system, when she's happy I'm Happy!
February 6th, 2017
- Since my brain is in garden mode the last few weeks, and that is all I can think about. I have been thinking about the support system, I was looking for a way to tighten the cable without tools, at first I was going to use a winch type adjustment but decided it was overkill and I do have a tendency to over engineer stuff. I want it simple enough where I can say to one of the kids, "Hey go outside and tighten the cable a bit", yes I do have a kid named "Hey". Here is what I came up with.
- If you look closely you can see the needle bearing sandwiched between the washer.
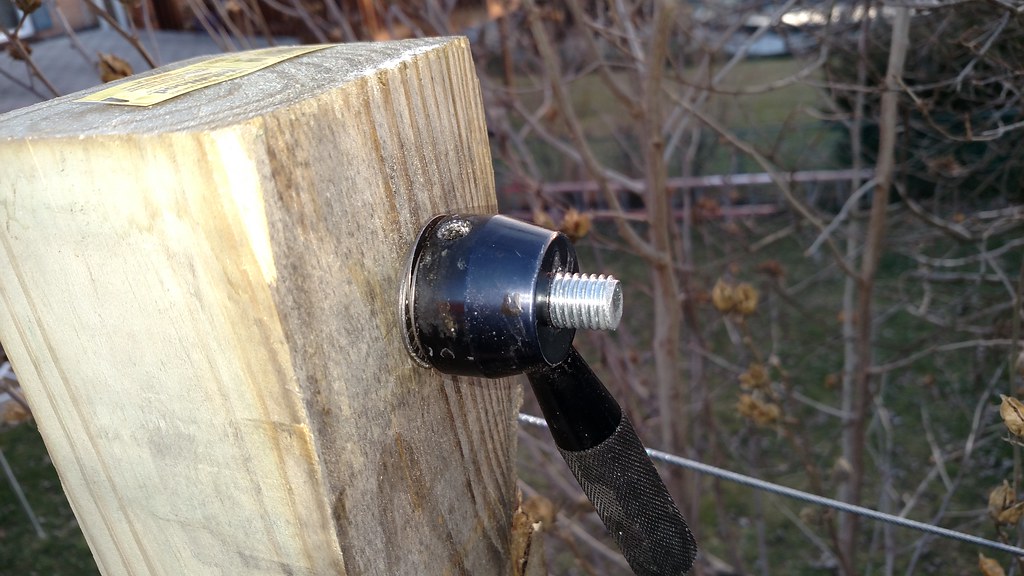
- The locking nut isn't really needed but I figured I would just toss it on.

- Finished the uprights on the new Hugelkultur bed, cleaned out the fire pit and spread the ashes and bits of wood on the beds.
Also put on the last few cap pieces, the one to the far left where the stained bed meets the new bed, I cut a piece that tapers wide in the back to narrow in the front to set the vertical garden tower on.
SQWIB- Posts : 366
Join date : 2016-03-07
Location : Philly 7A
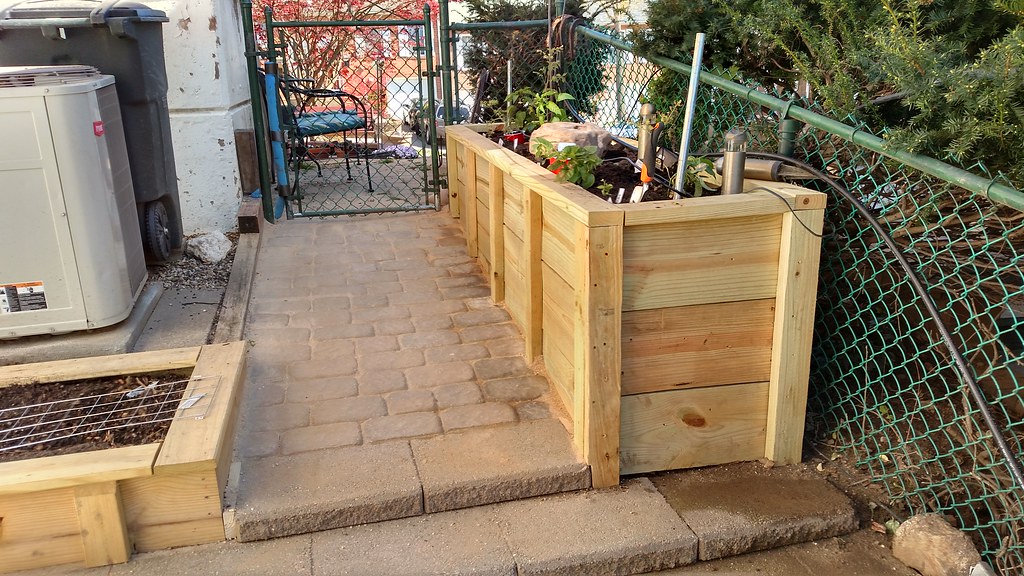
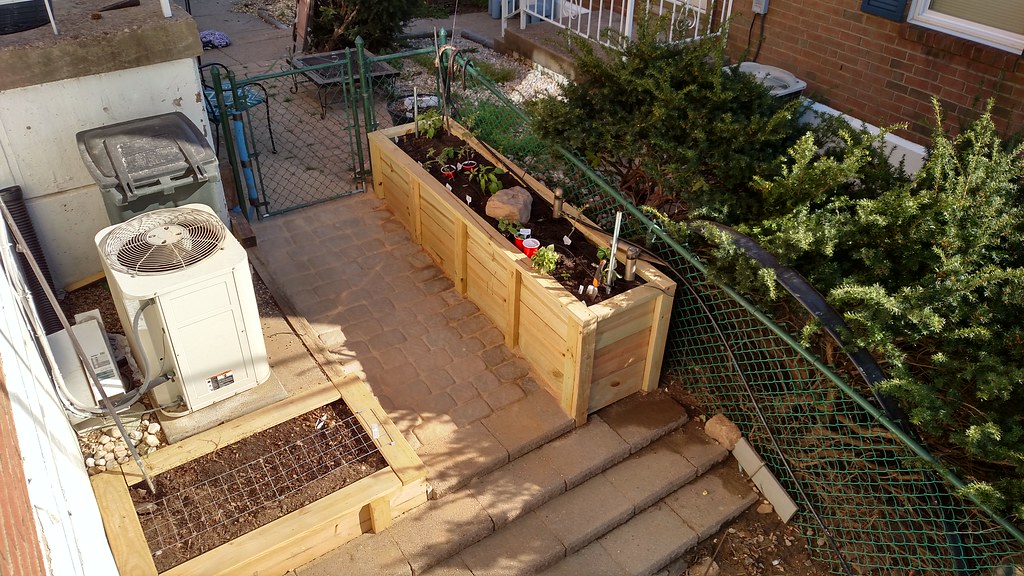
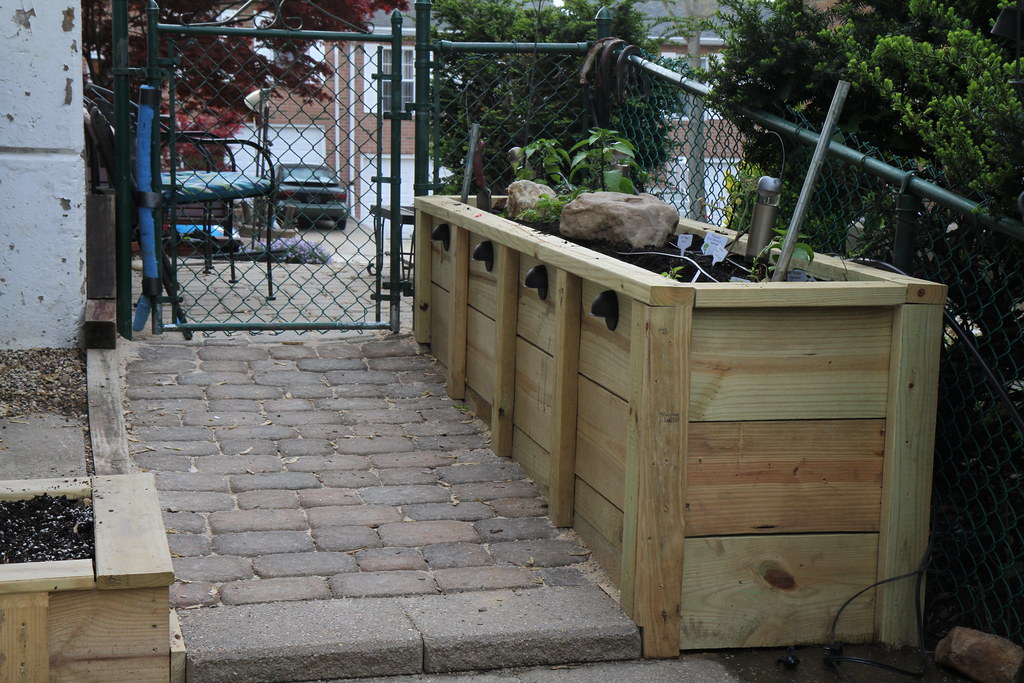
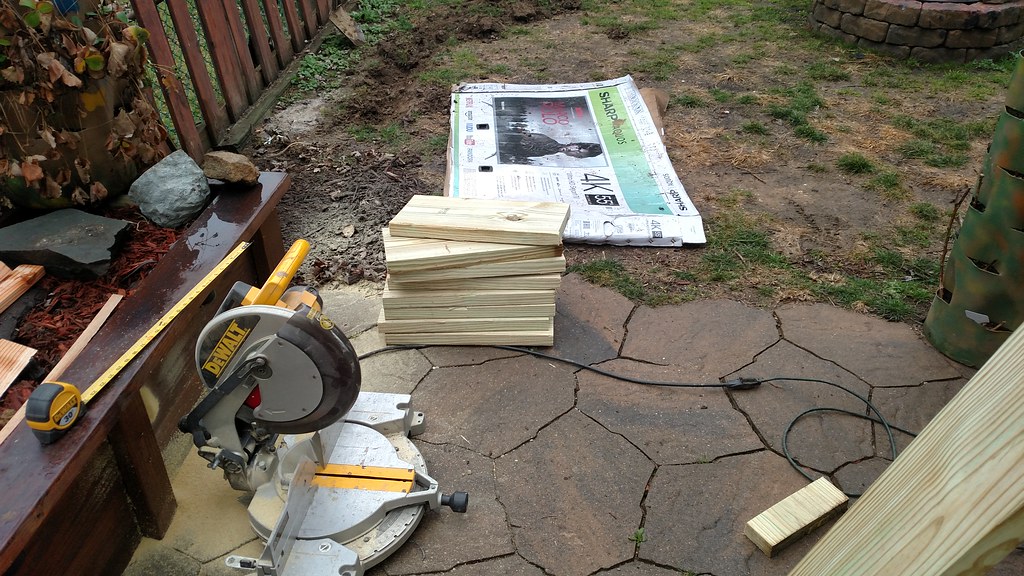
Raised bed build #1 Asparagus Bed
![]() SQWIB 3/17/2017, 9:54 am
SQWIB 3/17/2017, 9:54 am
Asparagus Bed
February 1st, 2016
In an effort to grow more greens without more hassle, I looked into Perennial Vegetables and was extremely happy to see that Asparagus was a Perennial Vegetable. Asparagus is one of my favorite green veggies for cooking, followed closely by Broccoli.
But the problem was, where the hell would I plant asparagus? I literally have no room.
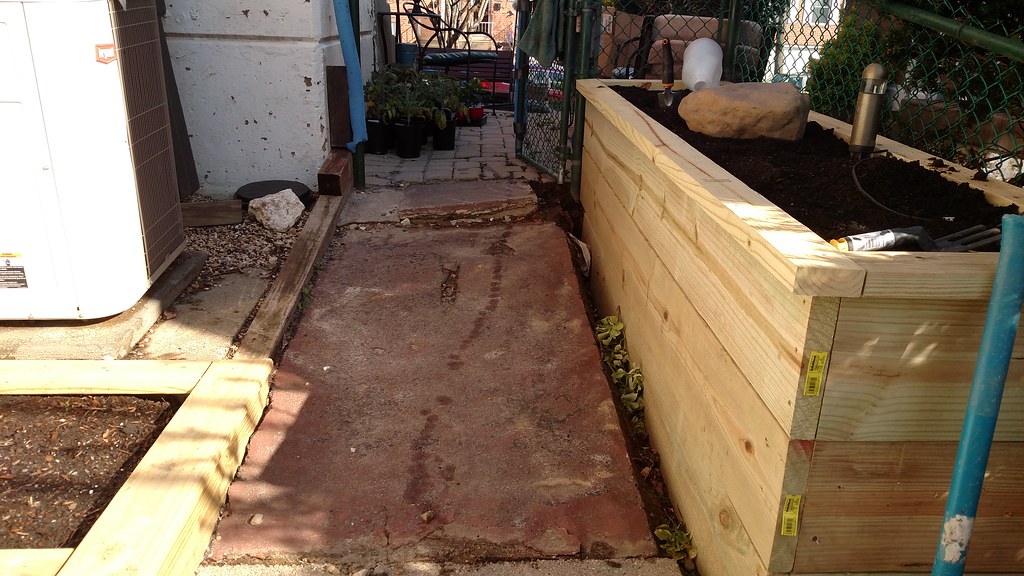
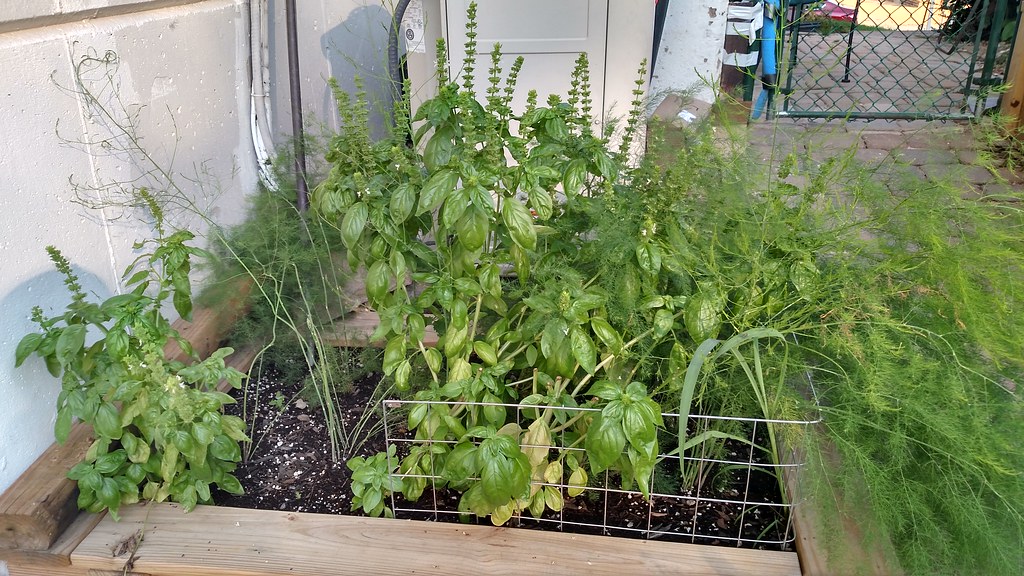
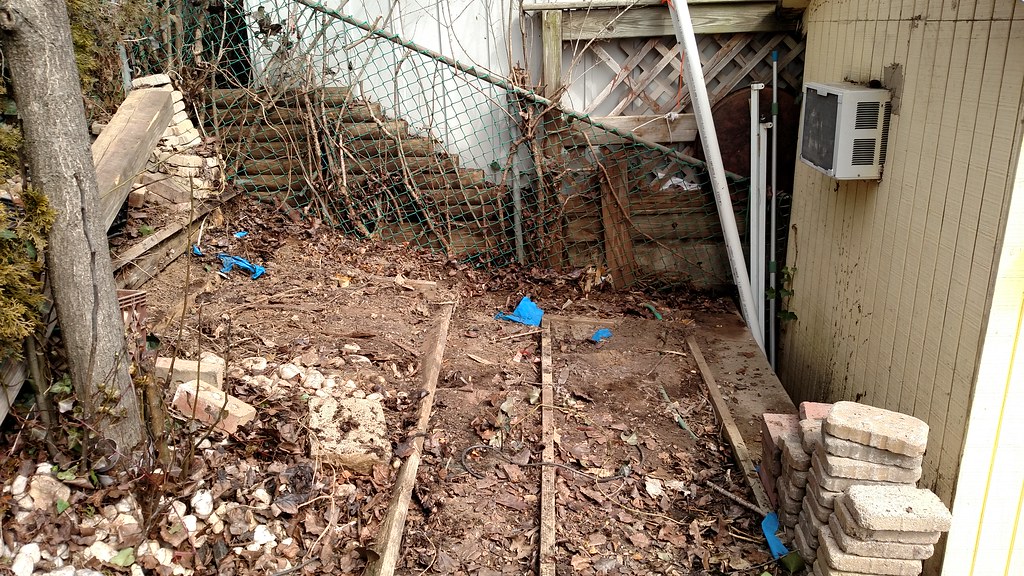
I think I may have found a place that gets good-OK sun, it is directly in front of my AC unit, it's tight, but with a little construction, I think I can get a decent bed of 10 plants. It Is a small area, maybe 3' x 4.25' (12.75 sq.')
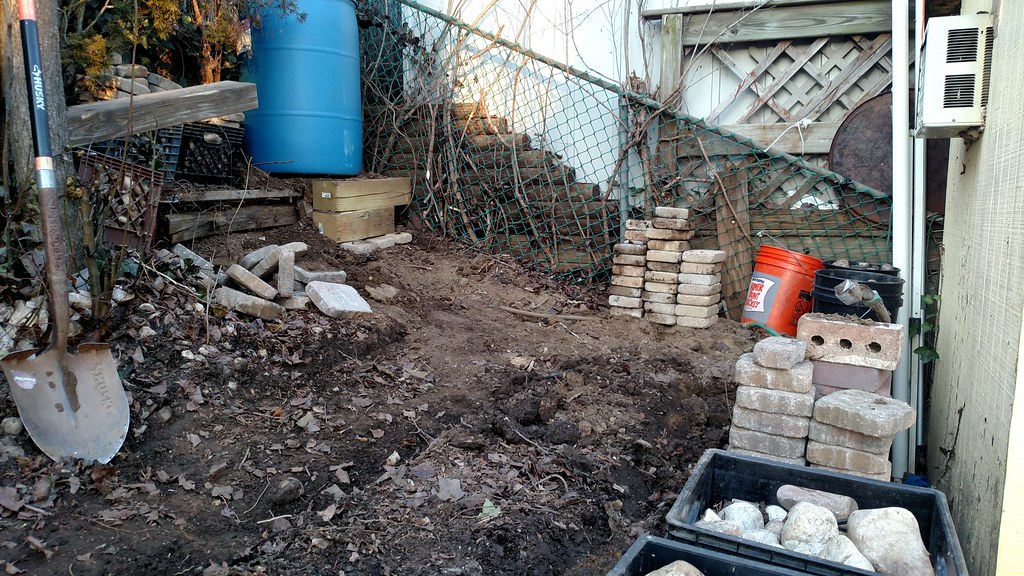
I have always disliked this part of the yard, between the slope of the hill, the AC, the trashcan, the neighbors hemlock hedge, the area that nothing will grow in and the Bradford Pear roots tearing everything up I just hate it. I plan on fixing this up somewhat, clean out the roots, put in a raised bed next to the Asparagus bed and install pavers in place of my spray painted (GHETTO) roof tile.
With a plan in mind, I ordered 10 Jersey Knight Asparagus crowns in January from American Meadows. The Asparagus crowns are shipping the week of April 4th, so I do have plenty of time but want to get this knocked out ASAP.
From what I have researched these are supposed to be an all male variety and will produce more and last longer than their female counterparts.
The weather may be half decent this weekend so I'm gonna try to get my son outside away from Black Ops 3 and jump on building the bed.
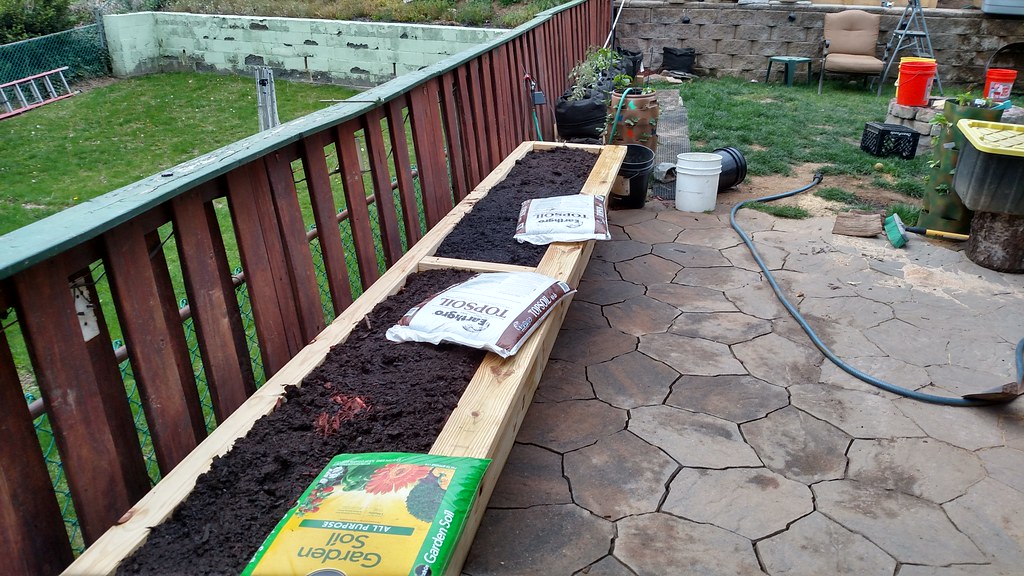
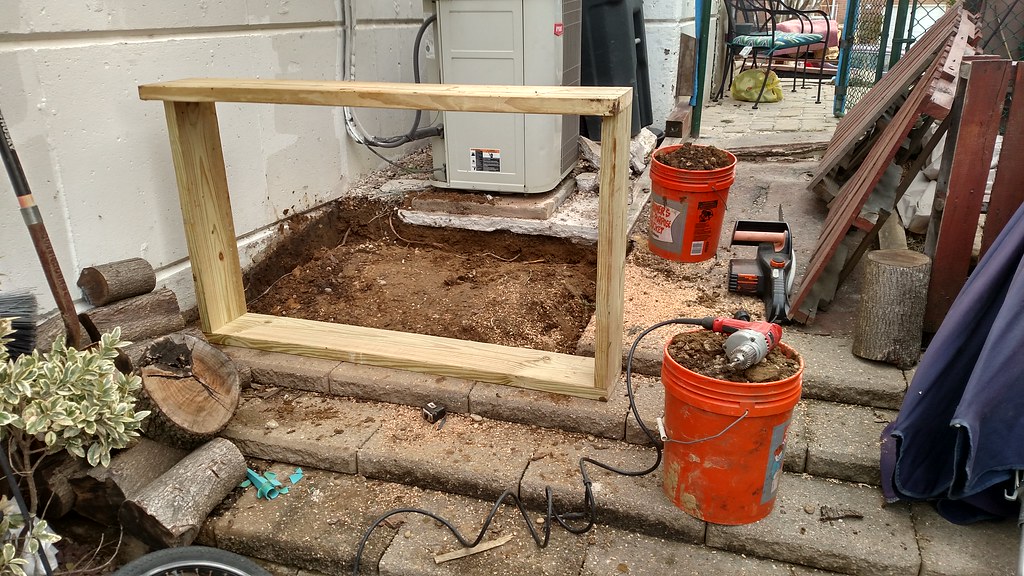
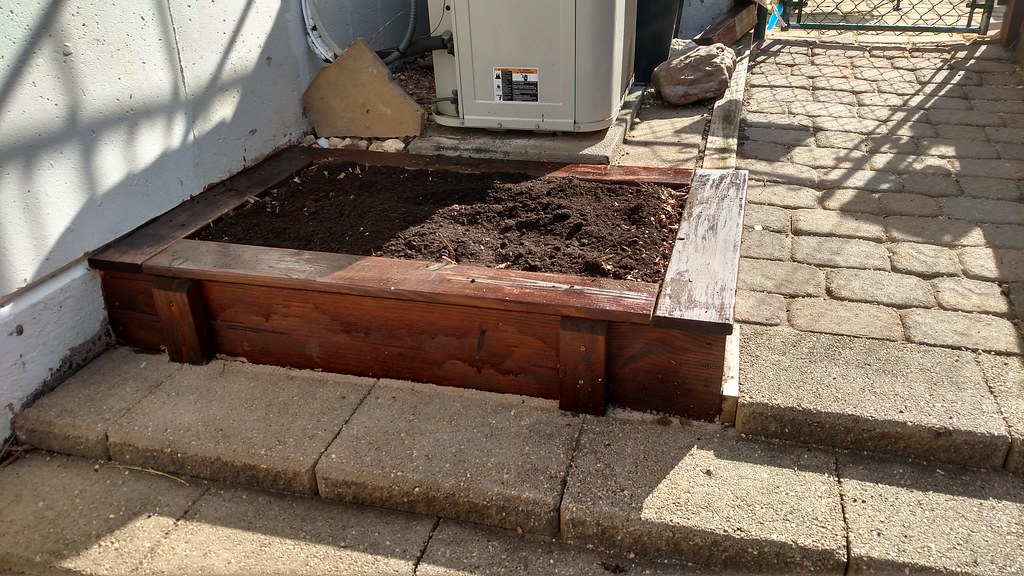
OK, I'm going to need a 2"x10" x 12', some deck screws, and loamy soil...whatever that is! I also picked up two 5/4" x 8' decking planks, I decided at the last minute to cap it, figured since its gonna be a permanent bed, I might as well dress it up a bit.
Dam I'm gonna need more 2"x12", oh well back to the store, picked up another 2"x12" but an 8 footer, dam again, it was supposed to be a 2"x10" not a 2"x12", oh well, I'll use it to my advantage.
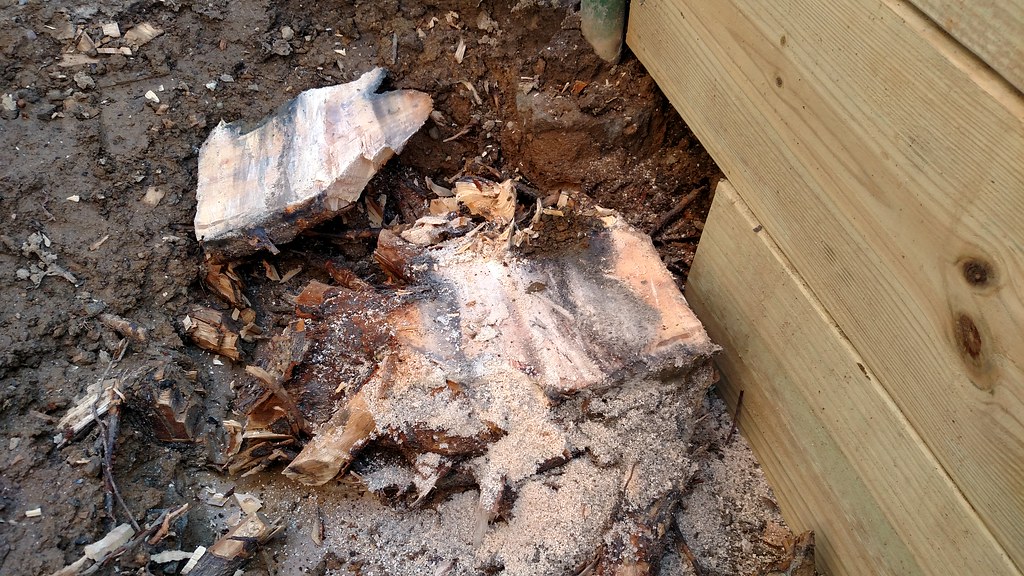
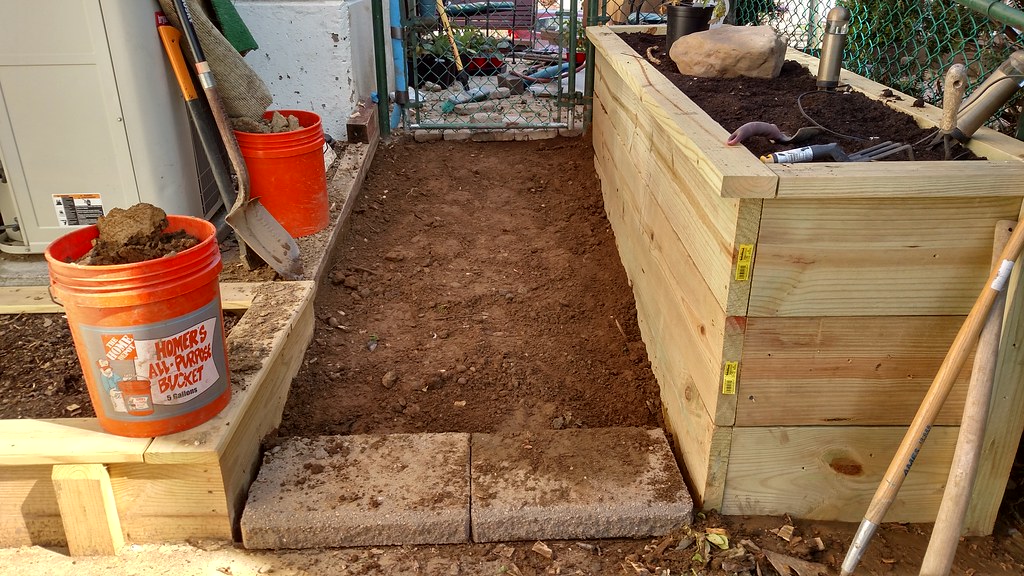
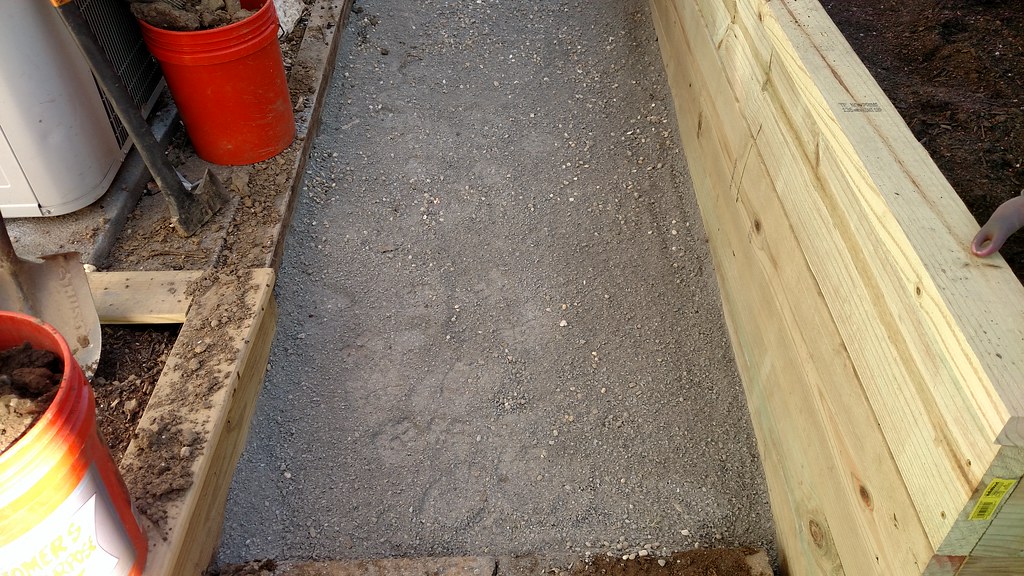
- First I cleaned out the area, removed the river rocks, removed the three pavers then cut the concrete slab that the AC rests on.
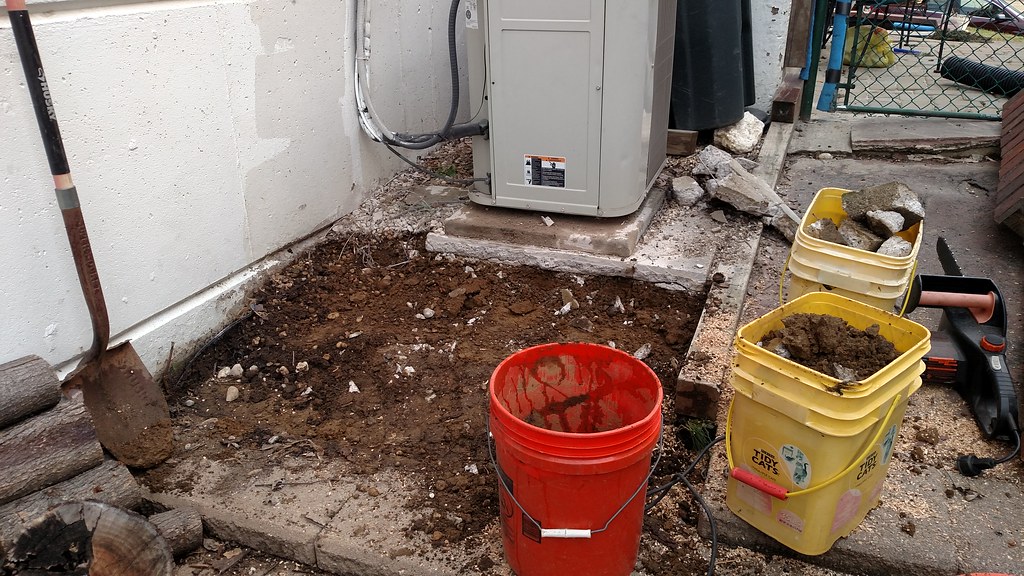
- I didn't realize but this slab had concrete mesh which made the job a tad bit more of a pain.
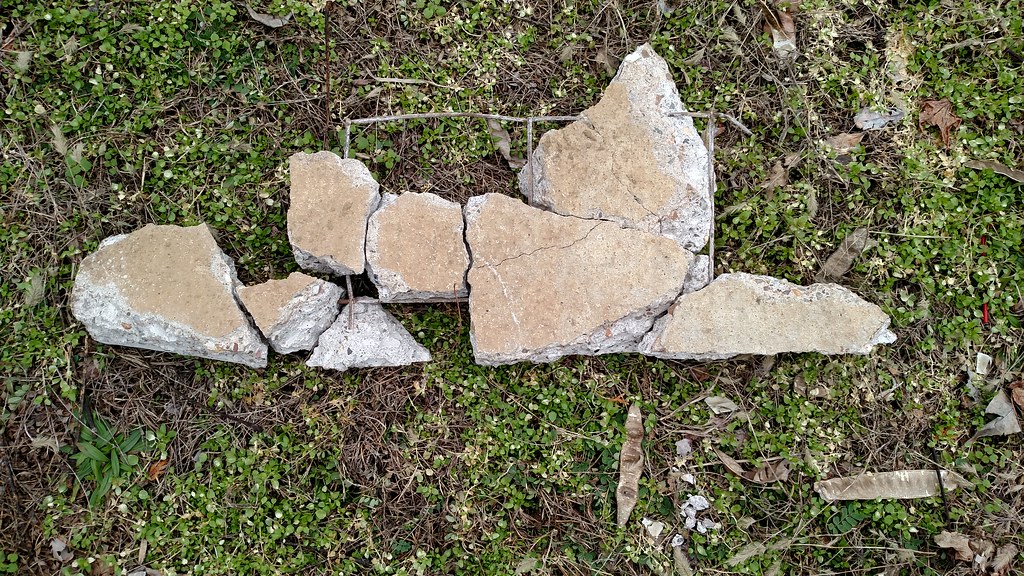
Next, I trimmed the 4x4 on the walkway with a sawzall.
Then I dug out about a foot of soil.
- The frame is assembled with 3" decking screws, dropped in place and leveled.
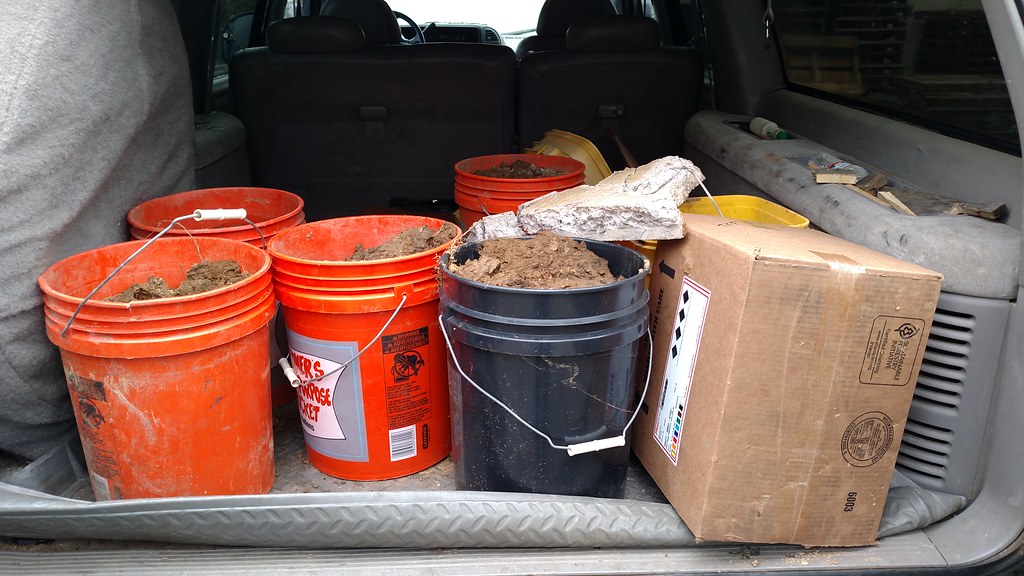
- Buckets of dirt and concrete are tossed in back of the truck to dispose of. I'll use the dirt to fill in a few holes in our lot at work.
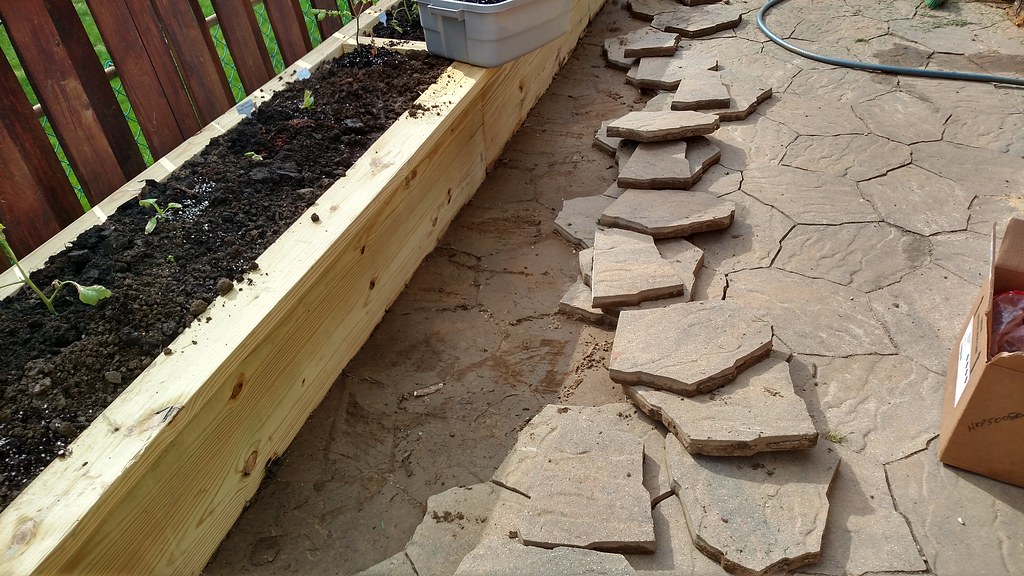
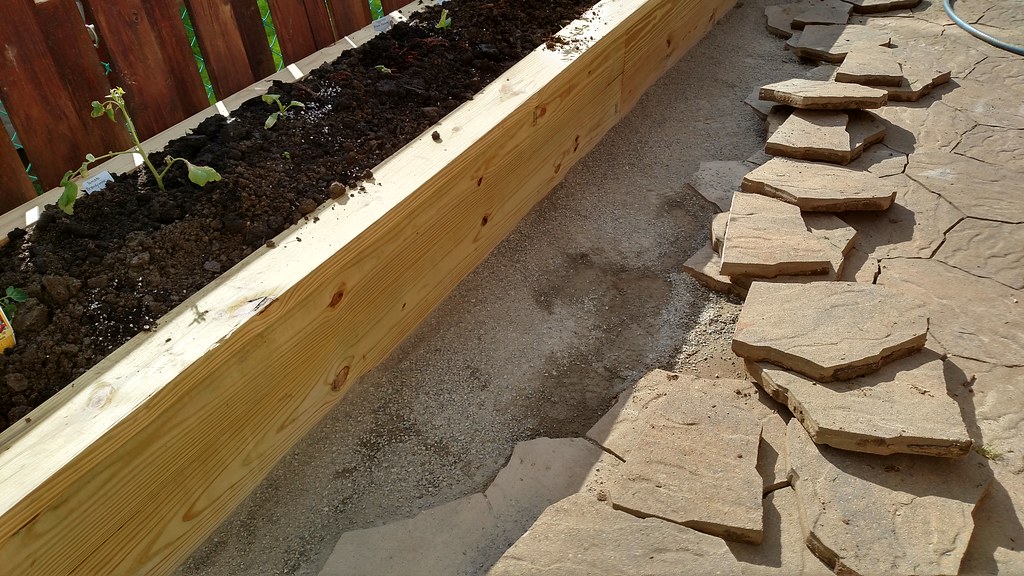
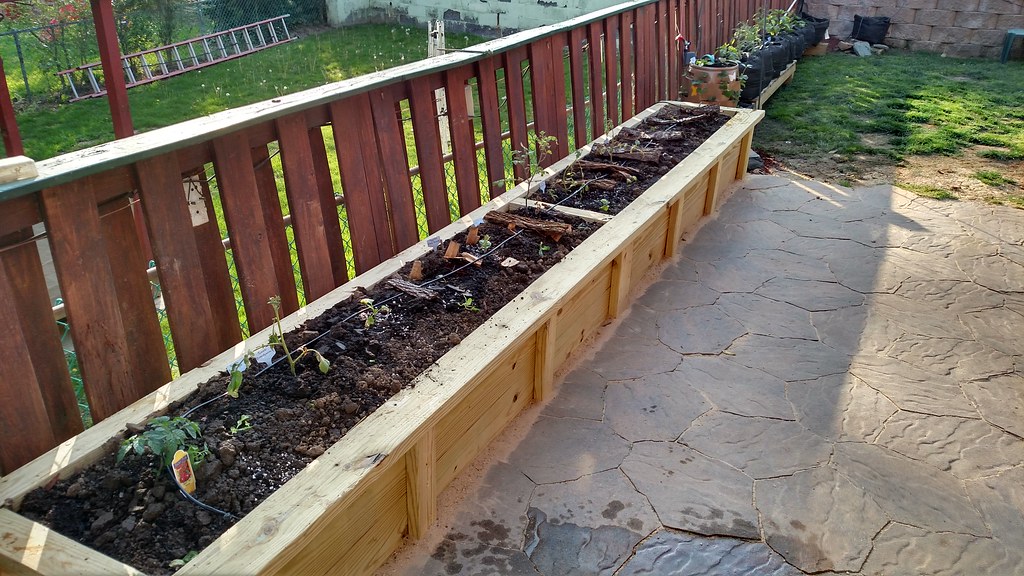
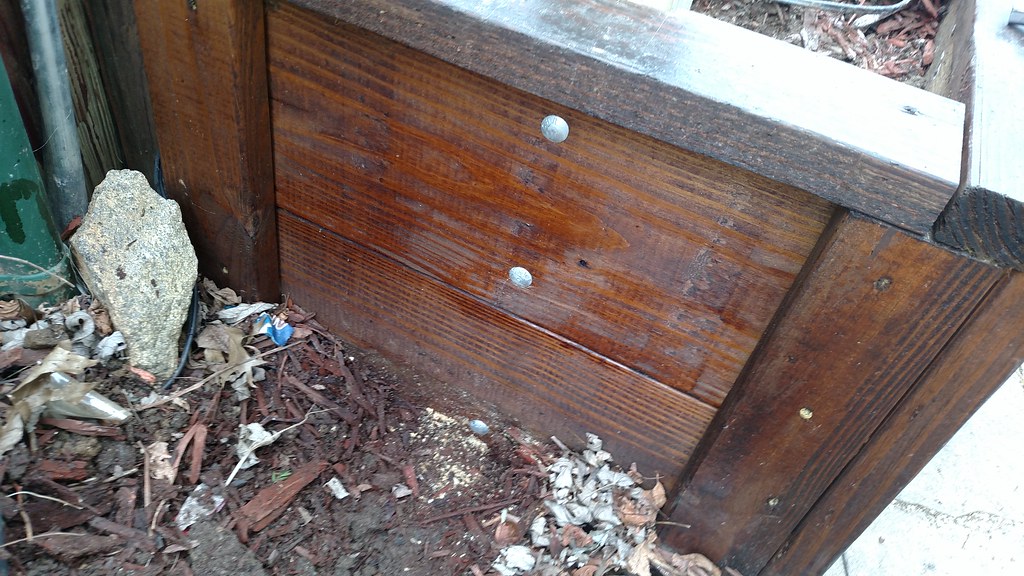
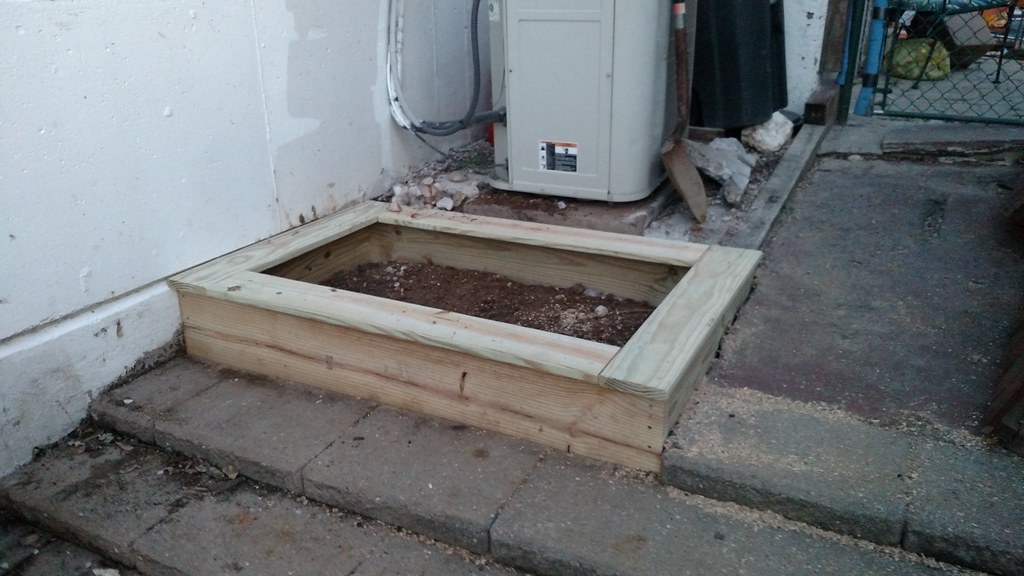
- The raised bed is capped with 5/4" deck board. This will be stained in the fall. The bed does tidy up the area a bit.
SQWIB- Posts : 366
Join date : 2016-03-07
Location : Philly 7A
Raised Bed Build #2 and #3
![]() SQWIB 3/17/2017, 9:59 am
SQWIB 3/17/2017, 9:59 am
- (2) 2x10x10
- (1) 2x10x8
- (3) 2x4x10
- (1) #8 x 1-5/8 in. Star Flat-Head Wood Deck Screws (1 lb.-Pack) [1-1/2" is fine, but this is what I had]
- (1) #10 x 3 in. Star Flat-Head Wood Deck Screws (5 lb.-Pack) [Had a box already]
- (4) ZMAX Galvanized 16-Gauge 2X Rigid Tie Connector
- (4) ZMAX 7 in. 16-Gauge Galvanized Reinforcing L-Angle
(I always buy my lumber from Lowes...much better selection)
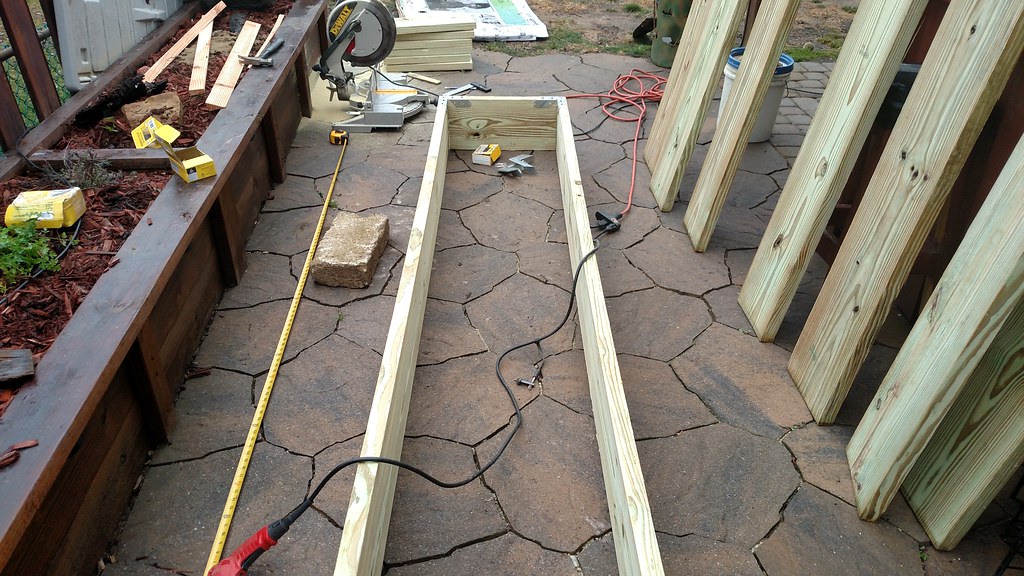
Earlier in the week I picked up some 2x10's, 2x4's and hardware for the raised bed and dug out around the old raised bed, I got home late and only had about a half an hour of light so I didn't get much done. Doing a bit of digging I was actually pretty impressed with the soil.
Since the weather forecast is for snow until Saturday sometime, I left work an hour earlier today to try and knock out this Raised bed, I figured the extra hour would be just enough time to knock out one of the raised beds. The weather complied, it wasn't too cold if I kept moving.
- I dug out the area a bit more and removed the wood, These raised beds were built in 1999, you can see how weathered the wood is that's behind the shovel. What happens is, it rots out where the screws are but the wood is usually still in fairly good shape, if left undisturbed. Anyhow I figured this is my last time doing this... they're gonna bury me in this bed... so I opted for additional hardware. The wood was all cut and placed on the hill.
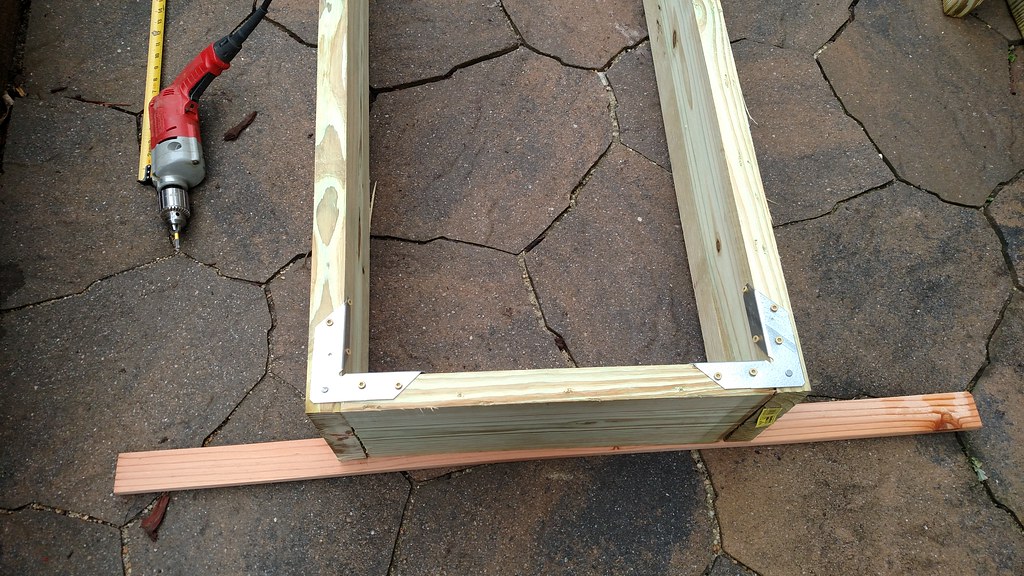
- Corner braces are put in, This will be the bottom. Then two 3" screws secure the other end, which will be the top.

- The bed is flipped and four 8-1/4" long 2x4's are cut but not secured yet, all the lengths of 2x4 for the cap are cut and secured to the top, using the 2x4x8-1/4" supports as a guide for a 1-1/2" overhang. After all the 2x4 (caps ) are screwed in place I installed the 2x4x8-1/4" supports, this will allow the bed to rest on the retaining wall cap stones and the bed will sit 1" below the cap stones.
- Then the reinforcing "L" angles are installed, butting up against the 2x4 cap. I made one small error that added 3" to the width of the bed, when I measured the side pieces from the old bed, I didn't realize that they were attached to the sides of the longer piece, so when I built this one I put the sides on the inside, adding 3", it's not a deal but it's a tad tighter than I wanted it to be when walking behind the bed with the tree there.
- I am glad I knocked this out yesterday, its gonna be a mess with all the snow we have coming.
It's not done yet, there's a few more tweaks that this bed will get, I am working on copper corners that I will cut from 3" pipe, anneal and peen , then the cap will be trimmed with Copper tape to keep slugs out and finally it will be stained in the fall after it has weathered a bit.
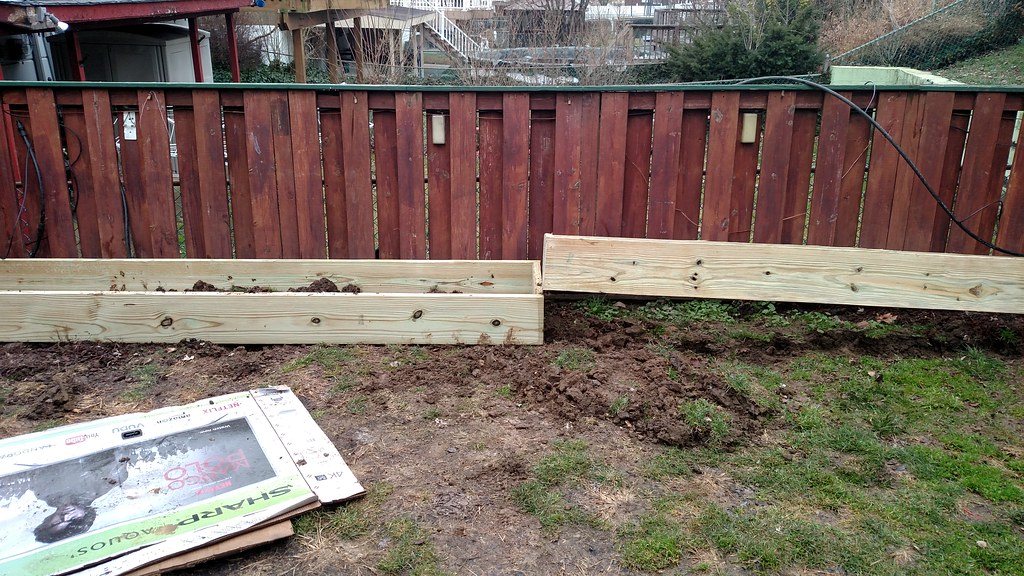
- All the wood is moved to the playhouse for now, all the pavers are sorted and will be re-stacked once the bed is finished. The pond and pool supplies are trashed, most of the "JUNK" lumber is burnt, I did reserve some lumber to see if I need any for this years gardens but will most likely burn it after the gardens are up and running.
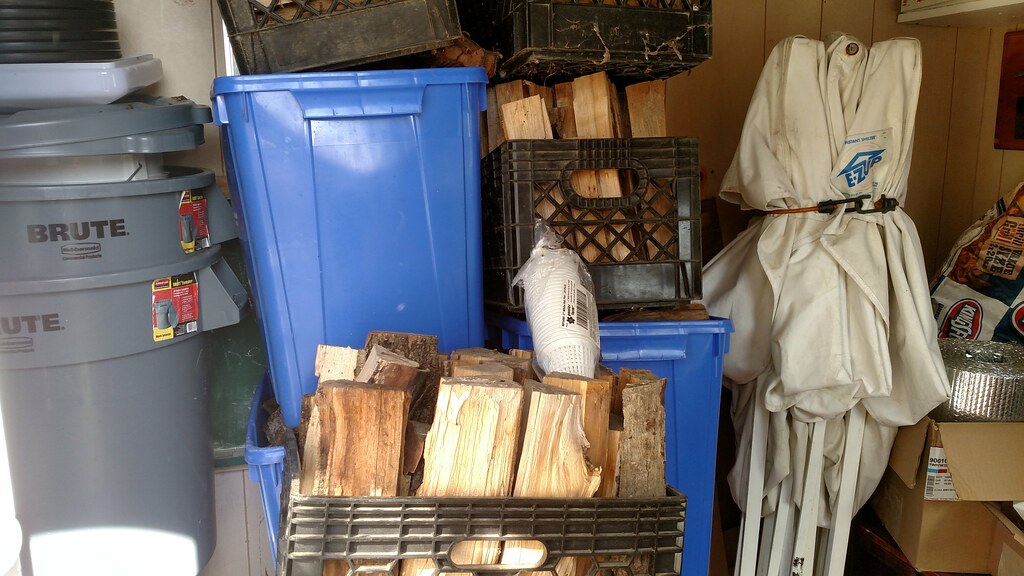
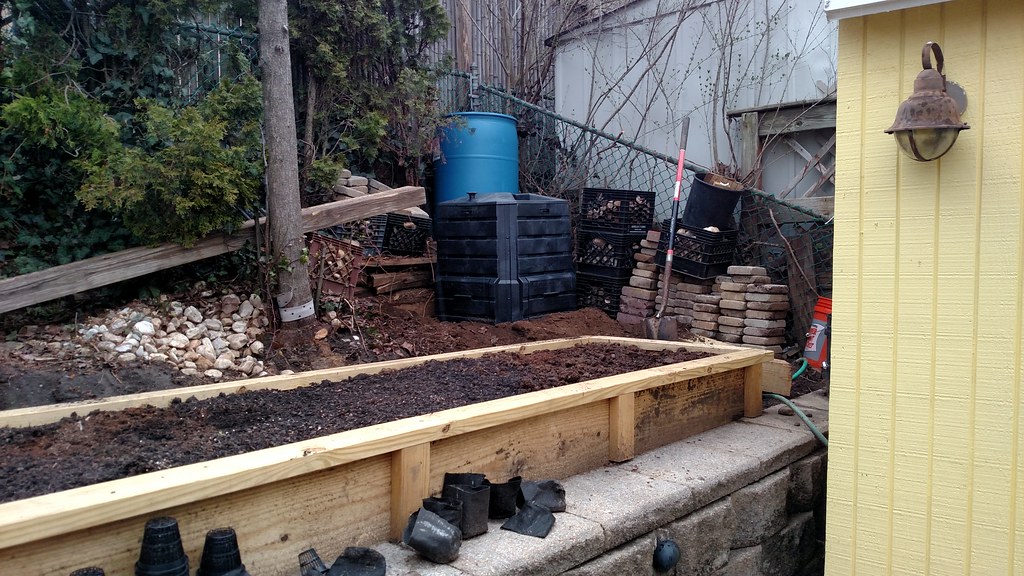
- The old raised beds are torn up and burnt in the pit. A water barrel is put in place and will need to be painted. I'm not sure if I will use this, but I may put in some wicking pots someday, not sure yet. I will still need this area for storing my fire wood, garden supplies, tarps and pavers but will have to tighten it up a bit. [size=16]This area is leveled for the compost bin.[/size]
- I found an old water line that I may use for irrigation, its a hose that runs from the house, underground and up under the retaining wall, hopefully it still works. That was put in twenty + years ago...at least!
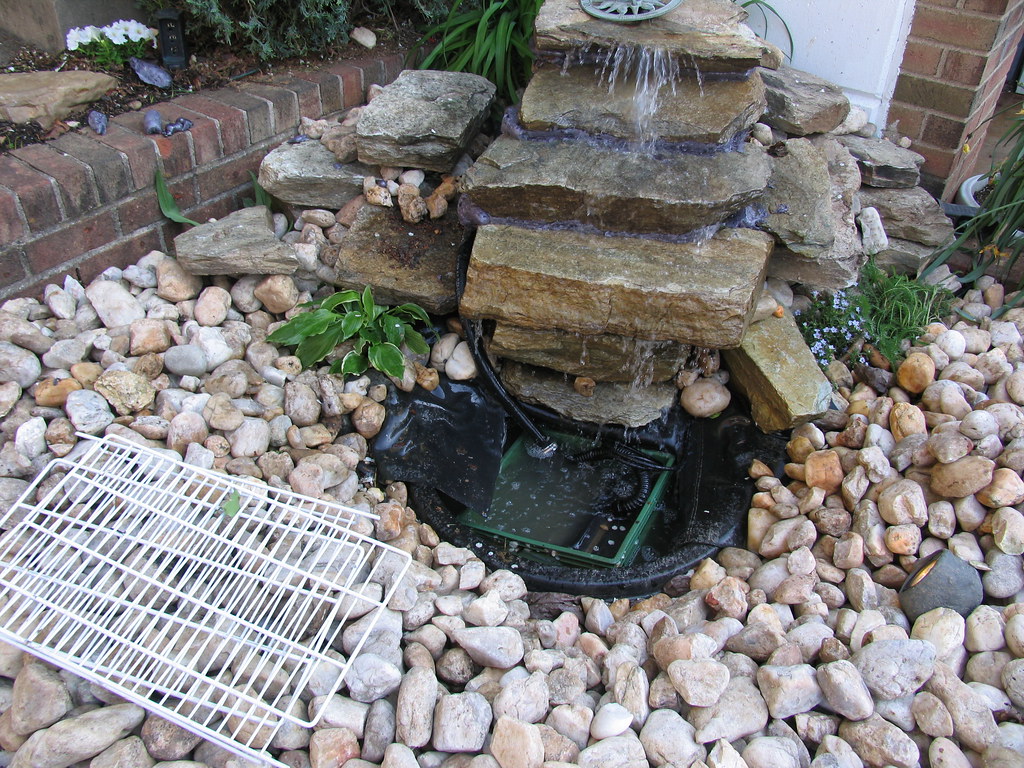
- The hardest part about building these beds has been removing the River Rock and the cleanup, this is the 3rd time they have been moved, every single one has been picked up three times, first to go into my front yard, then some were removed and replaced to build the pond-less waterfall, then they were all moved to the back yard when I built the Koi Pond, now they are being moved again into buckets and crates, I need to find a home fore these stupid rocks.
- (2) 2x10x10
- (1) 2x10x8
- (3) 2x4x10
- (1) #8 x 1-5/8 in. Star Flat-Head Wood Deck Screws (1 lb.-Pack) [1-1/2" is fine, but this is what I had]
- (1) #10 x 3 in. Star Flat-Head Wood Deck Screws (5 lb.-Pack) [Had a box already]
- (4) ZMAX Galvanized 16-Gauge 2X Rigid Tie Connector
- (4) ZMAX 7 in. 16-Gauge Galvanized Reinforcing L-Angle
(I usually buy my lumber from Lowes...much better selection)
I still have a few things to do on the hill, amend the soil, install the composter, cut out a few roots, level the ground behind the beds for a path, stack the pavers and a few other things I plan on keeping.
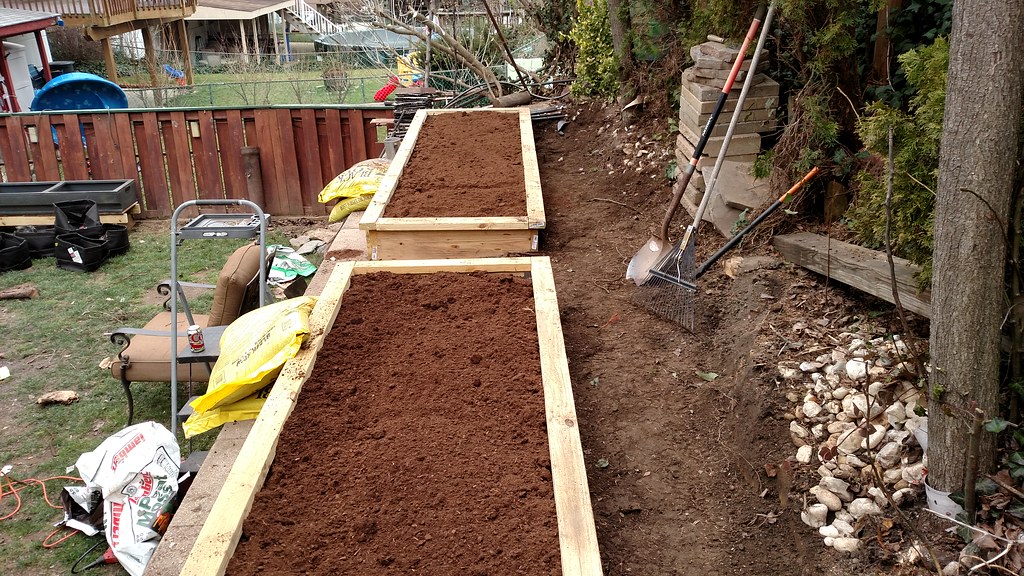
March 12th-13th, 2016 - This was a productive weekend, I wanted to get the beds done before the rain, that was forecast for Sunday.
I removed some roots from the tree to make a walking path behind the beds, spent near three hours on this...saved all the worms I found and tossed them in the beds.

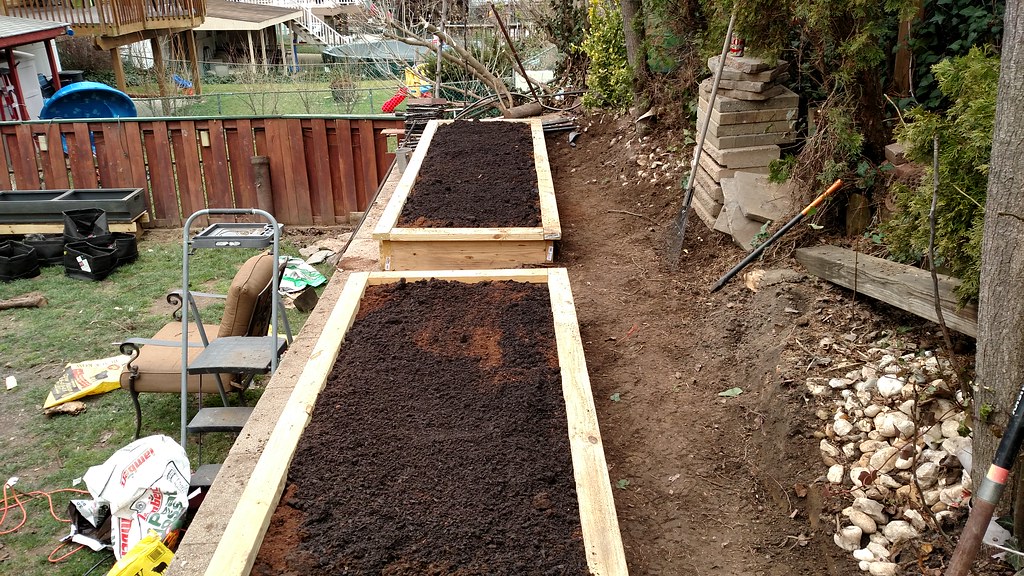
- Today I leveled, or should I say , Flattened the path somewhat, and added some peat and composted manure to the beds. For years and years, I never amended this soil, I just left it, "as is", and had a decent crop most of the time with the exception of eggplants. One year I went, "all out", amending the soil, turning the soil, weeding, mulching and was totally disappointed. I was going to fill these completely with composted manure, peat and top soil but decided to use the soil on the hill that seemed to be pretty good, hopefully it won't be laden with weed seeds...time shall tell.
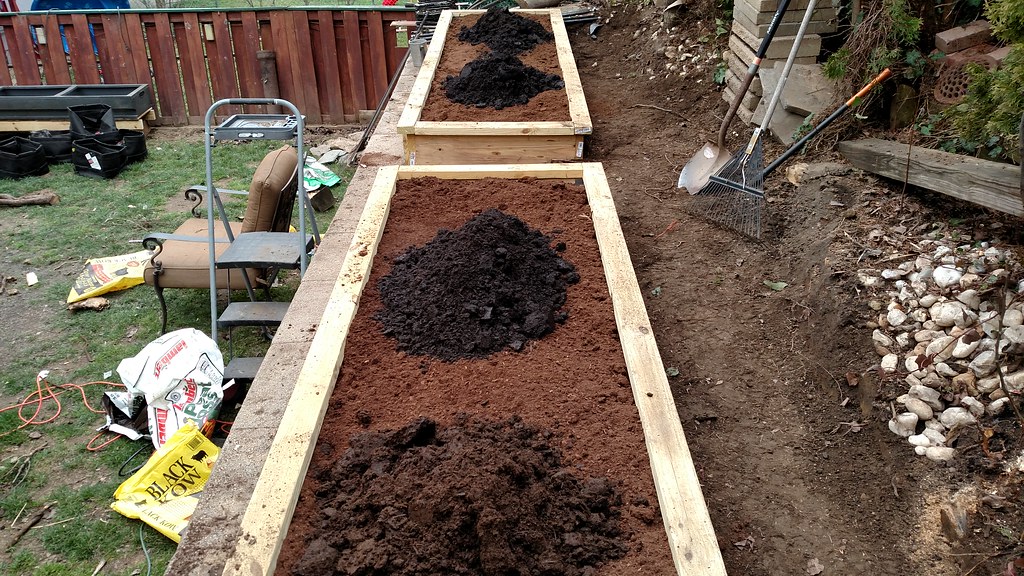
I really don't know whats up with this composted manure, the three piles further away in the picture are from Home Depot and the one closest me is from Lowes. Here are the following specs;
- Lowes 1 cu ft $4.98
- Home Depot 50lb $5.17
- Home Depot

- Lowes
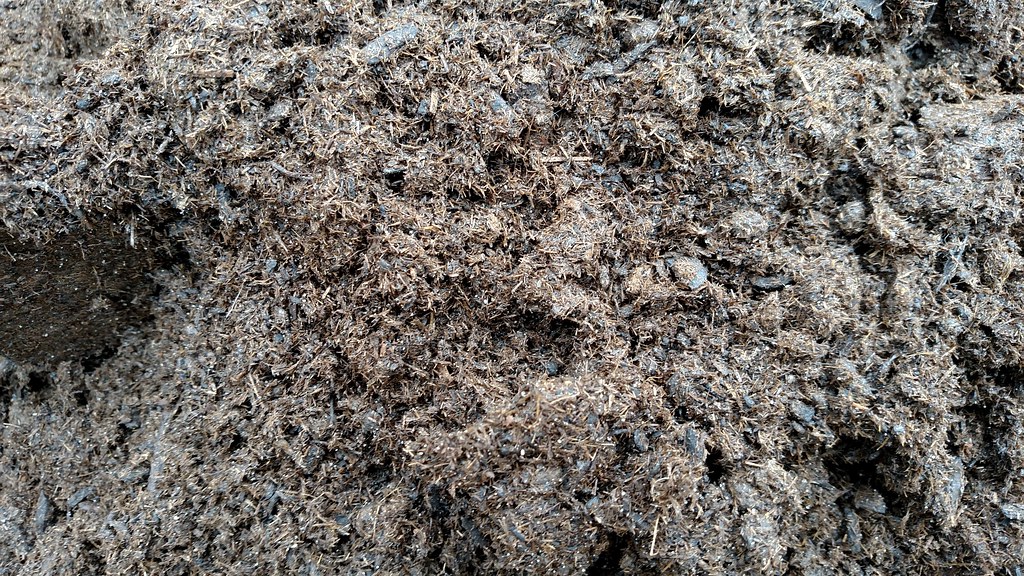
The home depot bag definitely has more volume, by like 20% but not sure which is of better quality, they are the same exact bag other than the weight/volume that it is sold by.
March 16th, 2016 - Added a compost bin. I also moved the upright end pieces all the way to the end and re centered the two center uprights..
And in an effort to keep the slugs out;
 | 1 inch x 55 yds Copper Foil Tape - (25mm x 50m) - EMI Shielding Conductive Adhesive | $39.95 |
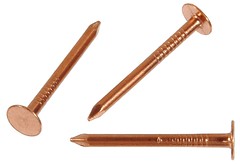 | Hillman Fastener Corp 42081 Copper Nail | 13.23 |
- The beds are stained and mulched, now I just need to clean the junk up on the hill.
Yeah, the garden got away from me last year.
SQWIB- Posts : 366
Join date : 2016-03-07
Location : Philly 7A
Mom and Dads Hugelkultur Raised Bed
![]() SQWIB 3/17/2017, 10:04 am
SQWIB 3/17/2017, 10:04 am
I've been spreading the word on Hugelkulture Raised Beds. My brother had seen mine and I was telling him about Hugelkulture, he was hooked immediately. He then built a few in place of his removed fence and will be building a few more.
We got to talking and I said we should do one for Mom and Dad in an effort to make their gardening a bit easier on them.
So I told Mom, "Mom were gonna build you a Hugelkulture bed", She said, "what" and I said, "Hugelkulture", she then said, "gesundheight"...I said, "no Hugelkulture, its a method of gardening". So I explained the entire process and she seemed to get it.
Over at Moms for Christmas dinner I checked out her little veggie garden. I said, "whats the hell is that", she said, "thats my garden".
I said, "NO, this just wont do"!
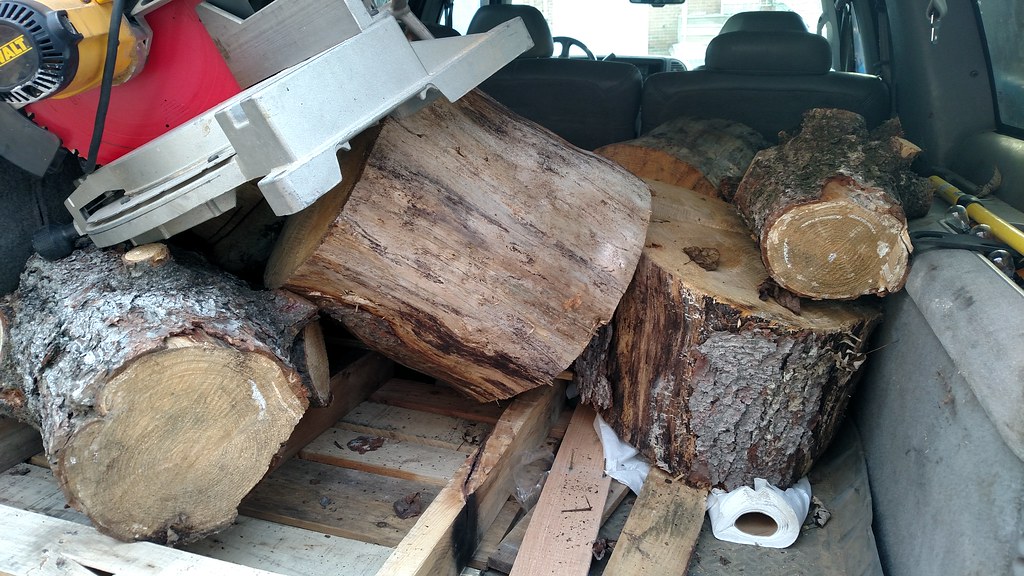
Later that week I was driving around and came across some wood perfect for the bed. I drove around with this wood in the back of the truck for several weeks.
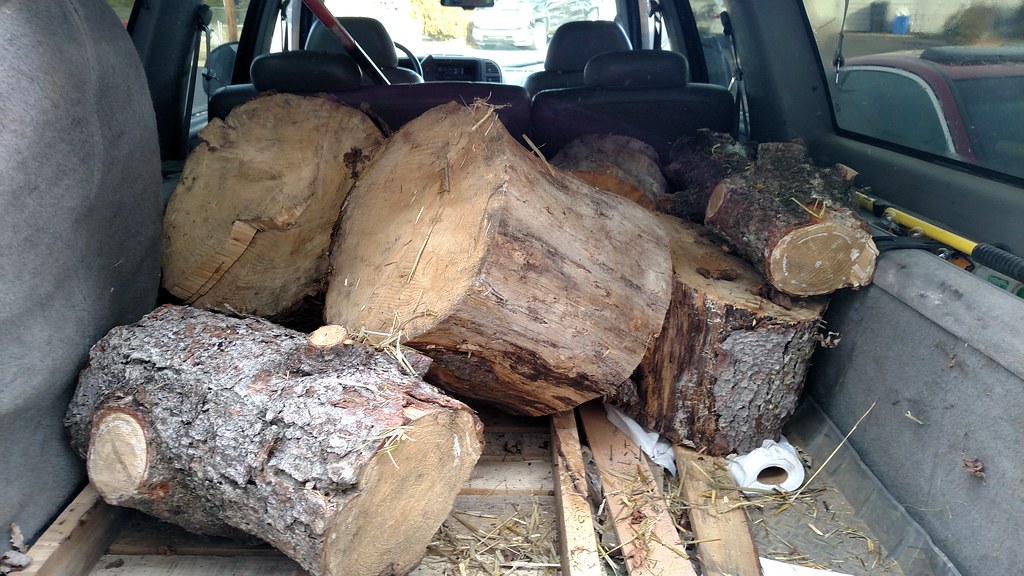
Then last week my brother calls and tells me he picked up and dropped the wood off at moms with some Hugel Wood.
I thought, "oh boy, were committed now", so we decided on knocking it out this weekend. Friday night I tossed some wood, tools and some other Hugel Bits in the back of the truck and proceeded to smash an 80 pound soaking wet hay bale in there also.
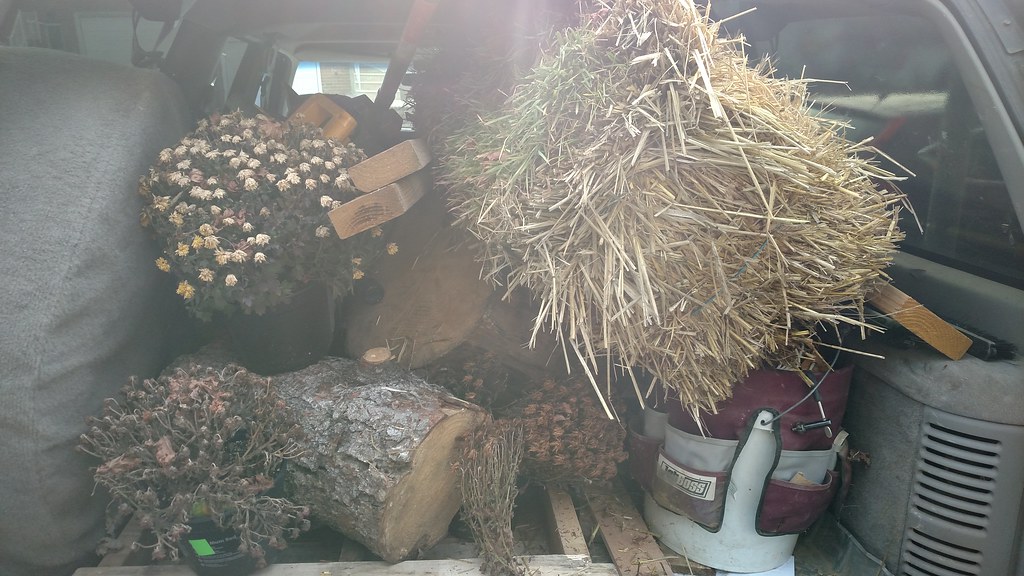
We crammed as much wood in as we could, then poured a few cups of 10-10-10 on top of the logs. I'm not sure if the 10-10-10 will even help, but I guess it can't hurt.
Then we topped the hay with soil and continued.
When we were discussing this build, we were under the impression we would need a lot more soil, since my original plan was to make my raised beds on the hill into Hugelkultur Beds, I figured I would dig out one of my raised beds and use the soil from that. Apparently we didn't need any additional soil.

 |  |
SQWIB- Posts : 366
Join date : 2016-03-07
Location : Philly 7A
Re: My first Hugelkultur Raised Bed
![]() CapeCoddess 3/17/2017, 4:15 pm
CapeCoddess 3/17/2017, 4:15 pm
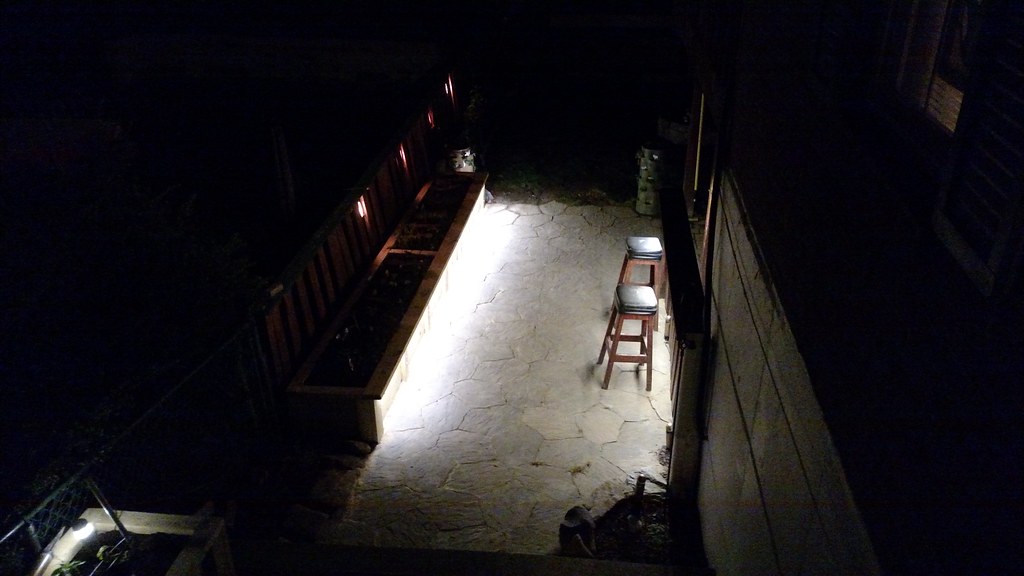
This bed is SO beautiful! I sure hope it works really really well for ya, forever. Can you please post a photo of it at night with all the lights? I'd love to see that.
On to the next bed...
CC

CapeCoddess- Posts : 6824
Join date : 2012-05-20
Age : 68
Location : elbow of the Cape, MA, Zone 6b/7a
Re: My first Hugelkultur Raised Bed
![]() CapeCoddess 3/17/2017, 4:31 pm
CapeCoddess 3/17/2017, 4:31 pm
CapeCoddess- Posts : 6824
Join date : 2012-05-20
Age : 68
Location : elbow of the Cape, MA, Zone 6b/7a
Re: My first Hugelkultur Raised Bed
![]() Scorpio Rising 3/17/2017, 8:02 pm
Scorpio Rising 3/17/2017, 8:02 pm

Scorpio Rising-
 Posts : 8712
Join date : 2015-06-12
Age : 62
Location : Ada, Ohio
Re: My first Hugelkultur Raised Bed
![]() Scorpio Rising 3/17/2017, 8:27 pm
Scorpio Rising 3/17/2017, 8:27 pm

Scorpio Rising- Posts : 8712
Join date : 2015-06-12
Age : 62
Location : Ada, Ohio
Re: My first Hugelkultur Raised Bed
![]() ralitaco 3/17/2017, 10:18 pm
ralitaco 3/17/2017, 10:18 pm
When I googled Hugelkultur, I saw lots of photos of them where they just made hills vs putting the material in a frame.

ralitaco-
 Posts : 1312
Join date : 2010-04-04
Location : Hampstead, NC
Re: My first Hugelkultur Raised Bed
![]() ralitaco 3/17/2017, 10:24 pm
ralitaco 3/17/2017, 10:24 pm
Isn't that ALWAYS the case! What should be an easy project turns out to be an ordeal...I was going to throw down some laminate floor one weekend...6 months later we finishedSQWIB wrote:I didn't realize but this slab had concrete mesh which made the job a tad bit more of a pain
ralitaco- Posts : 1312
Join date : 2010-04-04
Location : Hampstead, NC
Re: My first Hugelkultur Raised Bed
![]() ralitaco 3/17/2017, 10:28 pm
ralitaco 3/17/2017, 10:28 pm
ralitaco- Posts : 1312
Join date : 2010-04-04
Location : Hampstead, NC
Re: My first Hugelkultur Raised Bed
![]() ralitaco 3/17/2017, 10:33 pm
ralitaco 3/17/2017, 10:33 pm
I had to laugh at the step stool in the last photo
What did you use the copper straps for? I didn't understand that part.
ralitaco- Posts : 1312
Join date : 2010-04-04
Location : Hampstead, NC
Re: My first Hugelkultur Raised Bed
![]() ralitaco 3/17/2017, 10:43 pm
ralitaco 3/17/2017, 10:43 pm
Question: What stain are you using? Any concerns about using stain on a vegetable garden?
ralitaco- Posts : 1312
Join date : 2010-04-04
Location : Hampstead, NC
Re: My first Hugelkultur Raised Bed
![]() ralitaco 3/17/2017, 11:01 pm
ralitaco 3/17/2017, 11:01 pm
Very nice work!
That trellis tightening system is unique. You might consider a wire vise next time.
ralitaco- Posts : 1312
Join date : 2010-04-04
Location : Hampstead, NC
Re: My first Hugelkultur Raised Bed
![]() ralitaco 3/17/2017, 11:05 pm
ralitaco 3/17/2017, 11:05 pm
SQWIB wrote:
Are those 4x4's that you drilled out to act as corners for the EMT conduit trellis?
ralitaco- Posts : 1312
Join date : 2010-04-04
Location : Hampstead, NC
Re: My first Hugelkultur Raised Bed
![]() SQWIB 3/18/2017, 8:55 am
SQWIB 3/18/2017, 8:55 am
However, the more I thought about it, I decided to not use it. I really never had snail/slug problems in the past.
SQWIB- Posts : 366
Join date : 2016-03-07
Location : Philly 7A
Re: My first Hugelkultur Raised Bed
![]() SQWIB 3/18/2017, 9:08 am
SQWIB 3/18/2017, 9:08 am
I also done quite a bit of research on using PT for raised beds as it's a controversial subject and I am comfortable using it and when folks ask about it, I tell them I'm ok with it but for them to do their own homework and decide for themselves if they should use PT.
SQWIB- Posts : 366
Join date : 2016-03-07
Location : Philly 7A
Re: My first Hugelkultur Raised Bed
![]() SQWIB 3/18/2017, 9:19 am
SQWIB 3/18/2017, 9:19 am
Also not down yet are 36" steel fishing leaders that are secured to the wire, these hang down and I tie twine on the end and down to the plant.
At the end of the season three twine will be removed and composted, then the steel leaders are did to the far end for storage.
Yes the conduit supports are 4x4 drilled in the bottom but stop and the sides pass through. The conduit is held in place by hose clamps and the line is wrapped with a fishing weight.
Rebar is pounded into the ground and then the conduit slips over the rebar.
SQWIB- Posts : 366
Join date : 2016-03-07
Location : Philly 7A
Re: My first Hugelkultur Raised Bed
![]() RoOsTeR 3/18/2017, 9:58 am
RoOsTeR 3/18/2017, 9:58 am
CapeCoddess wrote:Holy crow! That's A LOT of work! And then I see there are more threads with more beds. Yikes! (how come they aren't all in one thread? So much easier to find that way.)
On to the next bed...
CC
All have been combined and put in one place.

I am my gardens worst enemy.

RoOsTeR- Posts : 4316
Join date : 2011-10-04
Location : Colorado Front Range
Using wood chips for Hugelkultur beds
![]() OhioGardener 9/24/2018, 8:36 am
OhioGardener 9/24/2018, 8:36 am
"In short, the soil food web feeds everything you eat and helps keep your favorite planet from getting too hot. Be nice to it." ~ Diane Miessler, "Grow Your Soil"

OhioGardener
Forum Moderator- Posts : 4517
Join date : 2018-08-06
Location : SW Ohio -

Re: My first Hugelkultur Raised Bed
![]() SQWIB 9/24/2018, 10:22 am
SQWIB 9/24/2018, 10:22 am
OhioGardener wrote:Since one of my friends runs a tree trimming service, I have access to unlimited free wood chips to use for my mulching and composting. When I need a load of chips, he is willing to collect just hardwood tree chips for me, without any walnut or locust. I am building some new 1.5' high beds, and wondering if I can fill first foot of the beds with these chips, and then top the last 6" with Mel's Mix. Will those hardwood chips provide the benefit of Hugelkultur to the beds? Or, will the chips rob the nitrogen from the plants as they decompose? They are majority green tree chips, with about 25% of them from dead trees.
Probably will tie up some of the nitrogen but give it a shot, My first year I put wood chips as a layer then topped with top soil and manure and planted directly in that.
You may have better results If you get then in now and wet everything down, and put in a nitrogen fixer.
SQWIB- Posts : 366
Join date : 2016-03-07
Location : Philly 7A
Re: My first Hugelkultur Raised Bed
![]() OhioGardener 9/24/2018, 10:37 am
OhioGardener 9/24/2018, 10:37 am
SQWIB wrote:Probably will tie up some of the nitrogen but give it a shot, My first year I put wood chips as a layer then topped with top soil and manure and planted directly in that.
You may have better results If you get then in now and wet everything down, and put in a nitrogen fixer.
Thanks! I have two beds on order, which should be here by the end of the week. I have the pile of wood chips to go in. By nitrogen fixer, do you mean adding something like a layer of alfalfa pellets between the wood chips and soil? Should I put a layer of weed barrier fabric above the chips to keep the soil from sifting down through the chips?
"In short, the soil food web feeds everything you eat and helps keep your favorite planet from getting too hot. Be nice to it." ~ Diane Miessler, "Grow Your Soil"
OhioGardener
Forum Moderator- Posts : 4517
Join date : 2018-08-06
Location : SW Ohio -
Re: My first Hugelkultur Raised Bed
![]() SQWIB 9/24/2018, 2:35 pm
SQWIB 9/24/2018, 2:35 pm
OhioGardener wrote:SQWIB wrote:Probably will tie up some of the nitrogen but give it a shot, My first year I put wood chips as a layer then topped with top soil and manure and planted directly in that.
You may have better results If you get then in now and wet everything down, and put in a nitrogen fixer.
Thanks! I have two beds on order, which should be here by the end of the week. I have the pile of wood chips to go in. By nitrogen fixer, do you mean adding something like a layer of alfalfa pellets between the wood chips and soil? Should I put a layer of weed barrier fabric above the chips to keep the soil from sifting down through the chips?
For Mom and Dads bed I added 10-10-10 on top of the wood and straw, If you dont have any qualms about fertilizer then add it to the top wood layer. I dont recall adding it to my beds first year, not sure?
I would also plant some clover or something, you may still have time.
No, don't put down a weed barrier but you could put straw or shredded cardboard, balled up newspapers, to hold the soil a bit and over time it will settle. I had no problem with the top layer settling into the mulch when making one of the Hugelkultur beds.
It's all about timing, if you have the time, dump everything in there, compost, kitchen waste, cardboard, woodchips, straw, old plants, potting mix, ashes, grass clippings, hedge clippings, weeds, leaves, Bio-char, urea, shells, top with soil/composted manure and sow some nitrogen fixers.
If you will do this in the spring you may need to be a bit more careful with adding too much carbon.
Many folks will cringe at this but this is one way I prep my beds for winter... You can start your beds the same way if you have time.
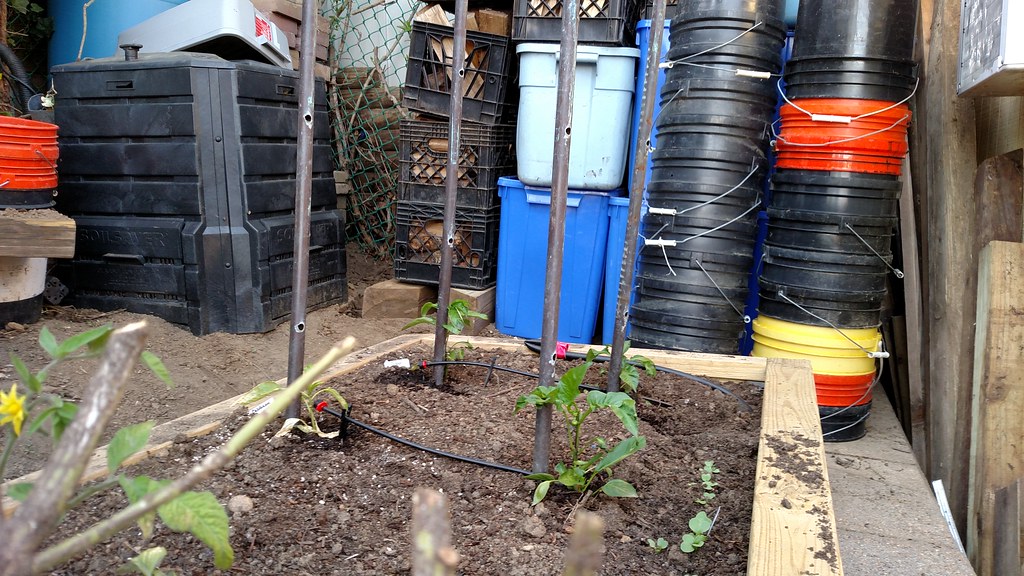
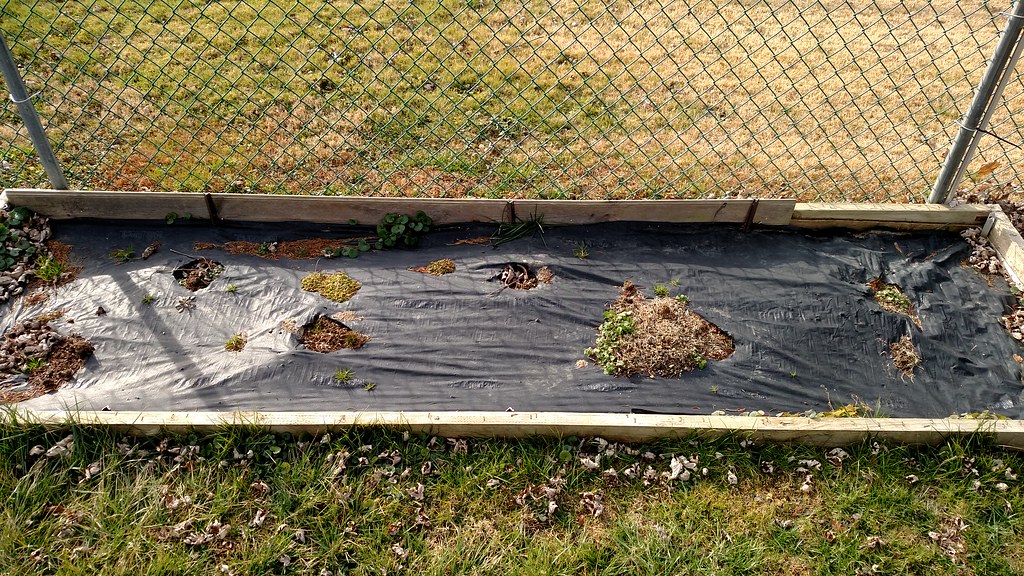
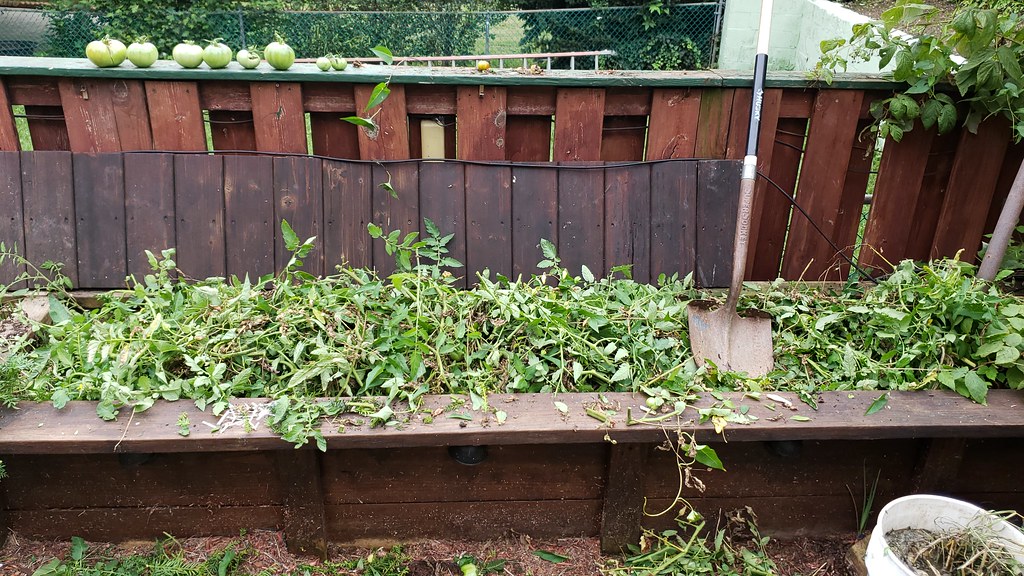
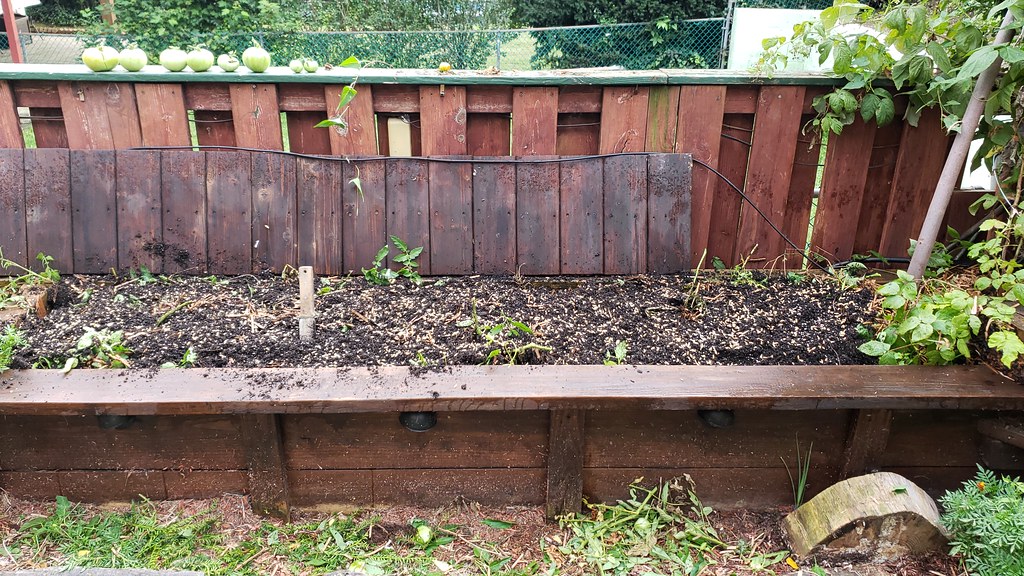
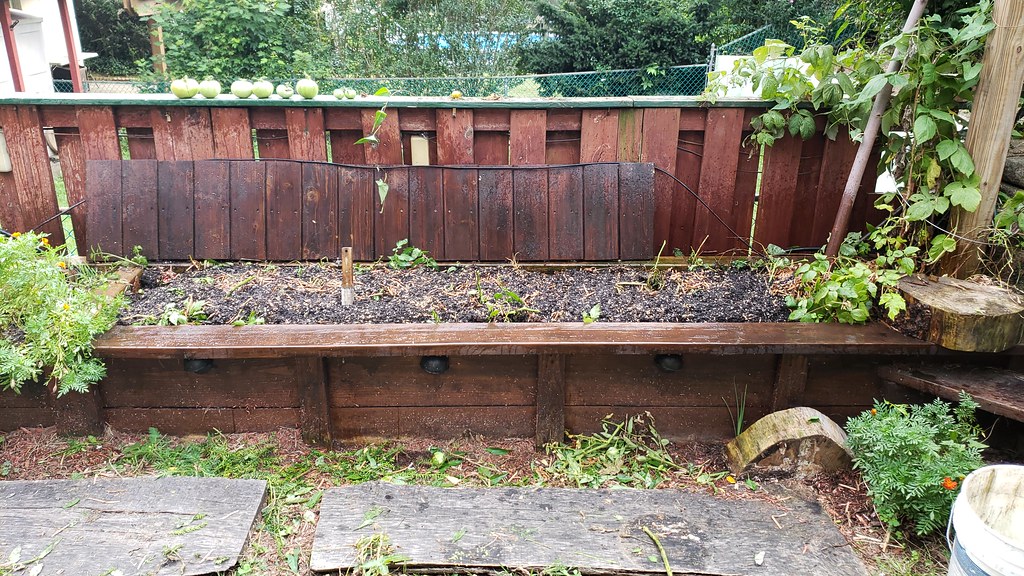
- This is one of the hardest things for me to do at the end of the season. Cutting down tomato plants that are still flowering and loaded with tomatoes.
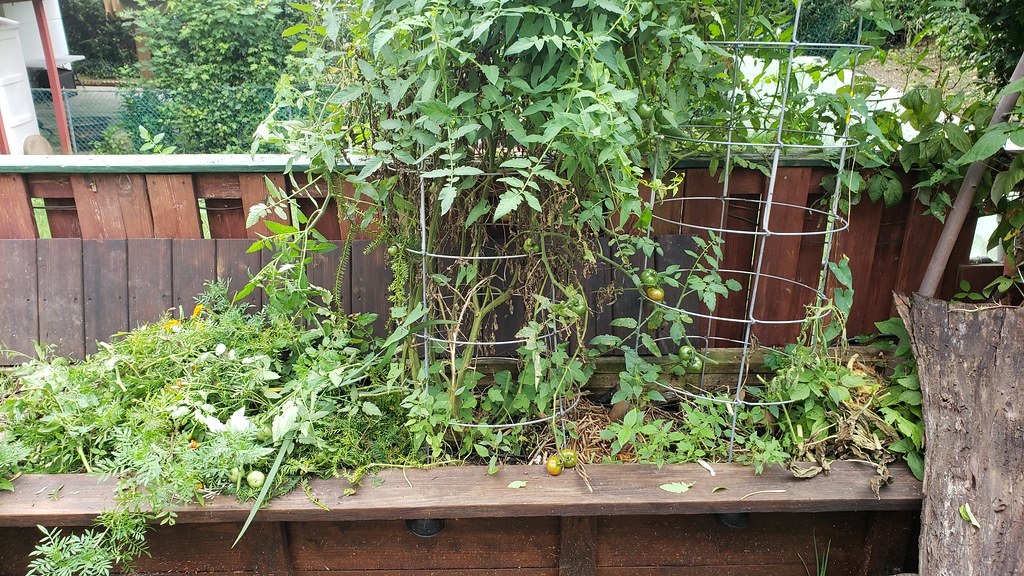
- Everything is cut down, the cages are removed, the drip line is turned off and moved out of the way. Tomato plants, and rogue weeds/plants are chopped up with my Felcos pruners then lightly chopped with the shovel, then saturated with rain water.
- My weeds that have been sitting in the bucket of rain water and a bit of urea for a week are dumped onto the bed and scattered somewhat.
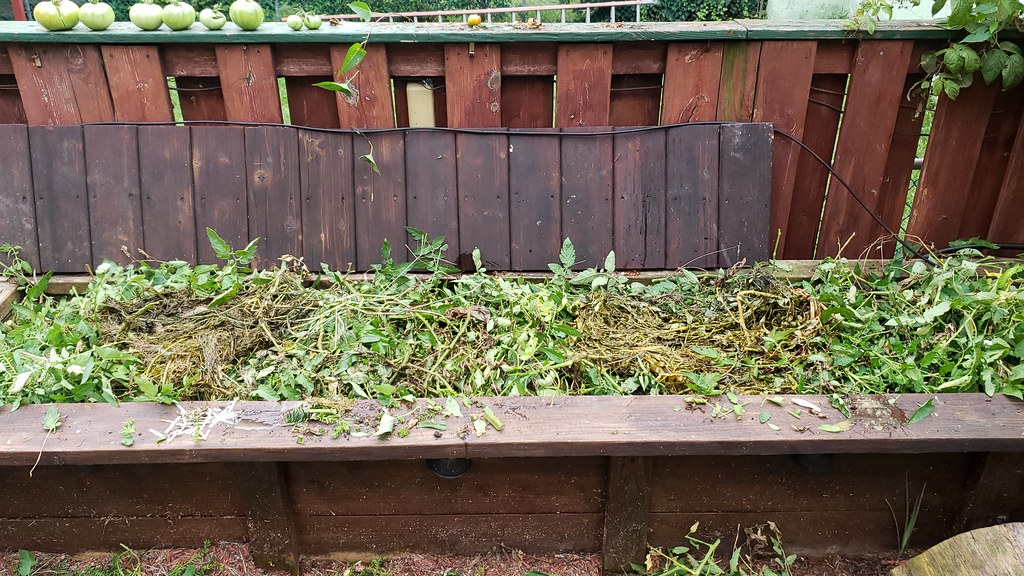
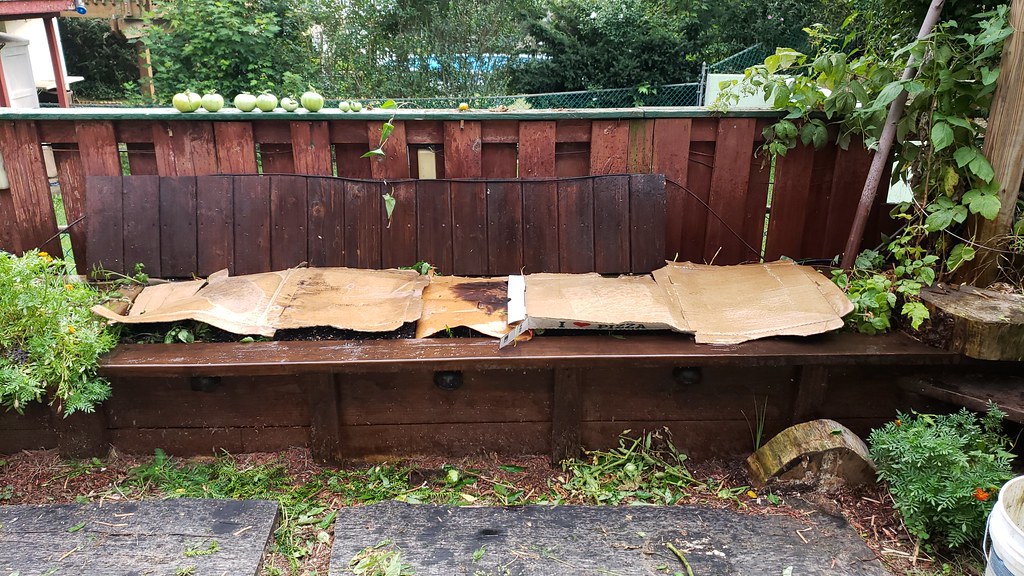
- A layer of shredded cardboard is placed on top.
- Cardboard is saturated with rain water.
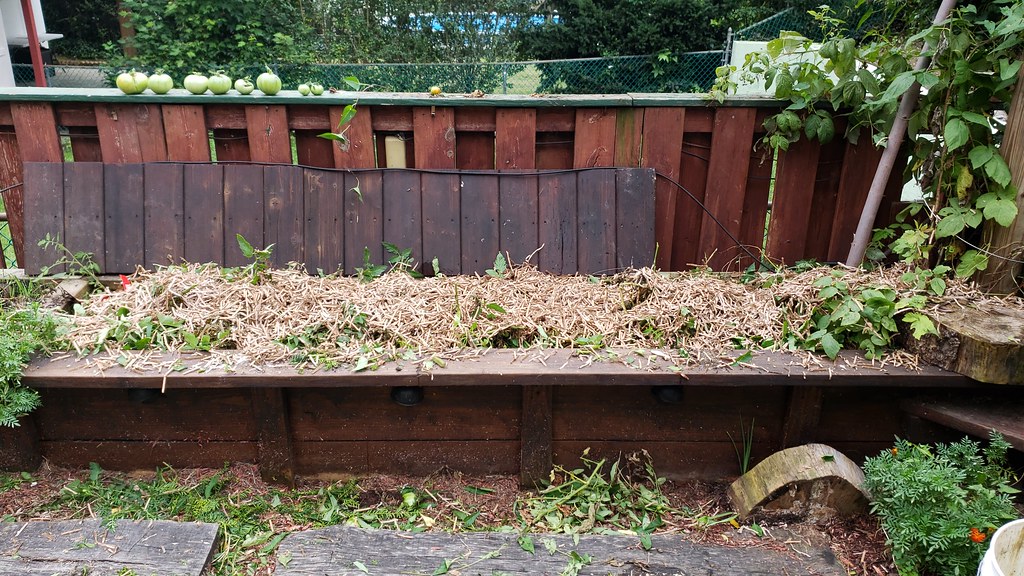
- I had a bit of spent potting mix left over from when I removed my garden tower and dumped that on top of the cardboard.
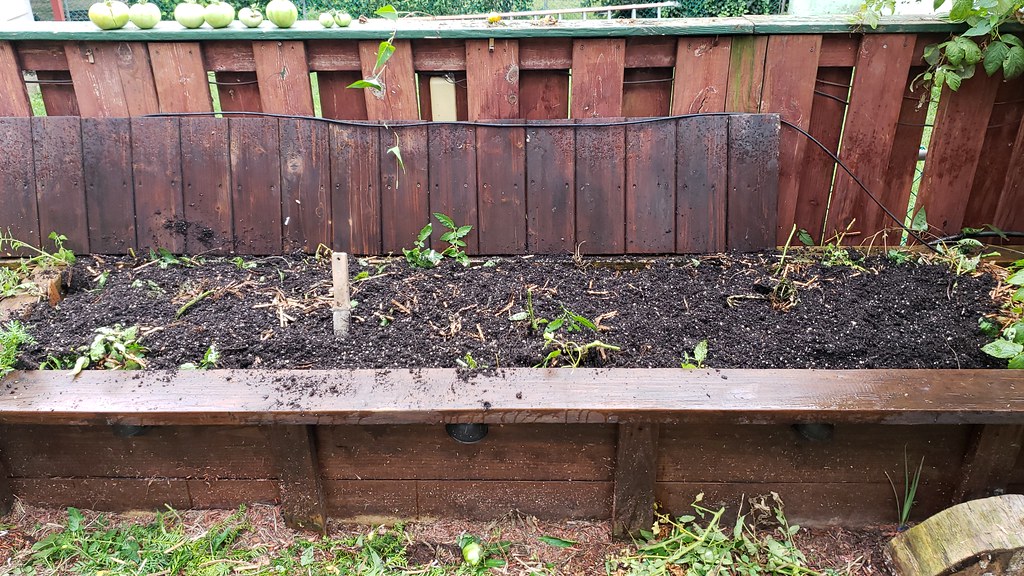
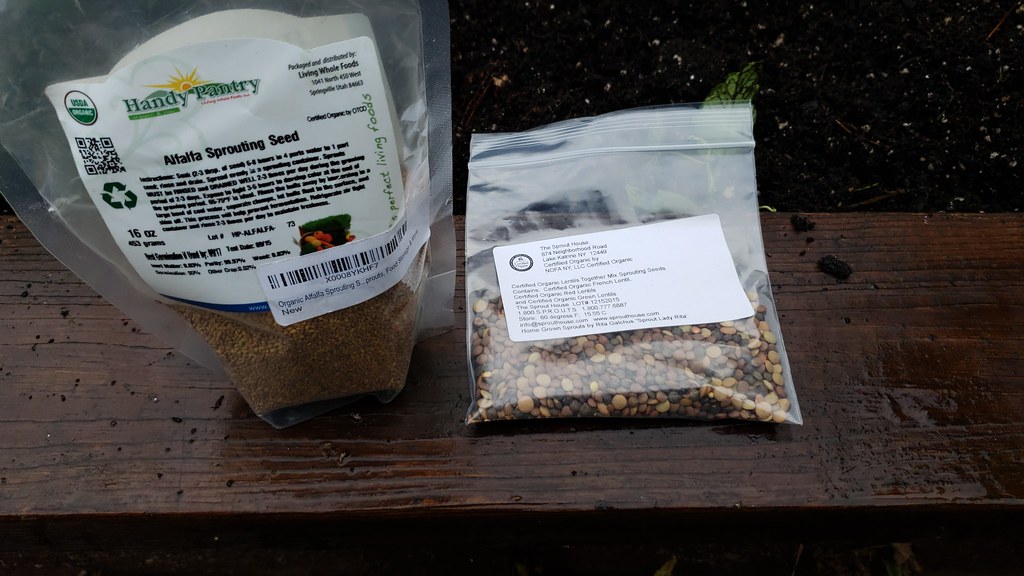
- For this bed I'll be using mixed Lentils, Crimson Clover, Alfalfa and Oats as a cover crop. I thing the oats will probably pretty much choke most of the stuff out, well see. Seeds are broadcasted.
- Seeds are mixed in with a needle hose sprayer using rain water.
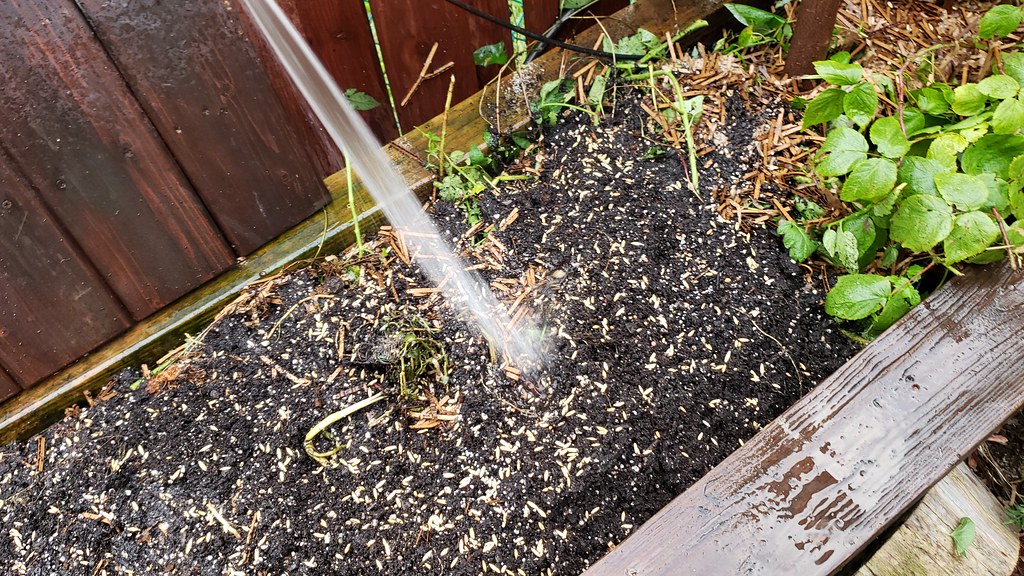
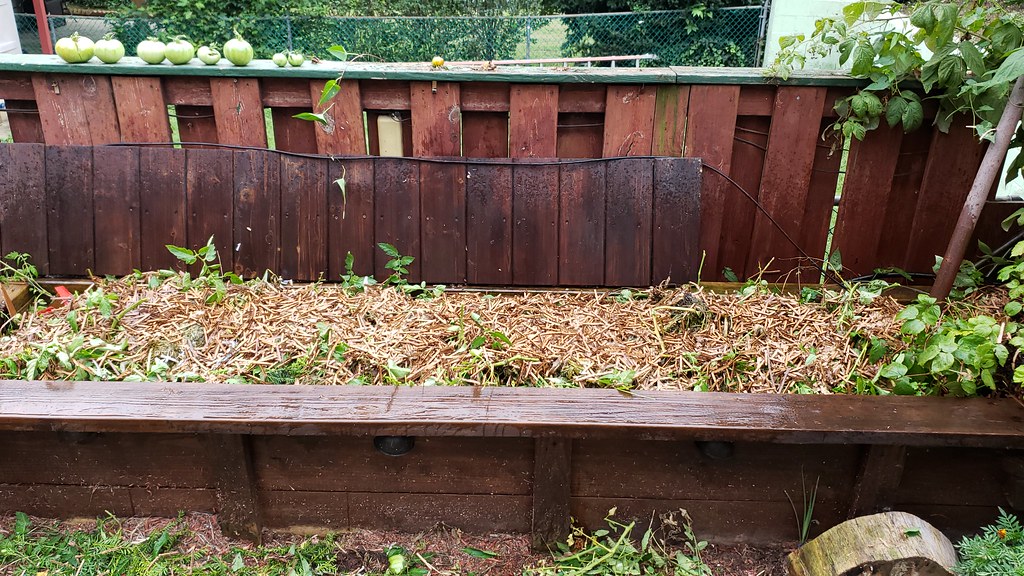
- The final step is to cover with cardboard, I used some pizza boxes. I will wet down the cardboard each morning and evening and when I have a good germination rate, I'll remove the cardboard and toss in the compost bin. It has been overcast lately but if it gets real sunny the cardboard dries out fairly quickly but the soil always stays moist.
SQWIB- Posts : 366
Join date : 2016-03-07
Location : Philly 7A
» Wood Pallets Hugelkultur Bed
» Varieties of mushrooms in beds built with Hugelkultur
» help with raised beds! how much can I grow in a 4' x 4' raised bed?
» Update: Square Foot Gardening in Greer, South Carolina - Exploring Hügelkultur and Connecting with Fellow Gardeners
|
|
|