


Search
Latest topics
» What do I do with tomato plants?by SMEDLEY BUTLER Yesterday at 8:53 pm
» N & C Midwest—May 2024
by OhioGardener Yesterday at 7:14 pm
» Ohio Gardener's Greenhouse
by OhioGardener Yesterday at 7:02 pm
» What Have You Picked From Your Garden Today
by OhioGardener 5/17/2024, 4:09 pm
» Compost not hot
by OhioGardener 5/17/2024, 8:05 am
» First timer in Central Virginia (7b) - newly built beds 2024
by flossy21 5/16/2024, 5:34 pm
» Help me correct my mistakes for next year please
by SMEDLEY BUTLER 5/16/2024, 4:46 pm
» Cabbage worms
by sanderson 5/16/2024, 1:34 am
» Complicated mixed up bunny poop!
by plantoid 5/14/2024, 7:20 pm
» They don't call 'em garden BEDS for nothing.
by sanderson 5/12/2024, 2:34 am
» Spring Flowers
by OhioGardener 5/9/2024, 12:02 pm
» Birds of the Garden
by OhioGardener 5/7/2024, 8:26 pm
» Greetings from Southport NC
by sanderson 5/6/2024, 4:36 am
» In the news: Biosolids in Texas.
by sanderson 5/6/2024, 4:19 am
» Rhubarb Rhubarb
by Scorpio Rising 5/5/2024, 7:57 pm
» Mark's first SFG
by markqz 5/4/2024, 12:08 am
» question about the digital tools from the sfg site.
by OhioGardener 5/2/2024, 4:50 pm
» Assistance Needed: Sugar Snap Peas Yellowing and Wilting
by Scorpio Rising 5/1/2024, 8:24 pm
» OMG, GMO from an unexpected place.
by sanderson 5/1/2024, 1:57 am
» N & C Midwest: March and April 2024
by Scorpio Rising 4/29/2024, 1:30 pm
» Lovage, has anyone grown, or used
by OhioGardener 4/29/2024, 12:27 pm
» New to SFG in Arlington, Tx
by sanderson 4/26/2024, 3:13 pm
» Soil Blocks: Tutorial In Photos
by OhioGardener 4/25/2024, 5:20 pm
» Manure tea overwintered outside - is it safe to use?
by Mhpoole 4/24/2024, 7:08 pm
» Advice on my blend
by donnainzone5 4/24/2024, 12:13 pm
» Senseless Banter...
by OhioGardener 4/24/2024, 8:16 am
» Kiwi's SFG Adventure
by sanderson 4/22/2024, 2:07 pm
» Sacrificial Tomatoes
by SMEDLEY BUTLER 4/22/2024, 10:36 am
» From the Admin - 4th EDITION of All New Square Foot Gardening is in Progress
by sanderson 4/21/2024, 5:02 pm
» Happy Birthday!!
by AtlantaMarie 4/21/2024, 6:56 am
Google
Summer-long Lettuce?
+6
timwardell
jenjehle
junequilt
GloriaG
SirTravers
Finch
10 posters
Page 1 of 1

Summer-long Lettuce?
![]() Finch 5/19/2010, 4:17 pm
Finch 5/19/2010, 4:17 pm
Does anyone in the South grow lettuce all summer? I've been ripping out the bitter stuff already, very sad to see it go. Does shading help? Any favorite summer varieties?

Finch- Posts : 17
Join date : 2010-05-17
Location : Chattanooga
the bitter end
![]() SirTravers 5/19/2010, 4:30 pm
SirTravers 5/19/2010, 4:30 pm
I'm holding out to the "Bitter End" 
I've got buttercrunch lettuce that seems to be ok as long as I'm picking the fresh leaves within a day or two of them filling out. Any week old leaves or dry tips are going into the compost.
I've got buttercrunch lettuce that seems to be ok as long as I'm picking the fresh leaves within a day or two of them filling out. Any week old leaves or dry tips are going into the compost.

SirTravers-
 Posts : 327
Join date : 2010-03-01
Age : 50
Location : Hobbs New MExico, Zone 7A/7B
Summer-long Lettuce?
![]() GloriaG 5/19/2010, 5:20 pm
GloriaG 5/19/2010, 5:20 pm
Hi Finch,
I'm growing a lettuce mixture in self-watering containers under partial shade and they're still doing great! No dry outer leaves, or bitter flavor. Not sure - but I think the combination of constant water supply and some shading during the heat of the day will help it last longer. I hope so!
Gloria
I'm growing a lettuce mixture in self-watering containers under partial shade and they're still doing great! No dry outer leaves, or bitter flavor. Not sure - but I think the combination of constant water supply and some shading during the heat of the day will help it last longer. I hope so!
Gloria
GloriaG-
 Posts : 440
Join date : 2010-03-15
Location : Double Oak, TX Zone 8a -

Re: Summer-long Lettuce?
![]() junequilt 5/19/2010, 5:39 pm
junequilt 5/19/2010, 5:39 pm
Which type of self-watering box do you have, GloriaG?

junequilt- Posts : 319
Join date : 2010-03-22
Location : Columbia, SC (Zone 8)
Salf-watering boxes
![]() GloriaG 5/20/2010, 8:02 pm
GloriaG 5/20/2010, 8:02 pm
Hi junequilt,
I have two types - the first is traditional "Earth Boxes" that I bought from a garden supply store. The second type I made myself. Once I got the Earth Boxes home, I realized I could make them fairly easily and MUCH less expensively.
Here's what they look like:

The two rectangular ones are the "official" Earth Boxes with my Tomatoes. The square one is "home made" with my Shallots.

Here's another home made version with bush beans.

And another with cucumbers, lettuce and a blueberry bush starting.
They aren't hard to make. It just takes a little planning and I really like the self-watering part here in Texas because it get's so hot. We'll be making a new one this weekend for our Okra so I'll see if I can't get some photos for you.
Thanks
Gloria
I have two types - the first is traditional "Earth Boxes" that I bought from a garden supply store. The second type I made myself. Once I got the Earth Boxes home, I realized I could make them fairly easily and MUCH less expensively.
Here's what they look like:
The two rectangular ones are the "official" Earth Boxes with my Tomatoes. The square one is "home made" with my Shallots.
Here's another home made version with bush beans.
And another with cucumbers, lettuce and a blueberry bush starting.
They aren't hard to make. It just takes a little planning and I really like the self-watering part here in Texas because it get's so hot. We'll be making a new one this weekend for our Okra so I'll see if I can't get some photos for you.
Thanks
Gloria
GloriaG- Posts : 440
Join date : 2010-03-15
Location : Double Oak, TX Zone 8a -
Question for Gloria
![]() jenjehle 5/20/2010, 9:54 pm
jenjehle 5/20/2010, 9:54 pm
Gloria,
About your Earth Box... what makes it self watering and how did you "make" one yourself?
Thanks!
About your Earth Box... what makes it self watering and how did you "make" one yourself?
Thanks!

jenjehle- Posts : 248
Join date : 2010-04-06
Age : 53
Location : Fort Wayne, IN - Zone 5B -
Salf-watering boxes
![]() GloriaG 5/20/2010, 11:02 pm
GloriaG 5/20/2010, 11:02 pm
Hi jenjehle,
Self-watering boxes (aka self-watering containers) have a water reservoir inside the bottom of the pot with a wick that draws water from the reservoir into the soil. The reservoir is separated from the potting mix by a plastic grate (grid) that is covered with landscape fabric to prevent the mix from falling through.
To water, you simply use the built-in tube to fill the reservoir daily and let the excess run out an overflow hole in the side of the pot.
The plants take up as much or as little water as they want. Self-watering pots are wonderful in our hot summer weather because I don't have to worry that my plants will dry out too much. The opposite is true however in colder/damper climates where over-watering can be a problem.
I'll post some pictures after we finish the new one this weekend.
Thanks
Gloria
GloriaG- Posts : 440
Join date : 2010-03-15
Location : Double Oak, TX Zone 8a -
Re: Summer-long Lettuce?
![]() timwardell 5/20/2010, 11:03 pm
timwardell 5/20/2010, 11:03 pm
My Simpson Elite and Bronze Arrowhead are hanging in there but I don't know for how much longer. My other varieties went bitter last week (but oh what a month of salad eating I had!). I often dream of picking tomatoes AND lettuce from my garden at the same time for the same bowl of salad instead of one or the other.Finch wrote:Does anyone in the South grow lettuce all summer? I've been ripping out the bitter stuff already, very sad to see it go. Does shading help? Any favorite summer varieties?

timwardell
Certified SFG Instructor- Posts : 778
Join date : 2010-03-02
Location : Frisco, Texas -
Re: Summer-long Lettuce?
![]() junequilt 5/21/2010, 11:41 am
junequilt 5/21/2010, 11:41 am
Isn't romaine supposed to be more heat-tolerant and last longer in hot weather than other lettuces? I've never grown it so I can't speak from experience -- just reiterating what I've read in gardening mags.
junequilt- Posts : 319
Join date : 2010-03-22
Location : Columbia, SC (Zone 8)
Re: Summer-long Lettuce?
![]() Finch 5/23/2010, 2:57 pm
Finch 5/23/2010, 2:57 pm
Tim: EXACTLY.
I've heard Romaine is heat-tollerant but don't care for it much. Kinda tough, but better than nothing I guess.
Gloria: I've had my eye on those very planters for a while. Very interesting! Please do post pictures when you make another. I'm thinking of trying lettuce (in planters, on a deck) under my 3-ft eaves where I can control the light and the water. I MUST have lettuce. My favorite thing in the garden is going over the fence to the neighbors' horses.
Finch- Posts : 17
Join date : 2010-05-17
Location : Chattanooga
Self-watering planter instructions
![]() GloriaG 5/27/2010, 1:25 am
GloriaG 5/27/2010, 1:25 am
As promised, Here are the pics and instructions for the self-watering planter we made last weekend.
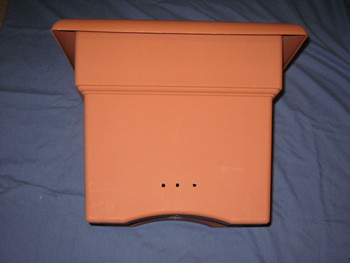
I used a 16" x 16" x 14" deep plastic planter but you could modify any planter that was deep enough and doesn't have drainage holes. The key is that there can't be holes before you start.
Materials required:
This is the planter with the piece of plastic grid, small orchid pot, and large PVC that will be used for the first step.

1. Cut the 1/1/4" PVC into four 2 1/2" lengths - these will become the inside supports for the plastic grid
2. Cut the grid to fit the inside dimensions of your planter, 2 1/2" above the bottom of the planter
3. Cut a hole in the center of the grid to fit the small orchid pot
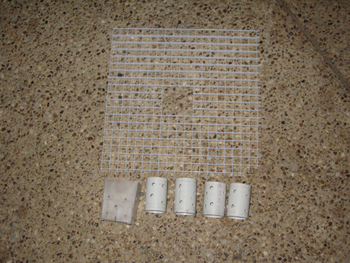
4. Drill 1/4" holes in the PVC pipes and orchid pots to allow water to move freely through them

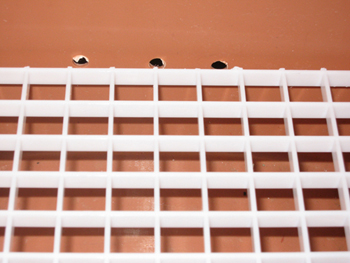
5. Next, drill three 1/4 (or larger) holes in the SIDE of your planter at the water line - just below where the plastic grid will sit when it's in the planter. THIS IS IMPORTANT. These holes are the overflow for the reservoir and must be below the bottom of the soil or your plant will be too wet. On my planter this measured 2" from the bottom of the planter because of the arch in the bottom
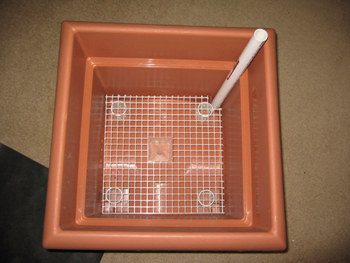
6. Place the four PVC supports into the corners of the planter and lay the grid on top. Drop the small orchid pot into the center hole. This will be the "wick" to permit the plant to draw water from the reservoir.
Here's what the planter should look like now.

Next you'll need the 3/4" PVC for your fill tube and the landscape cloth.

7. Drill several 1/4" holes in the bottom 2" of the small PVC pipe and cut out a section like this:

8: Notch a corner of the grid to permit the fill tube to be inserted all the way to the bottom of the planter
9. Insert fill tube so that the notch is facing the center of the planter
10. If you want, you can glue all the parts together to prevent them from moving
Your planter should now look like this:
11. Cut your landscape fabric to completely cover the grid and fit snugly around the orchid pot wick.
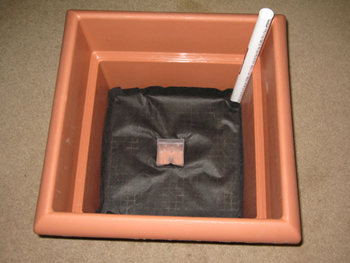
As you are filling the planter with Mels Mix, be sure that the landscape fabric stays against the sides of the planter and that the Mels Mix you use to fill the wick is moist.
I hope you find this information useful. The SW planter is really easy to make and we've had good luck with them in our hot weather.
Thanks
Gloria
I used a 16" x 16" x 14" deep plastic planter but you could modify any planter that was deep enough and doesn't have drainage holes. The key is that there can't be holes before you start.
Materials required:
- 1 planter without holes deep enough to hold your plant PLUS the water reservoir
- Plastic grid to fit your pot (The kind used on the bottom of 2'x4'
fluorescent lights works well) - 1 square plastic orchid pot 2 1/2" or 3" size
- Approximately 1 foot of 1 1/4" PVC pipe
- Approximately 14" of 3/4" PVC pipe
- Enough landscape fabric to cover the inside bottom of the pot
- $15 for the planter
- $7 for the plastic grid (enough to make 4 SW Planters),
- $1 for the orchid pot,
- $3 for the PVC (enough to make 8 SW planters),
- leftover landscape fabric
This is the planter with the piece of plastic grid, small orchid pot, and large PVC that will be used for the first step.
1. Cut the 1/1/4" PVC into four 2 1/2" lengths - these will become the inside supports for the plastic grid
2. Cut the grid to fit the inside dimensions of your planter, 2 1/2" above the bottom of the planter
3. Cut a hole in the center of the grid to fit the small orchid pot
4. Drill 1/4" holes in the PVC pipes and orchid pots to allow water to move freely through them
5. Next, drill three 1/4 (or larger) holes in the SIDE of your planter at the water line - just below where the plastic grid will sit when it's in the planter. THIS IS IMPORTANT. These holes are the overflow for the reservoir and must be below the bottom of the soil or your plant will be too wet. On my planter this measured 2" from the bottom of the planter because of the arch in the bottom
6. Place the four PVC supports into the corners of the planter and lay the grid on top. Drop the small orchid pot into the center hole. This will be the "wick" to permit the plant to draw water from the reservoir.
Here's what the planter should look like now.
Next you'll need the 3/4" PVC for your fill tube and the landscape cloth.
7. Drill several 1/4" holes in the bottom 2" of the small PVC pipe and cut out a section like this:
8: Notch a corner of the grid to permit the fill tube to be inserted all the way to the bottom of the planter
9. Insert fill tube so that the notch is facing the center of the planter
10. If you want, you can glue all the parts together to prevent them from moving
Your planter should now look like this:
11. Cut your landscape fabric to completely cover the grid and fit snugly around the orchid pot wick.
As you are filling the planter with Mels Mix, be sure that the landscape fabric stays against the sides of the planter and that the Mels Mix you use to fill the wick is moist.
I hope you find this information useful. The SW planter is really easy to make and we've had good luck with them in our hot weather.
Thanks
Gloria
GloriaG- Posts : 440
Join date : 2010-03-15
Location : Double Oak, TX Zone 8a -
Self-watering planter instructions
![]() trukrebew 5/27/2010, 1:35 am
trukrebew 5/27/2010, 1:35 am
Wow! Nice work on this tutorial Gloria! 

trukrebew- Posts : 129
Join date : 2010-03-24
Location : The Garden State — Watchung, NJ — Zone 6b
Re: Summer-long Lettuce?
![]() camprn 5/27/2010, 6:09 am
camprn 5/27/2010, 6:09 am
This tutorial is great. Gloria, would you post it again in a new thread labeled self watering container? It would be perfect for a Wiki thread...

camprn
Forum Moderator Certified SFG Teacher- Posts : 14169
Join date : 2010-03-06
Age : 61
Location : Keene, NH, USA ~ Zone 5a -
Re: Summer-long Lettuce?
![]() GloriaG 5/27/2010, 9:51 am
GloriaG 5/27/2010, 9:51 am
Hi camprn,
I'll be happy to do that if you'll tell me where to put it. What's a "Wiki thread".
Thanks
Gloria
I'll be happy to do that if you'll tell me where to put it. What's a "Wiki thread".
Thanks
Gloria
GloriaG- Posts : 440
Join date : 2010-03-15
Location : Double Oak, TX Zone 8a -
Re: Summer-long Lettuce?
![]() junequilt 5/27/2010, 12:25 pm
junequilt 5/27/2010, 12:25 pm
SO impressive, Gloria! Can't wait to get started making a few -- thanks so much!
junequilt- Posts : 319
Join date : 2010-03-22
Location : Columbia, SC (Zone 8)
Re: Summer-long Lettuce?
![]() jkdistad 5/27/2010, 12:55 pm
jkdistad 5/27/2010, 12:55 pm
hmmmmm.... I smell a project..... hehehe...
That's a GREAT tutorial, Gloria!
*thinks of ways to convince DH*
That's a GREAT tutorial, Gloria!
*thinks of ways to convince DH*

jkdistad- Posts : 69
Join date : 2010-05-10
Location : Twin Cities, Minnesota (zone 4)
Re: Summer-long Lettuce?
![]() kkalasa 5/27/2010, 3:14 pm
kkalasa 5/27/2010, 3:14 pm
Wow what a great tutorial! Thanks, I can't wait to try this.
kkalasa- Posts : 18
Join date : 2010-04-14
» Do seed packets lie?
» Long Range Summer Forecast for Lower Midwest..
» Growing Lettuce Indoors in the Summer
» shade cloth for summer lettuce
» Late Spring / Summer Lettuce
» Long Range Summer Forecast for Lower Midwest..
» Growing Lettuce Indoors in the Summer
» shade cloth for summer lettuce
» Late Spring / Summer Lettuce
Page 1 of 1
Permissions in this forum:
You cannot reply to topics in this forum|
|
|