


by OhioGardener Today at 10:38 am
» Senseless Banter...
by MrBooker Today at 6:57 am
» What do I do with tomato plants?
by sanderson Today at 12:00 am
» Maybe a silly question but...
by sanderson Yesterday at 11:22 pm
» Seedling Identification
by markqz Yesterday at 11:14 pm
» What Have You Picked From Your Garden Today
by OhioGardener Yesterday at 9:50 am
» Kiwi's SFG Adventure
by KiwiSFGnewbie Yesterday at 1:13 am
» Manure tea overwintered outside - is it safe to use?
by sanderson Yesterday at 12:49 am
» Hi from zone 10B--southern orange county, ca
by sanderson Yesterday at 12:25 am
» Asparagus
by OhioGardener 4/17/2024, 6:17 pm
» problems with SFG forum site
by OhioGardener 4/16/2024, 8:04 am
» Strawberries per square foot.
by sanderson 4/16/2024, 4:22 am
» What are you eating from your garden today?
by sanderson 4/16/2024, 4:15 am
» April is Kids Gardening Month!
by sanderson 4/15/2024, 2:37 pm
» Creating A Potager Garden
by sanderson 4/15/2024, 2:33 pm
» N & C Midwest: March and April 2024
by Scorpio Rising 4/15/2024, 9:26 am
» Butter Beans????
by OhioGardener 4/13/2024, 5:50 pm
» Companion planting
by sanderson 4/13/2024, 4:24 pm
» First timer in Central Virginia (7b) - newly built beds 2024
by sanderson 4/13/2024, 4:16 pm
» California's Drought
by sanderson 4/10/2024, 1:43 pm
» Sacrificial Tomatoes
by Scorpio Rising 4/8/2024, 11:40 pm
» Anyone Using Agribon Row Cover To Extend The Growing Season?
by sanderson 4/8/2024, 10:28 pm
» Soil Blocks: Tutorial In Photos
by Turan 4/7/2024, 11:41 am
» Tomato Cages Redux
by SMEDLEY BUTLER 4/5/2024, 10:30 pm
» Testing Compost for Persistent Herbicide
by OhioGardener 4/5/2024, 4:08 pm
» SFG Journey: Table top garden bed.
by OhioGardener 4/4/2024, 2:58 pm
» Hey Y'all from 9B
by sanderson 4/4/2024, 1:24 pm
» Hi from San Diego's North County zone 10a
by sanderson 4/4/2024, 1:09 pm
» Long Time Square Foot Gardener
by Scorpio Rising 4/4/2024, 7:50 am
» Famous Gardening Quotes
by OhioGardener 4/1/2024, 6:05 pm
Arbors
Page 2 of 3 •  1, 2, 3
 ![]()
Re: Arbors
![]() camprn 10/19/2010, 4:53 pm
camprn 10/19/2010, 4:53 pm

camprn
Forum Moderator Certified SFG Teacher-
 Posts : 14169
Join date : 2010-03-06
Age : 61
Location : Keene, NH, USA ~ Zone 5a -

Re: Arbors
![]() milaneyjane 10/19/2010, 5:03 pm
milaneyjane 10/19/2010, 5:03 pm
milaneyjane- Posts : 422
Join date : 2010-03-18
Location : MN Zone 4
Re: Arbors
![]() acara 10/19/2010, 5:17 pm
acara 10/19/2010, 5:17 pm
camprn wrote:I will have to look into the concrete wire stuff. i really wish I could afford one of these. She makes beautiful garden structures.
If I paid that much for an arbor that pretty, it sure as heck wouldn't be sitting outside ...LOL

acara-
 Posts : 1012
Join date : 2010-08-27
Age : 54
Location : Wesley Chapel, Florida (Zone 9)
Re: Arbors
![]() CarolynPhillips 10/19/2010, 6:07 pm
CarolynPhillips 10/19/2010, 6:07 pm
Anyway-----I had bought several rolls of concrete re-enforcement wire. Dunno what the gauge is.
The roll was 100 feet long by 5 ft high for $120.00. Since then the cost has went up a pretty good bit and I bought it at Home Depot. Also since then---they started selling it in
short panels instead of long rolls. Bummer. It was cheaper by the roll and I have my own set of Bolt Cutters.

CarolynPhillips- Posts : 779
Join date : 2010-09-06
Age : 54
Location : Alabama Zone 7a
Re: Arbors
![]() Furbalsmom 10/19/2010, 6:08 pm
Furbalsmom 10/19/2010, 6:08 pm
Sounds similar to what milaneyjane did, but she put it between two raised beds and in front of a gate. She had pumpkins growin in both raised beds.
Gonna try this I think. Of course I want to try everything


Furbalsmom- Posts : 3141
Join date : 2010-06-10
Age : 77
Location : Coastal Oregon, Zone 9a, Heat Zone 2 :(
Re: Arbors
![]() CarolynPhillips 10/19/2010, 6:32 pm
CarolynPhillips 10/19/2010, 6:32 pm


Oh my gosh. There is no telling how many arched trellises I will end up with now.

CarolynPhillips- Posts : 779
Join date : 2010-09-06
Age : 54
Location : Alabama Zone 7a
Re: Arbors
![]() acara 10/19/2010, 7:47 pm
acara 10/19/2010, 7:47 pm
CarolynPhillips wrote:I tried growing tomatoes in Re-enforcement concrete wire cages to lower my contact with tomato plants since I am allergic and it worked great but I like single vines better.
Anyway-----I had bought several rolls of concrete re-enforcement wire. Dunno what the gauge is.
The roll was 100 feet long by 5 ft high for $120.00. Since then the cost has went up a pretty good bit and I bought it at Home Depot. Also since then---they started selling it in
short panels instead of long rolls. Bummer. It was cheaper by the roll and I have my own set of Bolt Cutters.and they are easy to use. I have 30 3ft wide tomato cages. I plan on converting a few to this Arched Trellis project. I haven't started on it yet cause I been working on tomatoes All Day. But I been thinking about it.
If it's in a roll its probably;
2/2, 10/10 (2" mesh, 10 gauge (.135 wire)
or
4/4, 10/10 (4" mesh, 10 gauge)
or
6/6, 10/10 (6" mesh, 10 gauge)
Those three are "market grade" for the industry & account for probably 90% of whats out there.
acara- Posts : 1012
Join date : 2010-08-27
Age : 54
Location : Wesley Chapel, Florida (Zone 9)
Construction
![]() milaneyjane 10/20/2010, 2:41 am
milaneyjane 10/20/2010, 2:41 am
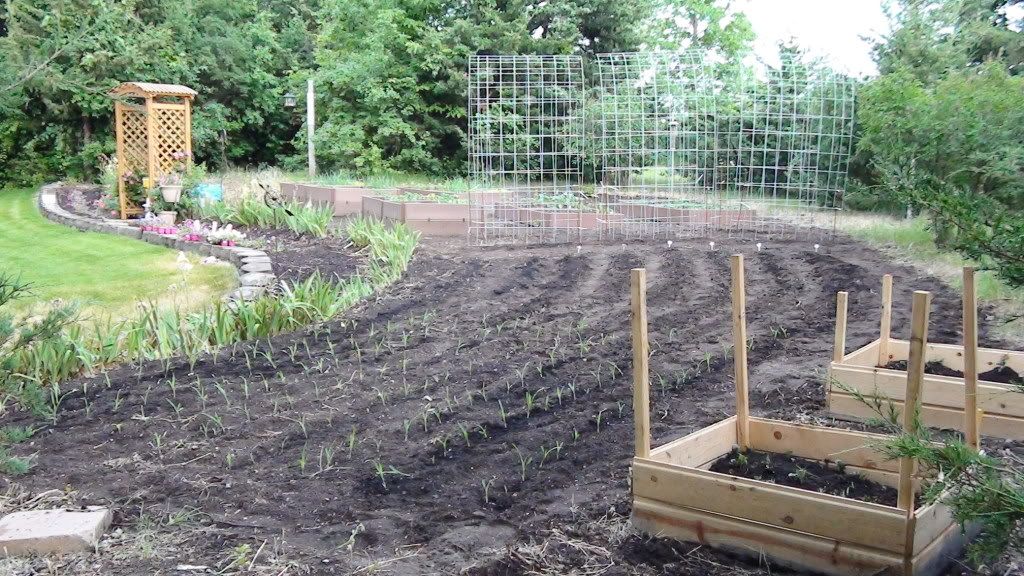
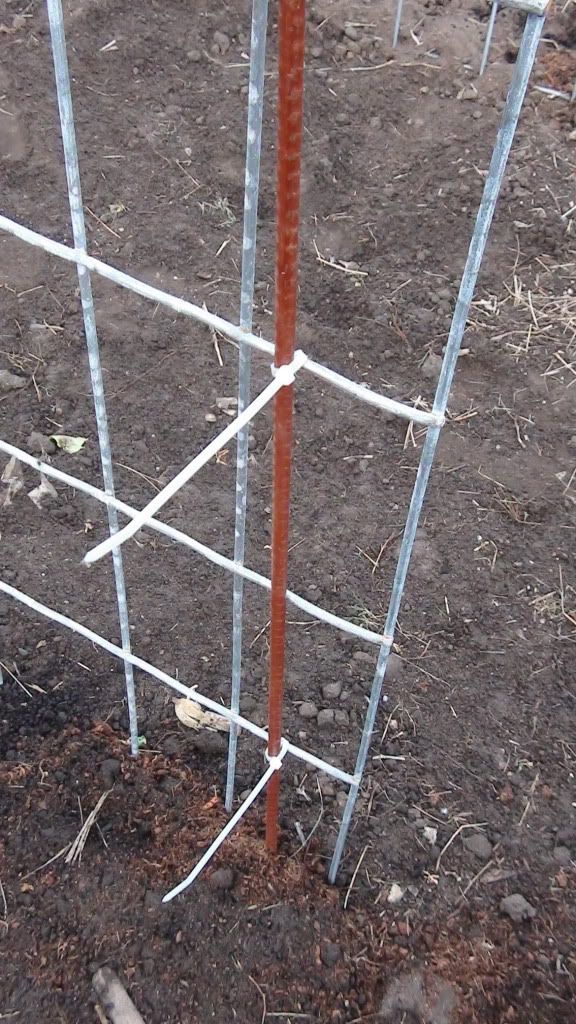
1) I did a test run with the help of a neighbor bending one of the cattle panels and putting it where I wanted it, measuring how far apart the two side were when I had it at the "right" height. And I don't know if bend is the right word since it goes right back to flat.
2)I pounded in Tstakes on one side. Then I put the cattle panel on the inside of the Tposts, bent it, and while I held it, my neighbor hammered in the other tstakes on the other side. Because the cattle panel does not have a lot of give and also because it is flat (not rolled up) it is very strong. Once the tstakes are hammered in it will stay in place just being sandwiched between the posts. I chose to use clear zip strips to attach the cattle panel and the stakes. I will replace them with wire this fall.
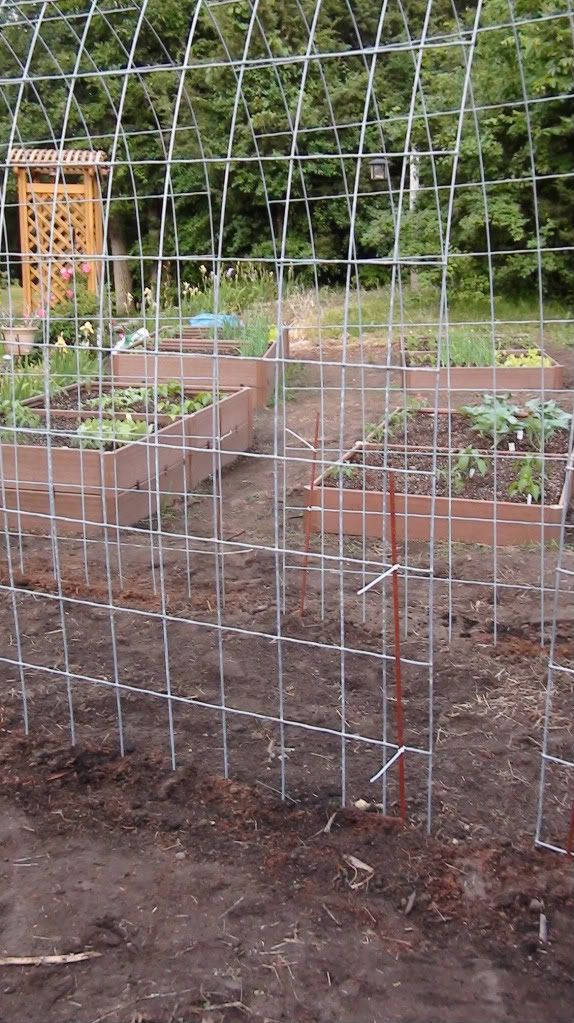
3) For the next panel arch I left about 6 inches between arches to allow for movement and slope (a must). I went ahead and hammered in the stakes in the same manner.
4) Repeat as necessary.
The installation would work the same in boxes. I would have loved to have used boxes underneath, but since I was out of $$$ and had the garden space I just placed it on the ground.
The frames are still very sturdy thanks to the tposts. My tposts look more like rebar with the t on the end but work very well. They were a LOT cheaper than Tposts. I think I paid $1/piece at a farm supply store..
milaneyjane- Posts : 422
Join date : 2010-03-18
Location : MN Zone 4
Re: Arbors
![]() milaneyjane 10/20/2010, 2:52 am
milaneyjane 10/20/2010, 2:52 am

You can see the spaces between arches
milaneyjane- Posts : 422
Join date : 2010-03-18
Location : MN Zone 4
Re: Arbors
![]() CarolynPhillips 10/20/2010, 10:59 am
CarolynPhillips 10/20/2010, 10:59 am
mini greenhouses over the garden beds too. I will check the local Tractor Supply and see
if they carry the Cattle panels for future projects.
I don't have the link.... but I saw how someone made a huge long greenhouse using the cattle panels-------that was very interesting... Then I saw a few small greenhouses made from the cattle panels. they just built wood frame walls at the end and a little door way and attached the hooped cattle panels to the frame. they were so cute.
CarolynPhillips- Posts : 779
Join date : 2010-09-06
Age : 54
Location : Alabama Zone 7a
Re: Arbors
![]() CarolynPhillips 10/23/2010, 5:50 pm
CarolynPhillips 10/23/2010, 5:50 pm
We still have to put the wire on it and I haven't decided if I am goin to paint it or not.
CarolynPhillips- Posts : 779
Join date : 2010-09-06
Age : 54
Location : Alabama Zone 7a
Re: Arbors
![]() Furbalsmom 10/23/2010, 7:27 pm
Furbalsmom 10/23/2010, 7:27 pm
Furbalsmom- Posts : 3141
Join date : 2010-06-10
Age : 77
Location : Coastal Oregon, Zone 9a, Heat Zone 2 :(
Re: Arbors
![]() Chopper 10/23/2010, 7:47 pm
Chopper 10/23/2010, 7:47 pm

Chopper- Posts : 2467
Join date : 2010-05-05
Age : 68
Location : Warner Springs, CA USDA Zone 8a, Sunset Zone 7 (I think) -
Re: Arbors
![]() CarolynPhillips 10/24/2010, 12:22 am
CarolynPhillips 10/24/2010, 12:22 am
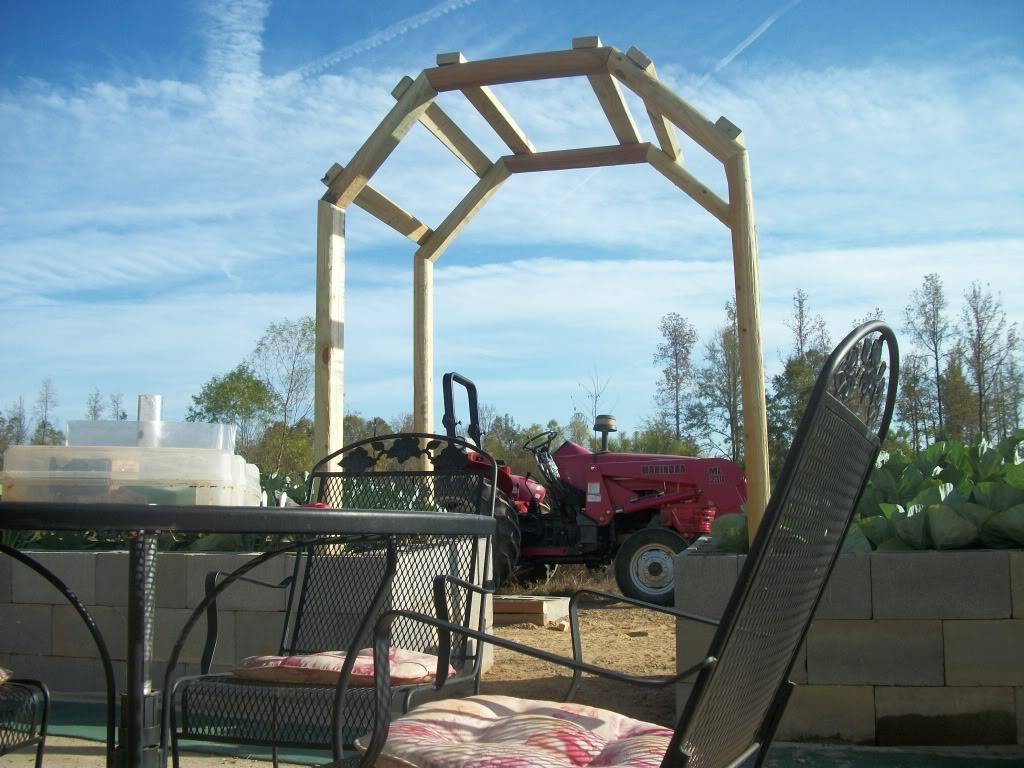
We used landscape timbers for the main frame.
The size of the arbor ended up being :
55 1/2 inches from inside to inside of the landscape timbers =this measurement would be needed to copy. This was the walk through area.
The other measurement which is not needed cause you will make yours as long as you need it is 42 " outside to outside.
The two side timbers at the top were 23 1/2 inches at the longest point.
The very top timber was 26 1/2 inches at the longest point.
These measurements will not come out the same for you if you use 4x4s or like many times---lumber companies have different size timbers in stock.
The cross supports are 2x4s
We used scrap lumber and scrap timbers---- we did buy the 4 corner timbers new
I can tell you how hubby figured out how long those three upper cut angles had to be.
He did not use engineering mathematics.
He took the 8ft timber and cut the 22 1/2 degree angle at the 6ft mark.
then he took what was left over out of that timber and cut the other end at 22 1/2 angle without cutting any length off of it.
He did the other post the same way.
Then he screwed those two short pieces in place. He did both sides------then he measured the center to see how long they had to be then cut other timber to fit with the same 22 1/2 degree angle.
BUT== keep in mind that my post are on ground level and were concreted into the raised cinder block beds-----they were not set below ground level. so==some how you have to figure out the difference if you are putting yours in the ground.
I do hope all this makes since.===putting it in writing makes it a little difficult since I am not sure what words to use.
thank you very much---it was not a hard project--I thought hubby would end up wasting a lot of lumber trying to figure it out but he did pretty good considering hes not a certified carpenter. I drew out on graph paper what I wanted according to my space and he just made it. (me= "go getter" )
I hope you have fun building you one and you must come back and share it with us.
CarolynPhillips- Posts : 779
Join date : 2010-09-06
Age : 54
Location : Alabama Zone 7a
Re: Arbors
![]() acara 10/24/2010, 7:12 am
acara 10/24/2010, 7:12 am
CarolynPhillips wrote:Well, It's not the prettiest Arched Trellis in the world but I'm sure it will work just fine.
We still have to put the wire on it and I haven't decided if I am goin to paint it or not.
Wow ... that wasn't what I was thinking when you said "arbor" ..... that's either a very small piece of equipment, or a HUGE arbor.
Heck .... no worries as to "what can I grow on my arbor" ....... that thing looks like you could have a watermelon forest hanging from it with no worries.
Very nice
acara- Posts : 1012
Join date : 2010-08-27
Age : 54
Location : Wesley Chapel, Florida (Zone 9)
Re: Arbors
![]() Old Hippie 10/24/2010, 12:41 pm
Old Hippie 10/24/2010, 12:41 pm
My DH is a very smart and talented guy. And he can build or fix anything. I love him dearly and appreciate how talented his is. But before he can build even the smallest thing, he has to research the project. Next he will make a scale drawing of it on autocad, indicating sizes of lumber, angles, lag bolts and a site plan showing how it is attached to the house, garage or shed or it's location in the yard if it is free standing. He will also calculate snow loads and do a 3-D rendering with shading, indicating shadows and prevailing winds. From this he develops a materials list and begins to gather supplies. Of course, that involves finding cheap if not free sources which can take some time. When the project is finally complete months and sometimes years have passed since the original idea was hatched. It will be a work of art and have all kinds of fancy joinery. It will withstand all manner of freaks storms of nature and everyone will tell me how lucky I am to have someone who can build such wonderful stuff........and I know I am but.....can't we just get out there and MAKE a thing??????
GK

Old Hippie- Regional Hosts
- Posts : 1156
Join date : 2010-08-12
Age : 73
Location : Canada 3b
Re: Arbors
![]() CarolynPhillips 10/25/2010, 9:17 am
CarolynPhillips 10/25/2010, 9:17 am
Acara--considering your occupation===I really appreciated your comments.
and LOL GK. I do all the research, planning, graphing, supply list and hubby does the building while I supervise and fetch. I love graph paper.
Off Topic
I have so many projects going on right now that I can hardly see straight.
Behind the Arbor are two more grow beds----narrow---for spring tomato trellis Wall. I think the back pasture is ugly not to mention the giant burn hole where my previous mobile resides and unable to burn finish burning it cause we have been under a Fire Alert for the past 2 months. (no rain til last night)
Then behind those beds will be a greenhouse----that we had to move from a
rainy weather flooding area. Explanation: When we first moved here 5 years ago this Jan, we built and installed a greenhouse right away so I could get my seeds goin for spring sales. We did not realize that location flooded during heavy long rains. I haven't used that greenhouse in 2 years. We had built a Sunroom and Greenhouse Seed house (it was huge) on the back of our previous mobile home-----now that it is gone---I been putting my raised beds in the back yard cause they were also in a flooding zone and have room to move the 12x40 Seedling house back there too. Greenhouses====thats another topic cause it will have redneck style side curtains for ventilation.
(when i start blabbering on---its a chain reaction that never ends)
I like this arbor so well-----I want more around my miniature garden court yard.
Time is on my side but my side is impatient.
CarolynPhillips- Posts : 779
Join date : 2010-09-06
Age : 54
Location : Alabama Zone 7a
Re: Arbors
![]() Aub 10/25/2010, 9:06 pm
Aub 10/25/2010, 9:06 pm

Aub- Posts : 283
Join date : 2010-08-07
Age : 43
Location : Central Illinois (near Peoria) 5a
Pergola Dreams
![]() camprn 10/30/2010, 7:22 pm
camprn 10/30/2010, 7:22 pm

camprn
Forum Moderator Certified SFG Teacher- Posts : 14169
Join date : 2010-03-06
Age : 61
Location : Keene, NH, USA ~ Zone 5a -
Re: Arbors
![]() CarolynPhillips 2/20/2011, 6:07 pm
CarolynPhillips 2/20/2011, 6:07 pm
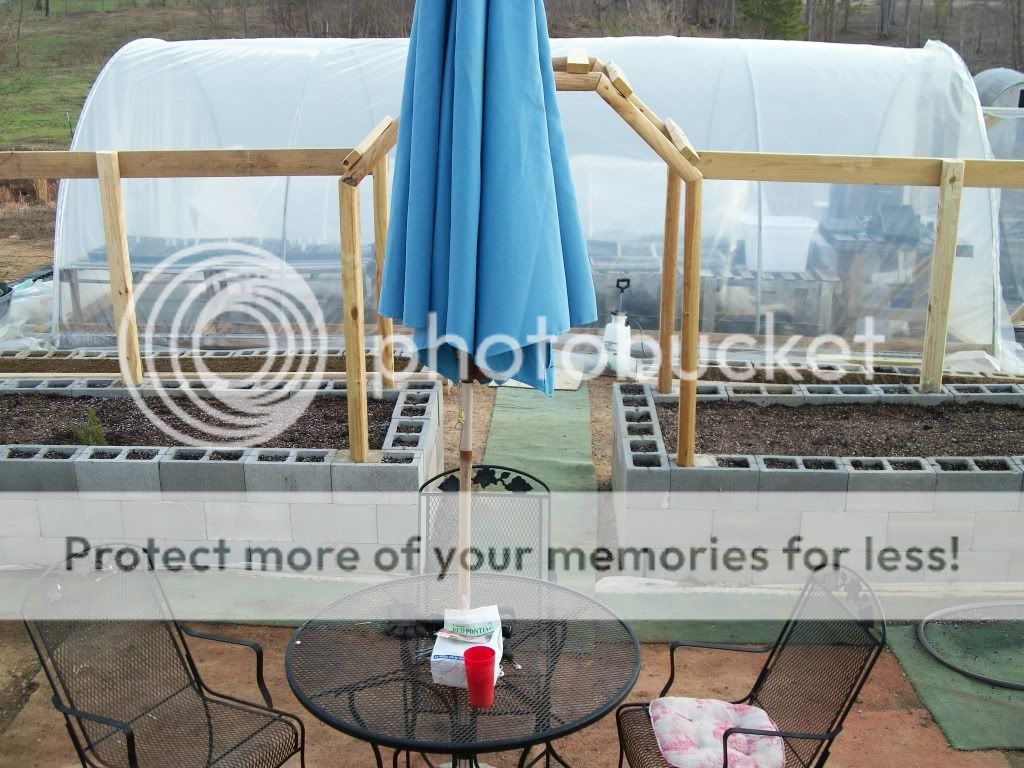
6 more weeks til time to plant my melons on the arched trellis. Impatiently waiting.
I obtained some free 2x6s and bought some landscape timbers and added long trellises to my Arbor=Arched Trellis. Still not sure what to call it. I also extended one of the beds of the arched trellis to give me more trellis room.
I will grow tomatoes on the long trellises this year.
I am satisfied with it. Wish I had more. I had fun building it.=====well, I mixed the concrete and set my landscape timbers. Hubby used the nail gun to attach the 2x6s while I held them up. So , I did have some help.

CarolynPhillips- Posts : 779
Join date : 2010-09-06
Age : 54
Location : Alabama Zone 7a
CarolynPhillips- Posts : 779
Join date : 2010-09-06
Age : 54
Location : Alabama Zone 7a
Re: Arbors
![]() quiltbea 2/20/2011, 6:52 pm
quiltbea 2/20/2011, 6:52 pm
I love your high beds. That would be great for my old back.
Lookin' good!

quiltbea- Posts : 4712
Join date : 2010-03-21
Age : 82
Location : Southwestern Maine Zone 5A
Re: Arbors
![]() CarolynPhillips 2/20/2011, 7:06 pm
CarolynPhillips 2/20/2011, 7:06 pm
CarolynPhillips- Posts : 779
Join date : 2010-09-06
Age : 54
Location : Alabama Zone 7a
Re: Arbors
![]() quiltbea 2/20/2011, 7:24 pm
quiltbea 2/20/2011, 7:24 pm
Someone on the forum mentioned buying them when they could afford them.
I think I'll buy concrete blocks whenever I have a few extra dollars. After a year, I might have enough for one bed. One bed a year for awhile is OK. At least its better than none at all.
By the time my wood rots and I need new beds, I'll have enough concrete to build a couple.
What is the width of yours with the 3 blocks, Carolyn?
quiltbea- Posts : 4712
Join date : 2010-03-21
Age : 82
Location : Southwestern Maine Zone 5A
Re: Arbors
![]() CarolynPhillips 2/20/2011, 8:53 pm
CarolynPhillips 2/20/2011, 8:53 pm
It takes 10 blocks to make a 4'x4' bed.
Down here the blocks cost about $1.38 at Home Depot right now.
With tax---a bed 4x4 and three blocks high would cost about $45 not counting
the soil.
one block high---$15
Could always start out with one level and build it up each year.
CarolynPhillips- Posts : 779
Join date : 2010-09-06
Age : 54
Location : Alabama Zone 7a
Page 2 of 3 • 1, 2, 3 ![]()
|
|
|